EN Summary: Here's another sewing project (actually a remake plus an extra garment sewn with the remnant fabric) finished back in early November 2021. Continue reading the full article on tanysewsandknits.blogspot.com.
---
PT Sumário: Aqui têm outro projeto de costura (mais especificamente um "remake" e uma peça extra confecionada com o tecido sobrante) terminado no inicio de Novembro de 2021. Continuem a ler o artigo completo em tanysewsandknits,blogspot.com.
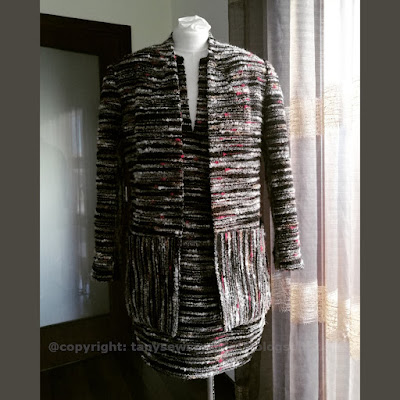
EN: I've sewn my first version of this kit in February 2019 (check out my sewing review here and find some sewing details as I was making the jacket in the previous posts) but unfortunately, after being worn a few times, the back seam tore apart (the fabric gave in due to its lose weave nature and the narrow 1cm seam allowances included in the pattern). I did mend it but even if no one else is noticing, I know the jacket isn't perfect anymore. So I bought another kit shortly after, intending to sew it again sometime. Last November I finally got to remake the jacket all together, this time using 1" wide fusible tape to reinforce all seams that weren't interfaced (back seam, side seams on the back pieces, and sleeve seams). I used the remnant fabric of the first kit to cut the sleeves so I had a good piece of fabric left in the end, enough for making a short dress or a tunic.
Note: The following two images are courtesy of DP Studio (line drawing and photo of the original model)
---
PT: Confecionei a minha primeira versão do kit Louise (tweed) em Fevereiro de 2009 (podem ler a resenha aqui e nos posts anteriores a esse, encontram alguns detalhes da sua confeção) mas infelizmente, depois de usar a jaqueta algumas vezes a costura das costas esgaçou (má combinação de tecido com trama solta e margens de costura estreitas, que já vêm incluídas no molde). Cerzi a costura o melhor que pude mas mesmo que ninguém reparasse que ali tinha havido um rasgão, eu sabia e a jaqueta já não me parecia perfeita. Acabei por comprar outro kit, para um dia quando me apetecesse refazer a jaqueta. A oportunidade surgiu em Novembro passado ( e desta vez não facilitei, reforçando as margens que não levam entretela com fita termo-colante de 2,5cm de largura). Como já tinha um sobrante do primeiro kit para cortar algumas partes da nova jaqueta, desta vez acabou por sobrar tecido suficiente para fazer um vestido curto.
NOTA: As duas fotos seguintes são cortesia de DP Studio e mostram o esquemático do modelo e uma das fotos originais da jaqueta.
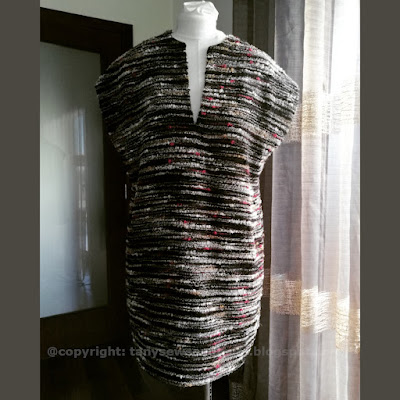
EN: Here's the short dress/tunic made with the remnant fabric and once again using the pattern of DP Studio Le500 with modified neckline, longer length and symmetrical hemline shape: ---
PT: Aqui têm o vestido túnica que fiz com o sobrante, mais uma vez usando o molde
DP Studio Le500 com algumas alterações (decote, comprimento e bainha simétrica):
EN: To outline my pattern alterations the original short-sleeve kimono pattern is overlapped on top of the modified pattern; the neckline deep opening is created while sewing the neckline facing (cut on the fold on center front) to the neckline, and only then the slit is cut open before turning the facing to the wrong side. Also note that the hemline is symmetrical on the front&back and that the back hemline facing is to be cut on the fold, while a center back seam remains on the dress. The pattern includes 3/8" seam allowances.
---
PT: Para evidenciar as alterações que fiz ao molde original do top kimono sem manga, sobrepus este à versão modificada; a abertura do decote na frente é criada quando se cose a vista do decote e só depois é cortada a abertura, antes de virar a vista/guarnição para o avesso. Notem também que a bainha nas costas tem a mesma forma que na frente e que a vista da bainha nas costas é cortada na dobra, enquanto as costas têm uma costura central. O molde inclui margens de 1cm.
EN: Here's the side view of the short dress:
---
PT: Aqui têm o vestido visto de lado:
EN: Here's the back view; it's always good to keep a center back seam for integrity, even if it seems unnecessary (there's no need for a back zipper because the dress has enough ease and neckline opening to go through the head). It keeps the dress from sagging on the back after being worn, specially if you spend most of the time sitting at a desk. The vertical seams were of course, reinforced with fusible tape (I learned my lesson the hard way!).
---
PT: Aqui têm as costas do vestido; embora pareça desnecessária agora (o vestido tem bastante folga e abertura no decote para ser enfiado pela cabeça e não necessita de fecho atrás), esta costura dá alguma integridade ao vestido e impede que deforme atrás principalmente quando passamos muito tempo sentadas a uma secretária. Como é óbvio, as costuras verticais foram todas reforçadas com fita de entretela termo-colante, para evitar o esgaçar com o uso (aprendi a minha lição!).
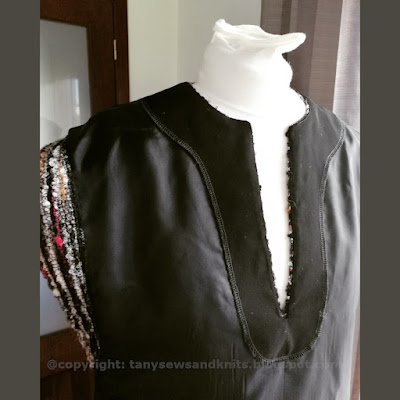
EN: The lining was cut with the same pattern pieces of the dress and the facings were stitched, under-stitched and topstitched to both layers of fabric/lining. There wasn't enough tweed to cut the neckline and hem facings so I used black fabric remnants from another kit. The facings were interfaced and the exposed edges were finished with the overlocker/serger.
---
PT: O forro foi cortado com o mesmo molde do vestido e as vistas foram aplicadas às duas camadas juntas e depois pespontadas. Não tinha tweed suficiente para cortar as vistas do decote e da bainha, por isso usei uns restos de tecido preto que sobraram de outro kit. As vistas foram entreteladas e as orlas expostas foram rematadas com a corta-e-cose antes de serem pespontadas.
EN: Here's a close-up of the neckline facing:
---
PT: Aqui têm o detalhe da vista do decote:
EN: It is important to include a hemline pleat on the lining, or else the hemline may pull up as we walk or sit down.
---
PT: é importante prever uma prega de folga na bainha do forro, dde contrário a bainha do vestido pode repuxar ao andar ou ao sentar.
EN: Here's the back neckline facing detail:
---
PT: Aqui têm o detalhe da vista do decote atrás:
EN: The jacket looks like my first version but now it has more structure: this time I added shoulder pads and actually like it more than the less structured version (the instructions don't mention adding shoulder pads so my first version didn't include them).
---
PT: A jaqueta parece-se muito com a primeira que fiz, mas tem mais estrutura, pois acrescentei chumaços nos ombros. Devo dizer que prefiro o modelo assim mais estruturado (da primeira vez não os incluí porque nas instruções eles não são mencionados).
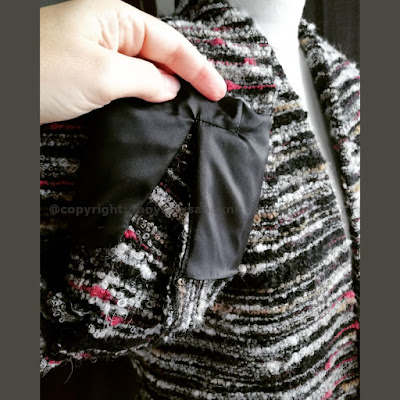
EN: Here's the sleeve slit finishing o the wrong side (there are no buttons on this particular model):
---
PT: Aqui têm o acabamento da abertura da manga pelo avesso (este modelo não leva botões):
EN: Here are the pockets set on the front horizontal seam:
---
PT: Os bolsos metidos na costura horizontal da frente:
EN: The back slit finishing:
---
PT: O acabamento da abertura atrás:
EN: Lastly here's the facing/hem/lining junction finishing on the inside:
---
PT: Por último aqui têm o acabamento da junção da vista da frente com a bainha e o forro:
EN: I really love the jacket and feel thrilled to finally get it "perfect". The dress was a nice addition (you all should know my love for matching ensembles and my aversion to wasting good fabric by now!).
Thank you all for the warm welcoming; I will definitely try to update this blog more often. Many people may think that blogs are dying, but there are a couple of good reasons to maintain them: as Beth said in a previous comment, when we think of all the connections we've made thanks to blogging, we can't see ourselves giving up so easily. Besides, blogging is the perfect way to document our creative projects: not just for the sake of sharing but also for our own pleasure going back and recalling everything we've made. Of course there's Instagram and other image oriented platforms that make the act of sharing so quick and easy, but it's not the same, is it? We put a lot more into our blogs, providing we have the time and the energy to maintain them. There will be times I lack the time and the energy but surely I will be drawn to come back as soon as it is possible.
---
PT: Gosto muito deste modelo e fiquei muito feliz por finalmente o ter "perfeito". O vestido foi um bónus extra (já estão todos fartos de saber que adoro conjuntos e detesto desperdiçar tecido bom!).
Obrigada todos pela calorosa receção; vou ver se venho aqui mais assiduamente de futuro. Muita gente pode pensar que os blogues estão a desaparecer, mas há algumas razões fortes para os manter, a primeira das quais mencionada pela Beth num comentário anterior: ao longo dos anos fomos estabelecendo um conjunto de ligações na blogosfera graças aos blogues, e deixar todas essas pessoas para trás é doloroso, por isso não é fácil desistir. Além disso, o blogue é a forma mais indicada para manter um registo preciso e completo das nossas atividades criativas, não somente para partilhar com outros mas também pelo prazer que sentimos quando revemos o nosso percurso e tudo o que fizemos. É claro que agora há o Instagram e outras plataformas mais "visuais" que fazem com que partilhar seja tão mais fácil e imediato, mas não é a mesma coisa, pois não? Damos muito mais de nós aos blogues, desde que haja tempo e energia para os manter. Irá sempre haver períodos em que não terei tempo nem energia, mas é certo que mal possa, sentirei sempre um impulso para voltar.


3 comments:
Thanks for sharing another post! I love the fabric, I see why you made another jacket. Interesting front darts in the jacket. I learn a lot from your posts, thanks again!😊
I've so enjoyed reading your blogging again. I also learn so much from your posts. Thank you!
I have a similar problem with a linen jacket I made. The seams at the back are pulling apart at the stitch line. It was not tight and I had only worn it a couple of times. I haven’t tried to fix it yet. I was hoping if I lined it that would fix the issue. I have only 1 cm seams. I might try and unpick and put tape and resew problem seams and hope for the best. I’m glad you posted this.
Post a Comment