Showing posts with label macacão - jumpsuit. Show all posts

2016#18: The cold-shoulder jumpsuit (Simplicity 1158) - Macacão com ombros de fora

EN: Hi guys, this is my sewing review for Simplicity 1158 (view B) that I've just finished making during the weekend. Keep reading for the full review.
---
PT: Oi pessoal, este é o artigo sobre a construção do macacão Simplicity 1158 (vista B), o qual terminei de fazer no fim-de-semana passado. Continuem a ler para o artigo completo.

2014#18 – Shattered effect white jumpsuit – Macacão branco efeito “estilhaçado”


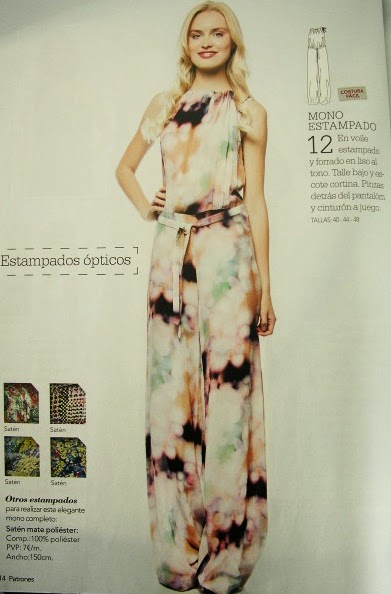
Description: Loose fitting jumpsuit has gathered tie-string neckline and tie-belt; I cut the pattern with some modifications and also adapted it to the fabric type that I used, which is very different from the sheer double-layer fabric used on the original model. More pictures of me wearing the jumpsuit were published here.
Original pattern: Patrones nº336, model 12; I cut the size 40, which is one size down to my usual Patrones size (after measuring the pattern, also taking into account that my fabric has some stretch into it) 
--- 
Descrição: Macacão solto com decote franzido por uma tira de atar; alterei um pouco o molde tendo em conta o tecido que usei, bastante diferente das duas camadas de voile usadas no modelo original. Mais fotos minhas a usar o macacão foram publicadas aqui.
Molde usado: Revista Patrones nº 336, modelo 12; cortei o tamanho 40, que é um tamanho abaixo do tamanho Patrones que costumo usar (o sistema de tamanhos não é igual ao da Burda), depois de medir o molde e de ter em consideração que o tecido que usei tem elasticidade.


Alterations: I shortened the pants by about 8 inches, substituted the neckline tie-string by black elastic, skipped the tie-belt adding some belt looks on the side also made of black elastic and an elastic belt (made of wider back elastic tacked on the pants’ back seam to keep it permanently in place). The elastic and the stretch fabric that I used allows me to get into the jumpsuit without having to untie/tie any strings or belts 
--- 
Alterações: Encurtei as calças uns 20cm, e em vez das fitas de atar no decote usei elástico preto; em vez do cinto de atar fiz umas passadeiras de cinto nos lados usando o mesmo elástico preto e passei um cinto feito de elástico mais grosso, que prendi na costura do meio de trás das calças para o manter no lugar. O facto de o macacão ser feito de malha elástica (tipo neopreno) e de ter usado os elásticos permite-me vestir o macacão sem ter de desamarrar/amarrar fitas ou cintos.


Conclusion: Nice and trendy jumpsuit that was easy and quick to make! The final result is quite different from the original model but I rather like my version best!
---
Conclusão: Um macacão giro e muito na moda que foi fácil e rápido de fazer! O meu resultou bastante diferente do modelo original, mas adorei o resultado e creio que gosto mais da minha versão!

Conjunto Donna Karan (V2064) e mais um macacão – V2064 (Donna Karan top and pants) and another jumpsuit

Português
English (uncheck the other box and check this one)
Foi um fim-de-semana em cheio:

Modelo original: V2064 Conjunto de calça e top em Jersey de Donna Karan (opções B e D) (cortei o tamanho 12)

Descrição: o top é justo e traçado na frente, formando um drapeado que se prende com uma presilha e um colchete. A opção B é assimétrica, tendo uma manga apenas. Toda a orla superior e superior da manga e ombro levam um elástico na bainha para ajustar melhor ao corpo. As calças, levam pinças e elástico; no molde são omissas as costuras laterais (a frente e as costas forma um único molde da perna). Os tecidos aconselhados são malhas com elasticidade nas duas direcções (apenas usar tecidos de malha com elasticidade para este modelo).

Tecido: Jersey 92%poliéster 8%elastano. Para as costuras usei uma agulha fina especial para malhas (ponta arredondada), a corta-e-cose para os remates e agulha dupla (também especial para malhas).

Detalhes:

O cós é cosido de uma forma simples: depois de confeccionadas as calças cose-se o elástico directamente no cós (no avesso) deixando uma pequena margem para virar para dentro; depois vira-se o elástico para dentro e dá-se uns pequenos pontos a segurar nas costuras centrais e nas pinças. Podem ver que do lado de fora não se vêm costuras:

A forma como o drapeado da frente é construído é muito inteligente: a parte interior tem uma presilha onde se fazem umas argolas de linha para prender com o colchete que fica na ponta do drapeado exterior:


Fica assim depois de apertado:


O decote assimétrico e a parte exposta da manga são ajustados ao corpo com a ajuda de um elástico passado dentro da costura:

O canto da bainha na frente fica com este aspecto por dentro:

E por fora:

Para as bainhas usei o Steam-a-Seam Lite que a Margi me enviou há uns tempos; cola a bainha permanentemente, mas depois de usar o top, com o esticar da peça, notei um ligeiro ondulado. Para disfarçar estou a pensar coser a bainha por cima com a agulha dupla.

Além deste conjunto ainda fiz um macacão de Jersey preto, usando o mesmo molde da revista Manequim do macacão com estampado assimétrico:

Conclusão: O conjunto e o macacão são óptimos para as férias e fiquei muito satisfeita com ambos; o molde V2064 está categorizado como fácil, mas na minha opinião é um modelo para pessoas com alguma prática, principalmente se quiserem primar nos acabamentos. Já o planeava fazer há muito tempo e agora surgiu a oportunidade pois decotes com o ombro de fora são uma tendência actual!

Tenho em stock muitas malhas estampadas e sólidas e preciso de ganhar espaço no meu armário de tecidos, por isso vou fazer uns tantos modelos de malha, que são sempre mais rápidos e fáceis! Até à próxima!

This is the result of a sewing weekend:

Original model: V2064 Misses’ top & pants by Donna Karan (view B and D) (I cut a 12):

Description: The close-fitting wrap top has right front (cut-in-one with back) forming drape and tab with hook/thread loops closing; the B version has an asymmetric neckline with drop-off shoulder and one sleeve with the top exposed. The pants are straight, are shaped by darts and an elasticized waistline. The fabrics are two-way stretch knits only.

Fabric used: 82%polyester 8%elastan jersey. I used a thin jersey needle (ball point) for seaming, the serger for the SA finishing and a jersey twin needle.

Details:

The waistband is very simple to make: after the pants are stitched together, the elastic is sewn over the waistline edge (on the wrong side) leaving a small fabric edge to turn in; the elasticized edge is then turned in and tacked down to the seams and darts. On the outside there’s no visible seaming, as you can see:

The front draping is very cleverly constructed: the inner layer has a tab with thread loops (it crosses a seam opening at the right side seam) and there’s a hook on the end extremity of the draped overlap:


This is how it looks:


The asymmetric neckline edge and the shoulder opening have a casing and elastic, adjusting the garment to the body:

This is the mitered hem corner on the front:

On the outside:

For hemming I used the Lite Steam-A-Seam that Margi was so kind to send me a while back; it glues the seams permanently and it’s really easy to apply (it sticks to the fabric just by finger pressing and it fuses permanently when ironed). After wearing the top once I noticed a slight rippling so I plan on making a row of double topstitching, just in case.

During the weekend I also managed to make another Manequim jumpsuit; this time I used black jersey and I think it looks great:

Conclusion: Both the Donna Karan knit set and black jumpsuit are great vacation clothes and I’m very happy with then. V2064 is rated “easy” but I believe there’s some difficulty to this pattern if you want to make it look really good and well made, so I’d rate it intermediate instead. I was planning to make it for quite some time and now the opportunity presented itself. Both asymmetric necklines and draped tops are strong trends for this season.

I have many knits in my stash and I need to free some storage space, so expect more knit garments soon! Happy Sewing to all!

Macacão: Burda Internacional 2/96 mod915 - The jumpsuit: Burda International 2/96 mod915

Português
English (uncheck the other box and check this one)

O modelo original vem na revista Burda Internacional 2/96 (esta revista já não é editada, infelizmente):


Descrição: macacão em malha justo, com cintura império e calças largas, sem mangas, com fecho e colchetes atrás.

Material usado: Tecido jersey buttermilk estampado que me foi oferecido pela Summerset, jersey brilhante branco, jersey fino anti-estático próprio para forro da cor da pele (que o Paco me ofereceu), resto de jersey preto, uma fivela quadrada, fecho invisível de 30cm, dois pares de colchetes pretos e um branco.

Fiz várias alterações ao modelo; a primeira foi forrar o corpete (parte feita com jersey branco) para são ficar transparente. Para isso corta-se o corpete também em forro e, tanto no tecido como no forro, cosem-se as pinças e as costuras dos ombros apenas. Junta-se o forro e o tecido direito com direito e cose-se as cavas juntas, o decote e no seu prolongamento as costuras centrais das costas (não se cosem as costuras dos lados ainda). Depois de aparar os valores de costura e golpear os cantos, o objectivo é virar o corpete, metendo a mão entre o forro e o corpete na frente e alcançando as costas através do canal dos ombros para poder virar tudo para o direito:


É importante parar de coser no valor de costura nos centros costas (não coser até ao fim, parar a uns 1,5cm):

Depois de virar este é o aspecto (antes de pespontar as costuras):

E é agora que se cosem as costuras dos lados (costas com a frente) e, no prolongamento, cosem-se também as costuras do forro:

Depois pespontam-se as cavas, o decote e as costuras do meio de trás (abertura):

Não se esqueçam de parar de coser antes do valor de costura! Isto é necessário para coser o corpete às calças (apenas o corpete e não o forro):

Depois de coser as calças ao corpete, no lado do avesso assentam-se os valores de costura para cima e dobra-se o valor de costura do forro para dentro exactamente na costura. Alinhava-se tudo para depois pespontar (as fotos mostram o direito e o avesso):


Resolvi também acrescentar um cinto com fivela em jersei preto; fiz um “tubo” de tecido com o comprimento desejado e mais largo um pouco que a fivela e apliquei-o à mão na junção atrás e em alguns lugares estratégicos ao longo da costura de união das calças:

Alguns pormenores do interior do macacão:

As costas do avesso:

Os colchetes por cima do fecho:

O colchete no decote das costas:

O fecho atrás:

Também devem ter reparado que o padrão do tecido das calças está alinhado em todas as costuras, de tal forma que as costuras quase não se notam. Isto dá um pouco de trabalho porque implica cortar uma peça de cada vez em lugar de se cortar com o tecido dobrado e também marcar o molde de forma a criar referências para quando se cortar a peça adjacente ela alinhar perfeitamente nas costuras.

Conclusão: Uma peça original e pouco comum, prática e bonita para usar no verão! Achei que foi o projecto ideal para o tecido que a Summerset me enviou, pela suia originalidade e pelo desafio de alinhar as costuras. Como optei por forrar o corpete em vez de simplesmente debruar as orlas, além de ter alinhado o padrão do tecido, este projecto demorou mais do que o esperado (agravando também o facto de não ter muito tempo livre ultimamente). O método de forrar que utilizei só funciona se a peça a forra for dividida à frente ou atrás por uma costura. Se qualquer forma é um método comum nas instruções da Burda e que muita gente acha confuso. Espero que estas explicações tenham ajudado a clarificar este método. Até à próxima!


The original model was featured in the 2/96 issue of Burda International (unfortunately this magazine is no longer in print):


Description: Close fitting sleeveless knit jumpsuit, has empire waistline and wide pants. The back closure consists of a zipper and some hook&eyes (the bodice is opened on the back).

Materials: Buttermilk jersey that I received from Summerset as a gift, silky white jersey, nude anti-static knit lining that I received from Paco, black jersey remnant, a leather buckle, an 12” invisible zipper, two black hook&eyes and one covered hook&eye.

I made some alterations to the original model; the first was lining the bodice to prevent see through. To line the bodice I made another bodice of nude lining: on both fabric and lining the darts and the shoulder seams are sewn first. The two shells are then joined right sides facing each other. Then the armholes are stitched together, the neckline and the center back seams (the side seams are left untouched for now). After trimming and clipping on the corners, the objective is to turn the two shells to their right side by reaching the backs through the shoulder channels (put your arm in between the front and the lining front and reach the back pulling it through the shoulders; repeat on the other side):


It is very important to stop stitching when you reach the center back allowance on the bottom edge:

After turning the bodice to the right side, this is how it looks like (before closing the side seams and topstitching the edges):

Now it’s time to stitch the side seams continuing over the lining side seams on the same stitching line:

Then the armholes, the neckline and the center back edges are topstitched:

Don’t forget to stop before reaching the SAs on the CB edge! This is necessary to be able to stitch the fabric bodice (not the lining bodice) to the pants:

After joining the bodice to the pants, the lining SAs are turned to the inside covering the stitching line and the edge is hand basted for topstitching (the pictures show the right side and the wrong side after basting and before topstitching):


I also added a belt band with a buckle. I made a large tube of jersey ( a little larger than the buckle) and stitched it by hand to the back closure and at some strategically chosen places along the bodice junction seam:

Some details on the wrong side:

The wrong side of the back:

The eyes&hooks above the zipper:

The covered eye&hook on the back neckline:

The finishing of the back zipper:

You must have noticed that I also matched the print pattern on all the vertical seams, making them almost unnoticeable. This is time consuming because it implies using a single layer layout and also marking the paper pattern for alignment but the end result is so much nicer this way.

Conclusion: A very unusual and original garment, practical and stylish for wearing during the summer days! It was a little time consuming (adding to my present lack of time) but I think I obtained a good end result and all the effort has paid off. The lining method that I tried to explain can be applied on other garments, providing that there is a vertical opening (front or back). This is a commonly used method on BWOF’s instructions and some of you may find it confusing, but it’s really quite simple. I hope my pictures and explanations helped you figuring out how it is done! See you next time!