EN Summary: Many of you may find useful to know my process of sewing buttoned vents on tailored two-piece sleeves (also applicable to any vent on lined garments. To learn about it, read the full article on tanysewsandknits.blogspot.com.
---
PT Sumário: Muitos de vós acharão útil conhecer o processo que uso para confecionar as aberturas abotoadas nas mangas de alfaiate de duas peças (o mesmo método aplica-se a qualquer racha encoberta de um lado em peças forradas) - Se o assunto vos interessa, continuem a ler o artigo completo em tanysewsandknits.blogspot.com.
EN: There are many methods to sew lined vents in general and vents on tailored sleeves; some methods produce a false vent (it looks like a vent but it can't be open), other methods produce a real vent but since the machine buttonholes are trickier to embroider on a completed sleeve, the buttons are simple sewn on top of the vent through all thicknesses (no buttonholes, resulting in a non working vent), or perhaps some of you prefer to hand embroider the buttonholes in which case there's no problem... There's also the lining, of course. The lining could be stitched around the vent and hem by hand, a method that I've used for many years. Yet there is an easier way that produces professional looking working vent, all stitching done by sewing machine and machine embroidered buttonholes may be used. The only trick is sewing and lining the vent on the flat! To achieve this, all you need to do is a bit of precise cutting (it includes figuring out the right sleeve lining pattern), pre-pressing and, most important of all, leave the front seam of the sleeve (the one without the vent) open and a small section of the hem next to its edges unstitched.
---
PT: Há muitos métodos para confecionar aberturas nas mangas com forro nas mangas de alfaiate; alguns desses métodos resultam em aberturas falsas (parecem rachas encobertas mas na verdade não abrem), outros produzem aberturas funcionais. Neste último caso, as casas são bordadas depois da manga terminada e como é fácil de perceber, é bastante difícil usar a função de casear automática da máquina de costura nestes casos, onde há pouco espaço. Uma das solução é coser os botões por cima, resultando mais uma vez numa abertura não funcional, ou então bordar as casas à mão. Também há a questão do forro, o qual pode ser cosido à mão em torno da abertura e bainha (método que usei durante muitos anos)... No entanto há uma forma mais fácil, inteiramente confecionada à máquina e que produz uma abertura funcional forrada na manga com aspeto muito profissional, além de permitir facilmente o uso do caseador automático. Para implementar este método, é necessário cortar todas as peças com precisão (inclui desenhar o molde do forro das mangas de uma certa forma), assentar as bainhas a ferro antes de coser e, o mais importante, deixar aberta a costura da frente da manga (a que não tem abertura) e uma porção da bainha junto à orla desta costura.
EN: I like to sew a mitered corner on the overlap of the opening; for that it's useful to have both hem allowance and vent facings with the same width. In this case I'm using a pattern from Burdastyle magazine which provides the sleeve patterns with a narrow vent facing and no hem or seam allowances. I copied the sleeve pattern adding more width to the vent facing, 4cm total to be exact (it will be cut with a 1cm SA so it will be 5cm when cut). I also cut the sleeves with 5cm hem allowances.
NOTE: I'm using the metric system; if you use imperial, the cut hems will be 2" and the facing width on the pattern will be 1"5/8. Adding 3/8" when cutting makes it 2" wide.
1 - Start by sewing the back seam of the sleeve until the vent opening; press open this seam; pre-press the hem and the vent facing on the upper sleeve; pre-press the hem alone on the under sleeve. If sewing the mitered corner on the overlap, cut the angle with 1cm (3/8") seam allowance.
---
PT: Gosto de confecionar um canto mitrado na parte superior da abertura e para isso é útil que a largura da vista seguida da abertura tenha a mesma largura da bainha da manga. Neste caso estou a usar um molde da Burda (não inclui margens de costura nem bainha) e a largura da vista é estreita (3cm ou pouco mais). A primeira coisa que faço é aumentar vista seguida para 4cm de largura, que depois será cortada com uma margem de 1cm, totalizando 5cm depois de cortada no tecido. Também corto as bainhas com 5cm de largura.
1- Começa-se por coser a costura de trás da manga até a abertura, e assentar a costura aberta. Também assento a ferro a bainha e vista da manga superior, e só a bainha na manga inferior. Se confecionarem o canto mitrado na manga superior, cortem o ângulo prevendo uma margem de 1cm.
2 - Sew the mitered corner on the upper sleeve
---
2 - Confecionar o canto mitrado na parte superior da manga
3 - Sew the back seam of the lining and the upper seam on the lining facing extension, leaving the 3/8" vertical allowances free.
---
3 - Coser a costura de trás da manga em forro e a costura superior da extensão da vista em forro, deixando as margens de costura verticais (1cm) livres.
EN: Before continuing, I'd like to try to explain how to draft the lining patterns for the sleeve; keep in mind that these paper patterns have no hem or seam allowances, since I prefer adding them on the fabric while I cut (when they are not included, of course). The lining pattern is on top of the corresponding sleeve pattern; notes in red refer to the lining. Also note that if the vent is cut 2cm lower on the lining, a 1cm ease pleat will form on the lining above the vent, which is intended. Also note that if the sleeve has 5cm hem allowance and the lining has 1cm hem allowance, another 1cm ease pleat will form at the hem when the lining is sewn to the hem with a 1cm wide seam (sorry, using metric units is much easier for me).
---
PT: Antes de prosseguir queria tentar explicar como desenhei os moldes do forro das mangas neste caso; lembrem-se que estes moldes em papel não incluem as margens de costura e bainhas, pois prefiro adicioná-las diretamente no tecido à medida que corto. O molde do forro está em cima do correspondente molde da manga e as anotações a vermelho referem-se ao forro. Notem também que se a abertura for cortada no forro 2cm abaixo da abertura da manga, vai formar-se uma dobra de folga no forro acima da abertura, que é o que se pretende. Igualmente na bainha, como o forro tem 1cm de margem e a manga tem 5, ao coser a bainha a 1cm forma-se outra dobra de folga acima da bainha, que é também o que se pretende.
4 - The next step is to sew the lining to the hem of the sleeve at the under-sleeve, stopping at 2" from the edge, as shown below:
---
4 - O próximo passo é coser o forro à bainha da manga inferior, parando a 5cm da orla, como é mostrado abaixo:
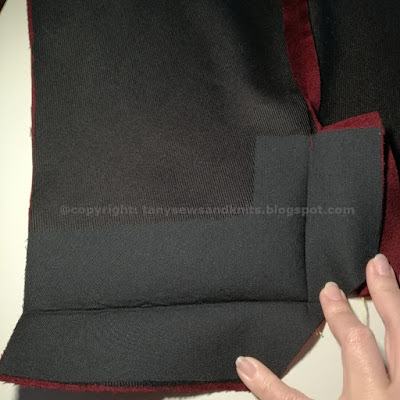
5 - Turn the hem to the outside and align the under-sleeve facing extension seams on both lining and sleeve; if the hem is turned at the pre-pressed fold (against it), a small lining pleat will form in this vertical seam.
---
5 - Girar a bainha para fora e alinhar as extensões da abertura do forro com a manga; se a bainha girar exatamente sobre a dobra (contra a dobra) e as orlas verticais se mantiverem alinhadas, vai-se formar uma pequena prega de forro dentro da costura.
EN: Here's a close-up of the lining ease pleat that is formed in the seam:
---
PT: Aqui têm o detalhe da pequena dobra de folga que se forma no forro, dentro da costura:
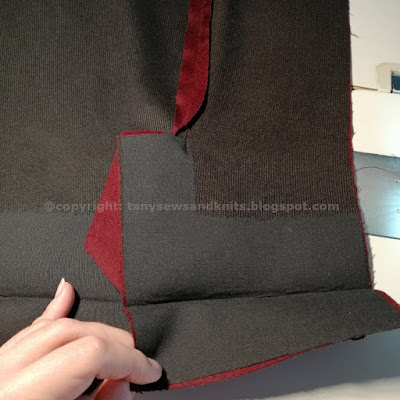
6 - Stitch the facing/lining extension seam from the lining top stitching line to the hem edge:
---
6 - Coser à máquina deste o pesponto horizontal to topo da extensão em forro até à orla da bainha:
7 - Turn the hem to the inside again; if desired, under-stitch the facing extension edge seam as shown:
---
7 - Girar a bainha para o avesso novamente; se desejarem podem fazer um pesponto de girar, como é mostrado na foto seguinte:
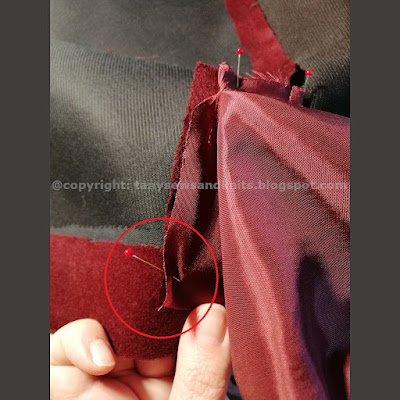
8 - Work the other side of the vent (upper sleeve) by pinning the lining along both tops of the vent facings and along the vertical seam of the facing as shown; turn in the lining edge in by 2cm (enough so the lining hem edge meets the upper sleeve hem edge); another ease pleat should be formed at this corner.
---
8 - Trabalhar o forro no lado da manga superior, prendendo com alfinetes ao longo da orla superior das vistas (ambas as vistas, manga superior e inferior presas juntamente com o forro) e ao longo da orla vertical da vista da manga superior. Em baixo, junto à bainha, dobra-se o forro para dentro 2cm, de forma que a orla da bainha do forro coincida com a orla da bainha. Aqui também dem de se formar uma prega de folga.
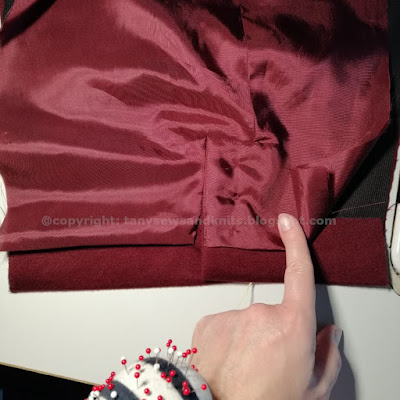
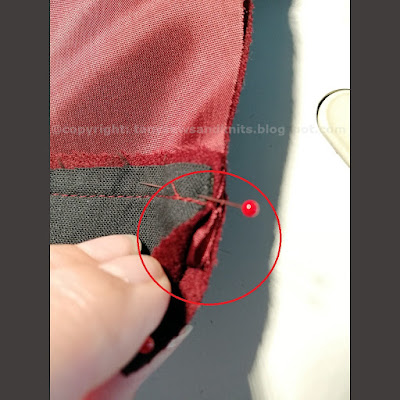
9 - There are several ways of forming the lining pleat ease; I prefer folding in the lining and stitching the corner at 1cm, forming a small lining "pouch" as seen; stitch the upper seam and vertical seam until reaching the "pouch".
---
9 - Há várias maneiras de formar a pequena prega de folga deste lado da manga; eu prefiro dobrar o fosso para dentro e coser 1cm, formando uma pequena "bolsa", como se pode ver abaixo. Depois da "bolsa" feita, é só coser o forro ao longo do topo e orla vertical da vista da abertura, até chegar à "bolsa".
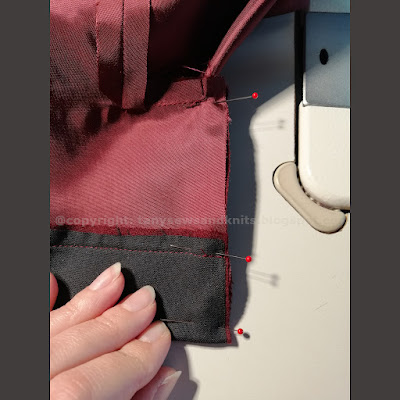
10 - Lastly stitch the lining along the hem of the upper sleeve (3/8" seam), once again stopping at 5" from the edge of the front seam of the sleeve (the one left un-stitched for now).
---
10 - Por último, coser o forro à bainha com uma margem de 1cm, mais uma vez parando a 5cm da costura da frente da manga que deixámos por coser.
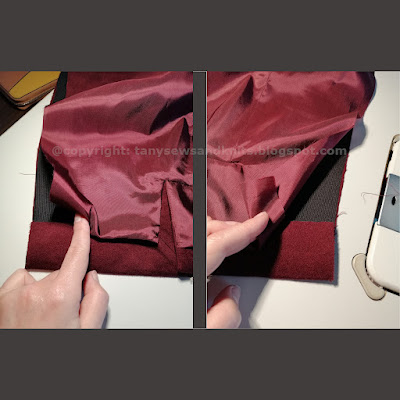
EN: See the resulting little pouch corner below?
---
PT: Conseguem perceber o canto com a dobra de folga na próxima foto?
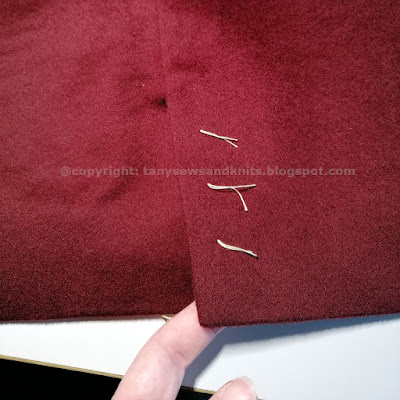
EN: Having the hem sections unstitched near the sleeve front seam is what allows stitching the front sleeve on the sleeve and sleeve lining, pressing these semas open, reach inside between lining and sleeve to machine stitch the remaining sleeve hem seam and finally tack the hem allowances by hand, all this AFTER the vent is completed and the buttonholes/buttons are set.
---
PT: Ter a bainha sem coser nos extremos é o que permite depois coser a costura da frente manga e do forro separadamente, assentar abertas ambas as costuras e finalmente meter a mão por dentro entre o forro e a manga e puxar a bainha para fora para coser a secção que falta e prender a bainha no sítio com pontos à mão. Tudo isto DEPOIS de ter caseado a abertura e pregado os botões.
EN: It's much easier to manipulate the finishing of the vent on the flat, isn't it? This same method can be used on a skirt vent, jacket/blazer/coat back vents; the vents/lining are worked the same way on the flat.
---
PT: É muito mais fácil fazer o acabamento de uma abertura forrada com o tecido plano, não é? Este método serve igualmente para rachas em saias forradas, casacos, etc.
EN: This is a pretty advanced technique and it is demonstrated here with a Burda pattern (I'm sewing a cashmere jacket from Burda International, hehehe). Most commercial patterns will have the seam allowances included and provide instructions and lining specific patterns to work the vents, so you'll be covered... Yet it's good to know a way to work around instructions/patterns if necessary and hopefully you guys will find good use for this information :).
---
PT: Esta técnica é bastante avançada e aqui está demonstrada com um molde da Burda (estou a confecionar uma jaqueta de cachemira com um molde Burda Internacional, hehehe). É sabido que a maioria dos moldes comerciais hoje em dia já incluem margens de costura e bainha e até contêm peças de molde específicas para o forro, além de instruções muito precisas para confecionar as aberturas... No entanto acho bom ter esta opção de aplicar a técnica e adaptar o molde de acordo se necessário. Espero que achem esta informação útil e que tirem proveito :).










No comments:
Post a Comment