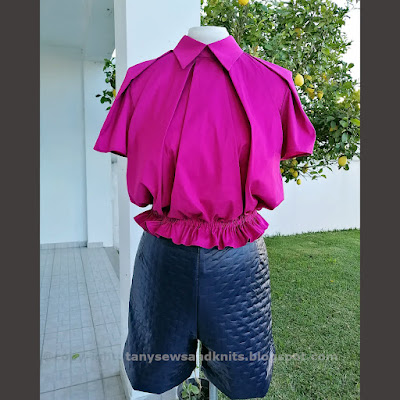
EN Summary: Today I bring you the sewing review, including step-by-step photos along the sewing process, of this very original model by DP Studio Fashion. Keep reading the full article on tanysewsandknits.blogspot.com.
---
PT Sumário: Hoje tenho para partilhar o artigo sobre a confeção deste modelo DP Studio Fashion tão original, incluindo fotos passo-a-passo da sua construção. Continuem a ler o artigo completo em tanysewsandknits.blogspot.com.
EN: The pattern is available from the DP Studio website in both printed (click here) and PDF format (click here). It is featured in the DP Studio size range 36 to 48 (do check their sizing table because it is not equivalent to Burda's), it includes hem/seam allowances (3/8" SAs) and instructions in both French and English (the instructions are available as a free download under the section "ATTACHMENTS" on the PDF version page).
---
PT: Este molde está disponível na página WEB DP Studio tanto em versão impressa (clicar aqui) como digital (clicar aqui). É um molde escalado nos tamanhos DP Studio 36 ao 42 (verifiquem a tabela de tamanhos DP Studio pois não correspondem exatamente ao que estamos habituados, por exemplo da revista BurdaStyle). O molde já inclui margens de bainha e de costura (1cm no caso das margens de costura) e tem instruções em Francês e Inglês (podem descarregá-las de graça na secção "ATTACHMENTS" da página do molde digital).
EN: The pattern description reads (adapted): "With its box pleats placed like a fan at the front, the romanticism of this shirt will win many hearts. The rather unusual sleeve on this model is partly in one with the front as one of the pleats continues onto the sleeve. The back is partly open on centre back, revealing the skin and the waist is fitted thanks to the use of elastic. Many fabrics are possible for making it but we recommend fluid ones of a certain weight to lend fullness to the pleats for them to hang better."
---
PT: A descrição lê-se (tradução livre): "Com os seus machos distribuídos em leque desde o pescoço na frente, o romanticismo desta blusa irá conquistar muitos corações. A invulgar manga deste modelo é seguida com a frente, com um dos machos a prolongar-se sobre a própria frente. As costas são parcialmente abertas no centro revelando a pele e a cintura é ajustada graças a um elástico. É possível utilizar vários tipos de tecido, mas recomendamos tecidos fluídos com bom cair para dar volume aos machos."
EN: I used a cotton/elastane blend in hot pink that has been in my stash for several years and also 3/8" wide elastic from my notions stash. I did purchase the ball buttons, rolled elastic for button loops and a Gutermann polyester thread spool for this blouse (found it all in matching color at a local notions store). I cut size 42 without alterations. The pattern is very accurate and includes two additional templates for positioning the buttons/loops along the collar stand and back yoke. The instructions are minimal but I did found the diagrams useful to figure out how everything is supposed to come together.
---
PT: Usei um tecido misto de algodão/elastano em rosa forte e elástico de 1cm que estavam no meu stock há anos; tive de comprar os botões bola, elástico rolinho para as aselhas e um carrinho de linhas de poliéster da Gutermann (tudo à cor, comprado numa retrosaria local). Cortei o tamanho 42 sem alterações. O molde está muito bem desenhado e inclui dois templates adicionais para o pé de colarinho e espelho das costas, com a indicação de onde colocar as aselhas e os botões. As instruções são mínimas, mas os diagramas ajudam bastante a perceber como é que as peças se encaixam umas nas outras.
EN: Next I will share photos of the construction process/order that I've used; note that this article is quite photo heavy.
I started by sewing the collar which is divided in two at center back (the closure is located on center back and not on the front, as with regular shirt/blouses). Note that the notched side is supposed to remain open, since it will be attached to the collar stand later. Don't forget to grade and clip the seam allowances at the corners, and give it a good press after turning the collar pieces to the right side.
---
PT: A seguir vou mostrar fotos do processo/ordem de construção que segui; notem que o artigo vai ficar bastante pesado em fotos.
Comecei por confecionar o colarinho, que está dividido em duas partes nas costas (a abertura fica nas costas e não na frente como é o normal nas camisas e blusas). Notem que a orla com os piques fica aberta para depois de juntar ao pé da gola. Não se esqueças de escalar as margens e de aparar os cantos, e depois de girar para o direito devem também assentar bem a ferro.
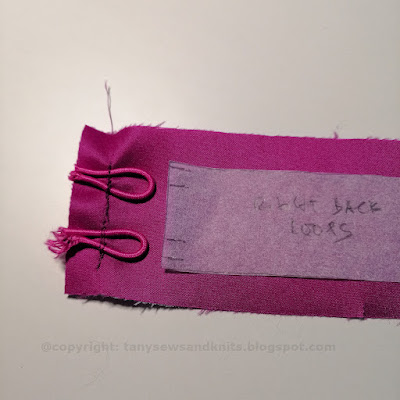
EN: The steps related with the button loops are miising in the instructions; the loops must be attached/positioned on the outer piece of the collar stand (right side) before assembling the collar stand to the collar pieces (the pattern piece seen on top is the provided template):
---
PT: Há passos que faltam nas instruções e a montagem das aselhas é um deles; as aselhas têm de ser colocadas na parte de fora do pé da gola antes de confecionar o pé da gola juntamente com o colarinho (o molde que se vê por cima é o template):
EN: Next the collar is completely assembled with the collar stand as seen in the next photos; note all the grading/notching and also that the inner collar stand neckline edge is pressed up, in preparation to assemble with the neckline later in the construction process.
---
PT: A seguir os colarinhos são montados no pé de gola como se mostra nas fotos seguintes; notem as margens escaladas e os cantos aparados, e também que a orla do pé de gola interior que se vai juntar ao decote está já assente para cima, em preparação para este passo mais tarde na ordem de construção.
EN: This is how the collar unit looks before being assembled to the neckline:
---
PT: A peça do colarinho fica assim pronta para ser aplicada no decote:
EN: Next I moved on to preparing the back yoke; as with the collar stand, the button loops must be attached beforehand to the outer right yoke (the outer yoke pieces are the ones which are interfaced); the center back seam is sewn first joining each inner and outer yokes right sides together, them under-stitching along the inner piece:
---
PT: O passo seguinte é preparar os escapulários das costas; tal como o que foi feito no pé da gola, primeiro fixam-se as aselhas ao escapulário de fora, no lado direito (os escapulários de fora são os que levam entretela no avesso). A costura do meio de trás é fechada unindo as peças de dentro com as de fora direito contra direito e fazendo um pesponto de girar sobre as peças interiores, prendendo as margens de costura:
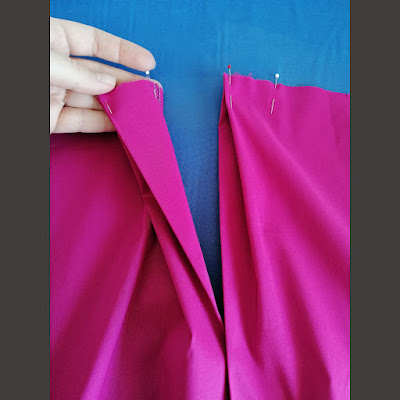
EN: Next it's time to prepare the back pieces to be joined with the yokes; the back pieces are stitched together at center back stopping above the elastic casing placement. The opening has a all-in-one wide facing which must be interfaced and its edges finished. The facing must be pressed to the inside (the elastic casing will be later stitched on top of the base of the back opening facing, holding it in place) and at the top of the back pieces a small pleat is formed:
---
PT: Em seguida temos de preparar as partes das costas para as unir com os escapulários; as partes das costas devem ficar unidas em baixo até à marca do molde, deixando uma abertura guarnecida com uma vista seguida larga. A vista deve ser entretelada e as suas margens acabadas. A vista é assente a ferro para o interior (o canal para o elástico depois vai ser cosido por cima da base das vistas, prendendo-as) e no topo formam-se duas pequenas pregas, uma em cada lado das costas:
EN: The back yoke pieces are then attached to the back pieces (the back pieces are stitched in between inner and outer yoke pieces for a clean finishing):
---
PT: As partes das costas são depois cosidas aos escapulários (ficam cosidas entre escapulário interior e exterior para um acabamento limpo):
EN: Next I prepared the front piece by folding the pleats in place as indicated on the paper pattern:
---
PT: A seguir preparei a frente formando os machos como indicado no molde:
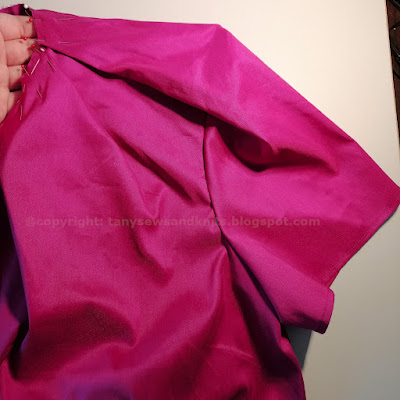
EN: Having the front and back units ready, it's time to deal with the sleeves, which will join everything together completing the neckline. The sleeve pattern is very intriguing: it has some sort of a dart and folds on itself towards the front (all fold lines are indicated on the pattern). There is a back and a front shoulder seams. I highlighted the corners at which I stay-stitched and notched to facilitate the assembly of the shoulder seams:
---
PT: Estando a frente e as costas prontas, resta-me preparar as mangas que vão completar o decote. O molde da manga é bastante interessante, como podem reparar; tem uma espécie de pinça e dobra-se sobre si mesmo para a frente (as linhas de dobra estão indicadas no molde). Há duas costuras no ombro, uma à frente e outra atrás. Destaquei a vermelho os cantos onde primeiro pespontei e depois golpeei para facilitar a junção do ombro com a cava:
EN: I now understand that the dart can be placed together at the back shoulder seam but at the time it seemed logical to stitch the dart closed separately and so I did. Then I stitched the sleeve inner seam and hemmed the sleeve (the order in the instructions is wrong: it tells you to first hem the sleeve and then stitch the inner sleeve seam).
---
PT: Agora compreendo que tem mais lógica fechar a pinça juntamente com a costura do ombro de trás, mas na altura pareceu-me lógico fechá-la independentemente do ombro. Depois cosi a costura interna da manga e fiz o acabamento da bainha (as instruções estão mal: primeiro dizem para fazer a bainha e só depois fechar a costura interior do braço).
EN: I joined the back shoulder seam to the yoke by the burrito method:
---
PT: Uni a costura do ombro das costas com o escapulário pelo método burrito:
EN: Next I stitched the front shoulder seam; after fixing the pleat at the top of the sleeve the neckline is completed. All it takes to finish the sleeves is sewing the side seams and lastly the underarm seam.
---
PT: A seguir cosi a costura do ombro da frente; depois de fechar a prega no topo da manga, o decote fica completo e pronto para montar a gola. Para terminar a aplicação da manga basta fechar as costuras laterais da blusa e a seguir a costura da cava em baixo.
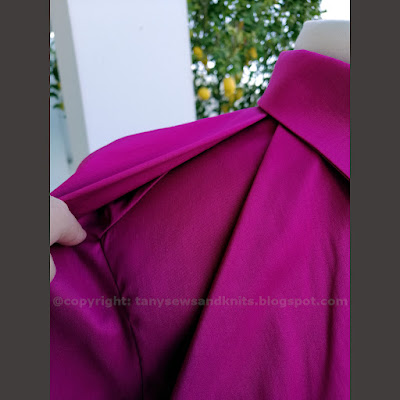
EN: The next steps are joining in the collar, hemming the blouse and stitching the elastic casing. There is a pattern for the casing (cut on the bias) but commercial pre-folded bias tape can also be used for the same purpose. Note how the fold on the sleeve covers the front shoulder seam on the finished blouse; neat, isn't it?
---
PT: Os passos seguintes são aplicar a gola no decote, embainhar a blusa e coser o canal para o elástico na cintura, no avesso. O molde para este canal é fornecido (uma tira em viés) mas para o mesmo efeito pode também utilizar-se fita de viés dobrada (já se compra assim). Na blusa pronta notem como a dobra da manda cobre a costura do ombro da frente; genial, não acham?
EN: How cool are the radiating box pleats and the collar?---
PT: Os machos e a gola camiseira criam um efeito verdadeiramente espetacular:
EN: I'm really proud of how the back closure turned out; if you feel uncomfortable with the buttons/loops at center back, the alternative is cutting the collar stand and the back yokes with an extra 3/8" for an overlap and use snaps instead.
---
PT: Fiquei muito satisfeita com o efeito final dos botões/aselhas; se não se sentirem confortáveis em confecionar este tipo de fecho, podem sempre cortar o pé da gola e os escapulários com 1cm extra para sobreposição e usar molas de pressão.
EN: How sexy is the opening on the back? SO cool!---
PT: E a abertura nas costas, não acham sexy? Adoro!
EN: The elastic casing is optional; there's the possibility of letting the blouse hem hang freely. The blouse can also be made longer into a tunic or a dress. Just imagine it with a long ruffle, for the most extravagant among us!
---
PT: O guia para elástico é opcional; há a possibilidade de deixar a blusa cair solta. Este modelo também pode ser feito mais comprido, transformando-se numa túnica ou vestido... Imaginem só este modelo com um folho largo, para as mais extravagantes!
EN: Thank you all for reading this really loooong article! If you have reached this far, you are a true sewing lover :)!
---
PT: Obrigada a todos por lerem este artigo (nunca mais acabava de o escrever!) Se chegaram aqui até ao fim, devem mesmo gostar de costurar :)!








5 comments:
that pattern is amazing and how fun to sew it together. It looks so cool and I think that color would be great on you.
AWESOMENESS ... it never cease to amaze me with what you produce next! Keep them coming ... FIESTA :)
Thanks for all the details!I so enjoy your info! And feel my sewing has improved because of reading your posts and excellent info. 😊
Hi. Absolutely beautiful! You said that you didn't make any fit alterations. Given the incredibly clever pleating, double shoulder seams and hidden from shoulder seam, would fit adjustments be possible? Could they be made on the pattern or would they need to be made after muslining/toiling?
Ymlb: Thank you! Due to the intricate pleating, I would strongly suggest picking the size according to the chest measurement, making a toile and make any adjustments on the toile (armhole depth, torso length, sleeve length, etc.). Making a toile is highly recommended to understand how everything is supposed to go together, in my opinion. It also helps with forming the pleats and making sure the final result is as shown in the line drawing.
Post a Comment