EN Summary: In this article I am sharing the remaining sewing process concerning the making of my leopard print sleeveless biker jacket (find the previous post on the same matter here). Keep reading the full article on tanysewsandknits.blogspot.com.
---
PT Sumário: Neste artigo partilho o restante processo de confeção do blusão biker leopardo sem mangas (podem ver o artigo precedente sobre esta mesma matéria aqui). Leiam o artigo completo em tanysewsandknits.blogspot.com.
Slanted welt pockets: I've already published at least one tutorial on the sewing of this type of pockets (refer to this article here, about the same type of pockets on my sherpa jacket). The secrets for achieving the best results are the marking and the cutting accuracy of all pieces, which are cut with 3/8" seam allowances. I usually mark the pocket ends with tailor tacks, then I trace the cutting line joining these marks and the two perpendicular lines on each end using a pencil or chalk. It is very important to transfer these markings to the right side, and I'm used to thread trace them. Below there's the side front of the jacket with the pocket placement lines already marked and thread-traced (note that the side front is fully interfaced and the armholes are reinforced with fusible tape; in the case when the piece is not fully interfaced, the pocket placement area alone should be reinforced with fusible interfacing):
---
Bolsos com pestana inclinados: Já publiquei pelo menos um artigo a respeito deste tipo de bolsos (podem ler um dos artigos clicando aqui, onde demonstro como confecionar os bolsos na minha jaqueta de imitação de carneira). O segredo para conseguir bons resultados está na marcação do bolso e na precisão do corte de todas as peças, que têm margens de costura de 1cm. Normalmente marco os extremos da abertura para o bolso com alinhavos e depois, usando os alinhavos como referência, traço a lápis ou a giz uma linha que une esses extremos, assim como duas perpendiculares exatamente nos pontos marcados. É muito importante que estas marcações sejam transferidas para o direito da peça, e para isso tenho o hábito de as alinhavar Abaixo podem ver uma parte lateral da frente com o posicionamento do bolso já marcado a lápis e alinhavado (notem que a lateral está completamente entretelada com as cavas reforçadas com fita de entretela; se a peça não estivesse entretelada, pelo menos o local onde vamos confecionar o bolso deve estar reforçado com entretela termo-colante):
EN: The welt should be sewn and turned to the right side, and the pocket facing should be stitched to the inner pocket bag; then the welt will be stitched on top of the outer pocket bag, raw edge with raw edge, a scant less than the included seam allowance.
---
PT: A pestana deve ser confecionada e virada para o direito, e a vista do bolso deve ser cosida à fundura inferior; depois a pestana deve ser cosida sobre a fundura superior, margem com margem, a 9mm da margem (1mm menos de 1cm, que é a margem final prevista).
EN: Using the thread tracing as reference, the two pocket units (inner pocket bag+facing and outer pocket bag+welt) should be positioned butting together at the pocket opening line (note that the welt is underneath the outer pocket bag); note the pocket bags are pointing upwards in this case, which makes sense because the pockets are above the waistline and when we put our hands in them while wearing the jacket, the hands will also point upwards. Next we top-stitch on both sides at 3/8" of the marked opening, ending exactly at the perpendicular traced lines (the top-stitching lines can be marked with a pencil or frixion pen, if necessary).
---
PT: Usando as linhas alinhavadas como referência, colocam-se as duas unidades do bolso (fundura inferior com vista e fundura superior com a pestana cosida por baixo) uma contra a outra coincidindo na linha alinhavada da abertura do bolso. Pesponta-se a 1cm de cada lado da linha alinhavada, não ultrapassando as linhas perpendiculares (se quiserem podem marcar as linhas de pesponto nas unidades das funduras com uma caneta frixion ou giz, antes de coser). Notem que as funduras apontam para cima, o que pode parecer estranho mas faz sentido, pois como os bolsos se posicionam acima do nivel da cintura neste caso, quando metemos as mãos neles, as mãos também ficam inclinadas para cima.
---
PT: Pelo avesso do trabalho, abre-se o bolso entre as duas linhas de pesponto, como mostro abaixo:
EN: The two pocket bag units are then passed through the opening to the wrong side, while the welt remains on the right side:
---
PT: As duas unidades das funduras passam-se pela abertura para o avesso, enquanto a pestana se mantém no direito:
EN: The pocket bag units are then stitched together all around, catching the little corner fabric triangles at the beginning and the end of the stitching:
---
PT: As unidades das funduras são depois cosidas uma à outra a toda a volta, fechando o saco do bolso, sem esquecer de prender no pesponto os pequenos triângulos de tecido nos extremos da abertura:
EN: To complete the pocket, the ends of the welt should be tacked in place, either by hand or machine:
---
PT: Para completar o bolso, os extremos da pestana devem ser fixados à mão ou à máquina:
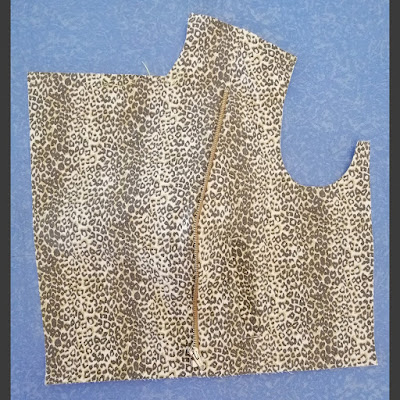
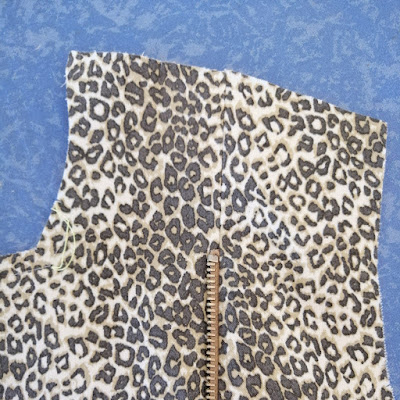
Separating zipper: With the pockets ready, it's time to move on and complete the front units. The left side of the separating zipper is sewn in the princess seam of the left front; first it is machine-basted along the princess seam on the left center front as seen (note how the zipper is positioned and also the folded tape at the top):
---
Zíper separável: Terminados os bolsos, passamos a completar as unidades da frente, fechando as costuras princesa. A parte esquerda do zíper separável é metido na costura princesa da frente esquerda; primeiro alinhava-se à máquina sobre a parte central da frente esquerda (notem como o zíper está posicionado e como dobrei a fita no topo do fecho):
EN: Next the princess seam is stitched sandwiching the left part of the zipper; I am placing the side front (curved seam) on top and using a zipper pressing foot to stitch as close to the zipper teeth as possible, maintaining the 3/4" seam allowance (the seam is pinned but I remove the pins before the needle can hit them):
---
PT: A seguir a costura princesa esquerda é cosida, com a parte esquerda do zipper presa entre as duas camadas; coso com a lateral da frente (costura curva) em cima e uso um calcador para fechos, cosendo tão próximo quanto possível aos dentes do fecho enquanto mantenho a margem de costura a 1cm (a costura está alfinetada, mas os alfinetes são retirados antes que a agulha os possa atingir):
EN: Here's the left front and a couple of close-ups at the zipper:
---
PT: Aqui têm a frente esquerda e algumas fotos de detalhe do zíper:
EN: The right front is easier: the princess seam is stitched and the right zipper tape is machine-basted along the edge, facing down:
---
EN: A parte direita da frente é mais fácil: cose-se a costura princesa normalmente, e a parte direita do fecho, virada para baixo, é alinhavada à máquina ao longo da beira da frente:
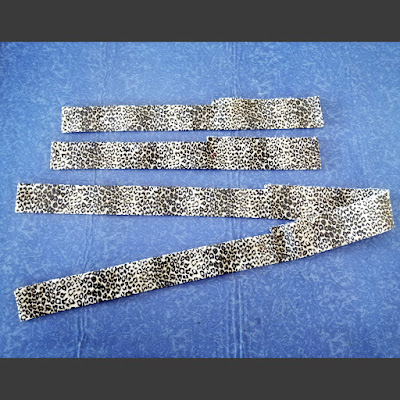
Waistband/ties: The front units are stitched to the back along the shoulders and side seams, thus completing the outer shell; at this point I moved on to sewing the waistband/side ties as shown; the longer one is the back waistband, and the two shorter ones are the left and right front waistbands. These units will be sandwiched between outer and inner shells, along the bottom of the jacket (not sewn as a regular waistband).
---
Cós com tiras de atar: As unidades da frente e das costas são cosidas juntas nas costuras laterais e ombros, completando assim a camada exterior do blusão; nesta altura passei a confecionar o cós/tiras de atar, como podem ver na foto seguinte. A tira mais longa aplica-se nas costas e as outras duas nas frentes; são presas na costura de baixo do blusão, entre a camada exterior e a interior (não são aplicadas como se tratasse de um cós normal).
Armhole facings: There's still the two armhole facings to sew and all the units will be completed and ready for assembly. The facing edges are serged/overlocked, then the side seams are stitched and pressed open, and finally the serged edges of the facings are turned in and top-stitched for a clean finishing inside:
---
Guarnições das cavas: Ainda falta confecionar as guarnições das cavas e estando terminadas, todas as unidades estarão prontas para serem montadas. Primeiro a orla das guarnições deve ser acabada com a corta-e-cose; depois fecham-se as costuras laterais, e assentam-se abertas; finalmente a orla acabada com a corta-e-cose vira-se para dentro formando uma bainha estreita e pesponta-se, para um acabamento limpo no interior:
Putting it all together: With all units ready for assembly, the work order is the following:
1 - Stitch the inner and outer shells together along front edges and lapels, right sides facing, ending at the center front notches where the collar will be inserted. When sewing the right edge, use a zipper foot to stitch as close to the sandwiched zipper teeth as possible, while maintaining the 3/8" seam allowance.
2 - With jacket turned inside out, put the collar inside and stitch it along the front/back neckline and facings neckline, as a circle (under-collar to the jacket neckline, upper-collar to the facings neckline). The circular seam should be clipped and pressed open and the seam allowances should be top-stitched together from the wrong side, so jacket's neckline and facings' neckline overlap and are fixed together. Jacket is turned to the right side now, and looking good :).
3 - Slip your hands through the armhole opening, between inner and outer shell, grabbing the waist seams as they should be stitched from the inside, with the belts sandwiched in between and pull them out for stitching (this should be done in stages, first the back waistband and then each of the fronts). In the end the entire bottom seam should be closed all around, with all allowances caught between inner and outer layers of the jacket. After a good pressing the jacket is complete, except the finishing of the armholes.
4 - Apply facings to the armholes (both outer and inner shell edges together), placing them on top of the armholes, right sides facing, and stitch all around the armhole edge. clip & grade seam allowances, under-stitch the edge on the facing side and turn facings to the wrong side of the jacket. Tack the facings edge to the lining.
---
Juntando todas as partes: Com todas as unidades prontas para serem "encaixadas" umas nas outras, a ordem de trabalho é a seguinte:
1 - Coser a camada interior à exterior, direito sobre direito, ao longo das orlas da frente e lapelas, terminando no pique do meio da frente onde a gola será encaixada. Ao coser a orla da frente direita, que tem o fecho preso na costura, usar um calcador para fechos que permita coser junto aos dentes do fecho enquanto mantém a margem de costura de 1cm.
2 - Ainda com o blusão do avesso, colocar a gola por dentro e coser ao longo do decote em círculo, gola inferior com decote do blusão e gola superior com decote das vistas. golpear e abrir esta costura a ferro e por dentro, pespontar as margens juntas, sobrepondo ambos os decotes (blusão e vistas) e fixando-os juntos. O blusão fica virado para o direito e tem bom aspeto :).
3 - Enfiar as mãos pelas cavas, entre o exterior e o forro, e agarrar as margens da bainha juntas, interpondo as tiras do cós entre camada interior e exterior. Puxar tudo para fora através das cavas e fechar a costura de baixo a toda a volta (pode e deve ser feito por fases, prendendo cada uma das tiras do cós de cada vez). No final todo o baixo do blusão fica fechado, com o cós intercalado e as margens presas para cima entre a camada exterior e a interior. Depois de uma boa passagem a ferro o blusão está quase concluído, falta só o acabamento das cavas.
4 - Aplicar as guarnições/vistas nas cavas (cavas exteriores e interiores juntas como se fossem uma só), sobrepondo direito contra direito e cosendo em redor da cava. golpear e gradar as margens, depois fazer um pesponto de girar, prendendo as margens na direção das guarnições. Virar as guarnições para dentro e fixá-las com pontos à mão no forro.
EN: Next I will show you the completed sleeveless biker jacket! Happy Sewing!
---
PT: Na próxima vez mostro o blusão biker sem mangas terminado! Boas costuras!


No comments:
Post a Comment