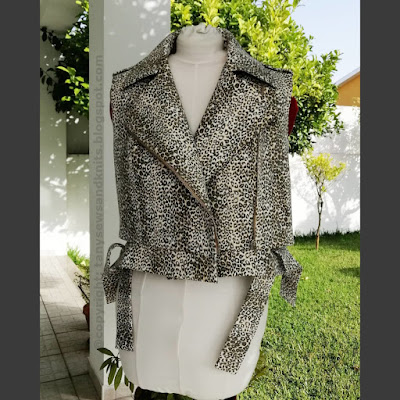
EN Summary: It's time to show you guys all the details of the finished leopard print sleeveless biker jacket! Read the full article on tanysewsandknits.blogspot.com!
---
PT Sumário: Está na hora de vos mostrar o blusão motard leopardo sem mangas terminado! Encontrem o artigo completo em tanysewsandknits.blogspot.com!
Edited to add: photos of me wearing the sleeveless biker jacket are already available on Tany et La Mode (click here).
---
Editado para acrescentar: fotos minhas a usar o blusão biker sem mangas já estão publicadas no Tany et La Mode (clicar aqui)
EN: The sleeveless biker jacket is finished, and I am thrilled with the outcome! The shaping and the proportions are spot on, in my opinion, and I finally got to use this leopard printed denim which has been lying in my fabric closet for years.
---
PT: O blusão motard sem mangas está terminado e fiquei mesmo muito satisfeita com o resultado! Na minha opinião a forma e as proporções são ideais e finalmente pude dar uso a esta ganga estampada leopardo que estava no meu stock há anos.
EN: Here are the slanted welt pockets (read the sewing tutorial in my previous post - click here).
---
PT: Aqui estão os bolsos inclinados com pestana (podem ver o passo-a-passo no meu artigo anterior - aqui).
EN: In the previous post I forgot to mention the shoulder tabs; they must be sewn to the outer shell (including installing the no-sew snaps, it it is the case), before joining inner and outer shells together; this prevents having the metal backing of the snaps exposed on the wrong side. When fixing the tabs with the snaps, don't forget to include some extra for the turn of the cloth, otherwise they will be pulling on the shoulders once the armhole facings are sewn and under-stitched. If button/buttonholes are used, there's no need to predict the turn of the cloth because the buttons could be sewn on the correct position after the armhole facings are installed.
---
PT: No artigo anterior esqueci-me de mencionar que as presilhas dos ombros devem ser cosidas e aplicadas antes de unir a camada exterior com a interior. No caso de usarem molas de pressão das que se aplicam com alicate como estas, devem aplicá-las também antes de coser a parte interior à exterior (assim evitam que o metal da mola fique visível no avesso) e têm que prever uma folga na presilha para ela "dar a volta" depois de aplicar as guarnições nas cavas. Se usarem botões e casas de botão como é preconizado nas instruções, o botão pode ser aplicado já com as cavas acabadas, na posição correta.
EN: Here's the front facing all-in one with the front hem facing:
---
PT: Aqui têm a guarnição da frente, que tem a guarnição da bainha da frente incluida na mesma peça do molde:
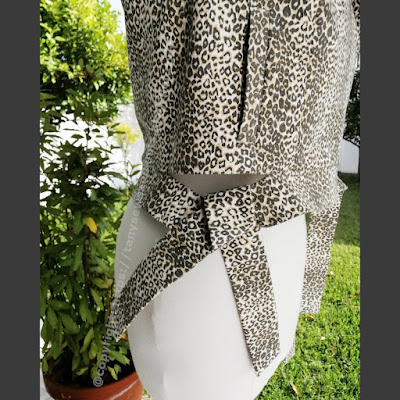
EN: The waistband which turns into side ties is one of the highlights of this pattern, but it can be modified into a regular one-piece waistband if desired:
---
PT: O cós que se transforma em tiras de atar é um dos destaques deste molde, mas se não gostarem, podem sempre cortar o cós numa peça única:
EN: Here are the ties seen from the inside; note that the section of the bottom edge with no waistband is under-stitched:
---
PT: Podem ver a seguir as tiras de atar e a orla da jaqueta do avesso; notem que a secção da orla que não tem cós leva um pesponto de girar no avesso:
EN: On the side seam, the front and back facings width should match; the pattern comes with a small fault, having the back facing a little wider, which I easily corrected:
---
PT: Na junção lateral, as guarnições da frente e das costas devem coincidir; foi aqui que descobri um pequeno erro no molde, que tinha a guarnição das costas um pouco mais larga, erro que corrigi facilmente:
EN: On the inner shoulder seams, the back neckline facing and the front facing are also a little off but in this case I left it as is because the difference is minimal and the finished back and front shoulder seams did match when joined together:
---
PT: A guarnição do decote atrás também não coincide exatamente com a guarnição da frente no ombro, mas neste caso a diferença é mínima e não vi necessidade de corrigir, pois a frente e as costas interiores acabam por coincidir na dimensão final da costura do ombro:
EN: Here's how I tacked the edge of the armhole facings to the lining (a photo that I forgot to include in my last post):
---
PT: Abaixo podem ver como prendi a orla da guarnição da cava ao forro (uma foto que me faltou incluir no último post):
EN: Hopefully you'll find the series of posts on this biker jacket useful in some way. I haven't got photos of me wearing it just yet; we have been working from home and will remain so while necessary and possible. This week and the next two following weeks we'll be on "stay at home vacation" and perhaps I will take some time to dress up and take a few photos of my new clothes (preferably after visiting my hairdresser, :D !). Happy sewing y'all!
---
PT: Espero que esta série de artigos sobre este blusão vos seja útil de alguma forma. Ainda não tenho fotos minhas a usar esta peça; temos estado a trabalhar de casa e iremos manter-nos assim enquanto for necessário e possível. Esta semana e nas próximas duas estaremos de férias, mas sem sair de casa, por isso pode ser que tenha um tempinho para me arranjar e vestir as minhas roupas novas para as fotografar, de preferência depois de ir ao cabeleireiro :D. Boas costuras a todos!


3 comments:
This looks like a wonderful piece which you'll love wearing! I will go over the 3 posts multiple times to totally understand your directions. Thanks!
I absolutely love your jacket. I wish that pattern was still available for purchase. I tried but it is not available. So sad.
So very chic and I predict a workhorse in your wardrobe. Beautiful work and creative vision, Tany.
Post a Comment