
EN Summary: The amount of adjustments that can be made into a lockstitch sewing machine is surprising; in spite of doing just one single stitch (the lockstitch) this sewing machine offers a lot more of “play” when compared to the domestic sewing machines. Keep reading to find out more!
---
PT Sumário: A quantidade de ajustes que se podem fazer numa máquina de ponto corrido é surpreendente, pois afinal trata-se de uma máquina de costura que só faz um único ponto, o ponto preso. No entanto, em geral oferece muito mais margem de manobra para ser ajustada do que uma máquina doméstica. Continuem a ler o artigo se quiserem saber mais sobre este tema.
EN: For the purpose of this series of articles on industrial lockstitch sewing machine mechanical adjustments, I will narrow down the adjustments to those that can be made into a flat-bed single-needle lockstitch with drop-feed. My machine doesn’t feature the automatic thread cutter so any specific adjustments related with this feature will be left out. I won’t address adjustments related to motors or the treadle either. This first article will address most common thread feeding mechanism adjustments.
---
PT: O âmbito desta série de artigos será limitado apenas a alguns ajustes que se podem fazer na máquina plana de ponto corrido com uma agulha com arrasto simples inferior. A minha máquina não tem corta-linhas automático por isso qualquer ajuste específico desse mecanismo também não será endereçado. De fora ficam também ajustes relacionados com o motor e com o pedal da máquina industrial. Este primeiro artigo centra-se em alguns ajustes comuns da alimentação da linha da máquina de ponto preso.
EN: Let’s start by realizing what I personally mean by “mechanical adjustments” and start off by comparing these adjustments to those available (or not) on a domestic sewing machine; mechanical adjustments in my perspective are those adjustments implying adding/removing/replacing parts, or changing their configuration. There are some very simple mechanical adjustments that anyone used to operating a sewing machine will know, and there are other adjustments that go slightly beyond common knowledge, specially on the context of industrial sewing machines.
---
PT: Comecemos por perceber o que quero dizer com "ajustes mecânicos" e partir sempre que possível de uma comparação com a máquina doméstica; na minha perspectiva, um ajuste mecânico é aquele que implica adicionar, retirar, substituir ou reconfigurar uma peça integrante do mecanismo da máquina. Alguns ajustes são muito simples que qualquer pessoa que opera uma máquina de costura saberá fazer, e outros vão um pouco mais além do sonso comum, especialmente no domínio das máquinas industriais.
Changing the needle - Trocar a agulha

Common types of Schmetz domestic sewing machine needles
Tipos comuns de agulhas para máquinas de costura domésticas Schmetz
EN: The 130/705H needle system is used by the majority (if not all) domestic sewing machines. My favorite brand of domestic sewing machine needles is Schmetz (I have also used Singer and Organ, and I consider both equally reliable). Domestic sewing machine sizes range from 8(60) to 18(110) and there’s a large selection of types (needle points) available. The ones I have used are the Regular, Microtex, Jeans, Jersey/Ball point, Stretch, Topstitch and Leather. There are also twin needles of different sizes and needle-points. The domestic sewing needles have a flat surface on the shank and can only be inserted in the needle slot on a certain position, with the needle eye facing the operator.
---
PT: O sistema de agulhas usado pela maioria (senão a totalidade) das máquinas de costura domésticas é o 130/705H. A minha marca de eleição de agulhas para máquinas de costura domésticas é a Schmetz (também usei Singer e Organ e considero-as igualmente boas). Os tamanhos vão desde 8(60) a 18(110) e há uma larga seleção de tipos (pontas) disponíveis, de acordo com a aplicação desejada. As que usei até ao momento são as normais, as Microtex (mais afiadas), Jeans (para gangas), Malha (ponta bola), Stretch (para tecidos com elastano), de pespontar e para couro/pele (com ponta facetada). Também existem à disposição agulhas duplas de vários tipos (Jeans, malha,...) As agulhas domésticas têm um cabo/cana achatado de um dos lados que só permite inseri-las na máquina numa determinada posição, com o olho da agulha virado para o operador.

Groz-Beckert Industrial DPx5 sewing needles size 75/11 with Regular point (R)
Agulhas Industriais DPx5 da Groz-Beckert, tamanho 75/11 com ponta normal (R)
Different types of Industrial sewing needle points available (image from Groz-Beckert brocure)
Diferentes tipo de pontas de agulhas industriais disponíveis (imagem tirada da brochura Groz-Beckert)
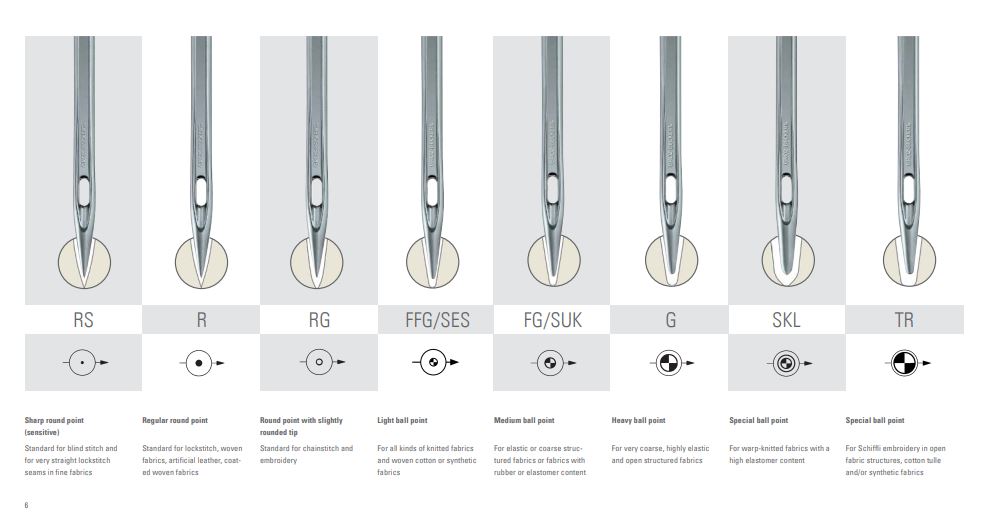
EN: Regarding regular industrial single-needle lockstitch sewing machines the two mainly used needle systems are: DBx1 (aka 1738, etc.), which has narrower shank diameters for the smaller needle sizes and wider shank diameters for large needle sizes and DPx5 (aka 134, etc.) with wider shank diameter for all needle sizes. Sewing needle range size can go much wider regarding bigger sizes, fitting heavy duty industrial sewing machines for sewing upholstery, heavy canvas, etc. These needles have a round shank (no flat surface) yet they must be inserted in the correct position, with the eye of the needle and its scarf (identified by the letter "A" in the next diagram) facing to the right where the arm of the machine stands. There are many industrial needle brands and so far I've used Groz-Beckert and Schmetz. There's also many needle point types available; they are usually identified by a letter code and in the case of industrial sewing needles, the universal point (R) and the light ball point (FFG/SES) will fit most applications in dressmaking. As an example, my industrial sewing machine uses the DPx5 system so if I’m looking for a needle for sewing, let's say, medium weight cotton, I'll use a size 14(90) DPx5 R needle or a size 14(90) DPx5 FFG/SES needle (these work well with knits and wovens and don't get damaged as easily as the regular point). Using a twin needle is simply not possible on a single-needle lockstitch sewing machine. If I need to make two rows of perfectly aligned top-stitching (example: a flat-felled seam) I would use industrial compensating feet and stitch one row at a time, unless I own a two-needle industrial sewing machine, of course.

PT: Quanto às agulhas para a máquina de ponto preso de uma agulha, há dois sistemas comuns: o DBx1 (também designado como 1738, etc.) com a cana fina para os tamanhos usuais e cana grossa para tamanhos de agulha muito grossos, e o DPx5 (também designado como 134, etc.) com cana grossa para todos os tamanhos. Existem tamanhos bastante além do 18(110) nas agulhas industriais, pois há aplicações que as requerem (tapeçaria, estofos, sapatos, etc.). Estas agulhas têm uma cana cilíndrica (sem a parte "chata" das domésticas) mas também têm ser inseridas numa posição específica: o olho e a junta ou cava da agulha (identificada pelo "A" na figura anterior) devem ficar virados para a direita, na direção do braço da máquina. Há muitas marcas de agulhas industriais, mas até agora só tenho usado as Groz-Beckert e as Schmetz. Nas agulhas industriais também há diferentes tipos de pontas, que neste caso são identificadas por um código de letras. A agulha de ponta universal (R) e a de pinta bola fina (FFG/SES) servem para praticamente todas as aplicações de costura normais. Por exemplo, a minha máquina industrial usa ao sistema DPx5 e se precisasse de coser algodão de espessura média poderia usar uma agulha DPx5 R tamanho 90/14 ou em alternativa o mesmo tamanho com ponta FFG/SES (esta última tem a vantagem de também dar para tecidos de tear mas não se estragará tão depressa como a de ponta universal). Numa máquina industrial de uma agulha não se podem usar agulhas gémeas como na máquina doméstica; se precisar de fazer duas costuras perfeitamente paralelas, por exemplo numa costura Jeans ou Inglesa, usaria os calcadores compensados da máquina industrial para coser uma linha de pesponto de cada vez. Para coser com duas agulhas é necessário uma máquina industrial específica, de duas agulhas.

Example of a needle-thread tension adjust dial on a modern domestic sewing machine
Exemplo de botão de ajuste da tensão da linha da agulha numa máquina de costura doméstica moderna
Adjusting thread tensions - Ajuste das tensões das linhas
EN: All sewing machines have a tension dial or knob that regulates the tension applied to the needle thread. In the case of domestic sewing machines these knobs are scaled with numbers and a slight turn on the knob affects the tension dramatically; on industrial sewing machines these knobs are called “tension units” and you can turn them multiple times instead of just a fraction of a turn. Typically they are not numbered. I could write an entire post just about the tension unit, the tension take-up spring, etc. For now I will just highlight how crucial this unit is. Common problems are caused by lint accumulation between the tension unit disks and take-up spring breakage or degradation.

Industrial sewing machine needle thread tension knob
Botão de regulação da tensão da linha da agulha na máquina industrial
PT: Todas as máquinas de costura têm um botão ou disco para regular a tensão da linha da agulha. No caso das máquinas domésticas estes botões são geralmente numerados e só dão uma volta; um ligeiro ajuste (de um nº para o nº seguinte, por ex.) faz bastante diferença na tensão da linha. Nas máquinas de costura industriais, o ajuste de tensão é feito por uma unidade tensora e o ajuste já se faz dando várias voltas no botão, que não é tão sensível. Normalmente os botões das industriais nem sequer são numerados, pois como dão muitas voltas não faria sentido ter os números. Há muito a dizer sobre os tensores (dava para escrever um post só sobre eles), mas para já apenas saliento que são uma peça muito importante para o desempenho da máquina. Os problemas mais comuns originados no tensor são a acumulação de detritos entre os discos, a perda de força da sua mola de pressão e por último a quebra da mola do estica-fio.

Tension unit of a lockstitch industrial sewing machine
Tensor de uma máquina industrial de ponto preso

The take-up spring is part of the tension unit; with wear sometimes it breaks and must be immediately replaced
A mola do puxa-linha é uma peça do tensor e com o uso por vezes parte, tendo de ser imediatamente substutuida
EN: Near the tension unit of the industrial lockstitch, there's another adjustable part that is often neglected: the thread take-up stroke guide. Its position is adjusted by loosening the top screw, slide the guide to the desired position and then tighten the screw back. The position of this guide to the far right will decrease the amount of thread within a stroke so it will be ideal for very thin threads, short stitch lengths and light-weight fabrics; if it is positioned far to the left, it will increase the amount of thread within each stroke so if you're sewing heavyweight fabrics with heavy-duty thread and long stitch lengths this guide should be positioned to the far left. For normal operation, the guide should be centered.

Thread take-up stroke adjustment
Ajuste do curso da mola do estica-fio
PT: Perto do tensor da máquina industrial há outra peça ajustável que muitas vezes é esquecida: o guia do estica-fio. A posição deste gua tem influência direta no curso da mola do estica-fio, dando mais ou menos linha por cada ponto. Para ajustar basta afrouxar o parafuso, deslizar o guia para a posição desejada e voltar a apertar. Quando o guia está encostado à direita, passa menos linha por laçada, o que é ideal para pontos pequenos, linhas finas e telas muito leves; pelo contrário, quando está encostado à esquerda, deixa passar mais linha, ideal para pontos compridos, linhas grossas e telas pesadas. A posição para costura normal é centrada.

Domestic top-loading bobbin case
Caixa da bobina horizontal de uma máquina doméstica
EN: Regarding bobbin thread tension there’s not much difference between domestic and industrial sewing machines, other than the type of bobbin case, related to the type of hook system. There’s usually a small screw that can be slightly tightened or slightly loosen. Bobbin thread tension is not often adjusted unless the thread size is changed or if you’re using elastic thread in the bobbin. While top-loading bobbin systems on domestic sewing machines use fixed bobbin cases, on industrial lockstitch sewing machines (and some domestic models) the bobbin case is supposed to come off out of the hook shuttle easily because you need to take it out to put the bobbin in the case and then insert the whole unit back in the shuttle/hook device.

Industrial Sewing machine bobbin case for vertical hook system
Caixa de bobina de máquina industrial com laçadeira vertical
PT: Relativamente ao ajuste de tensão da linha da bobina não há muita diferença entre as máquinas domésticas e industriais, além do tipo de caixa de bobina, relacionada com o tipo de laçadeira que usam. Em qualquer dos casos há um pequeno parafuso que pode ser ajustado (sempre muito ligeiramente) para dar mais ou menos tensão à linha da bobine. Normalmente não se mexe na tensão da linha da bobine, a não ser que mudem drasticamente a espessura da linha ou então queiram coser com elástico rolinho na bobina. Enquanto nos sistemas horizontais das máquinas domésticas as caixas da bobina estão fixas (só se tiram para limpar a sujidade que se vai acumulando com o uso), nas máquinas industriais e nas domésticas com sistema de laçadeira vertical as caixas da bobine retiram-se para carregar a bobine, e depois são encaixadas no lugar já com a bobine instalada no seu interior.

How to determine the right bobbin thread tension on a vertical hook bobbin case
Como se determina a tensão ideal na linha da bobina numa caixa de bobina de laçadeira vertical
EN: Regarding removable bobbin cases, the way to know when the bobbin thread tension is right is quite easy: after inserting the bobbin in the bobbin case correctly, if you hold it grabbing a 4" tail of thread (give or take), the bobbing case shouldn't slide down; yet, with just a slight shake it should start to slide down. There's also a bit of controversy regarding how to insert the bobbing in the case correctly (bobbin turning clock-wise or counter clock-wise, as you pull the thread?). Some sewing machine manuals show it one way, others show the opposite. My sewing machine instructions indicate that when the bobbin is facing me inside the bobbin case and I pull the thread out, the bobbing should turn clock-wise which is also more intuitive to me because that's the way my domestic top-loading sewing machine also works: the thread goes around clock-wise and then pulls back through the slit.

PT: Quanto às máquinas industriais, a forma de saber se a tensão da linha da bobine está bem é segurar a caixa de bobina pela ponta da linha (aprox. 10cm de linha) depois de introduzir corretamente a bobina na caixa. Ao suspender assim a caixa da bobina, esta não deve deslizar com o seu peso; no entanto, deve bastar sacudir ligeiramente para o fio começar a sair e a caixa da bobina começar a deslizar para baixo. Há também alguma controvérsia quanto à forma correta de inserir a bobina na caixa; a bobina deve girar em que direção quando puxamos o fio? Alguns manuais dizem no sentido dos ponteiros do relógio, outros dizem no sentido contrário. O meu manual diz no sentido horrário, o que para mim é mais intuitivo pois é a mesma direção que observo na minha máquina doméstica, com a bobina colocada na horizontal. Como tal, com a caixa da bobina com a bobina virada para mim, se puxar o fio a bobina roda no sentido horário.
Adjusting stitch length - Ajuste do comprimento do ponto
EN: There are similarities between the domestic sewing machine stitch length adjustment and the industrial sewing machine stitch length adjustment, yet there are some particularities regarding the industrial sewing machine: the reverse lever and the stitch length dial are intimately connected so when reducing the stitch length, the reverse lever should be lowered while you turn the dial to the left, otherwise you'll be forcing the mechanism. The stitch length on industrial sewing machines should be calibrated in millimeters, so 1 on the dial corresponds to 1mm stitch length, 2 is 2mm and so on. This means that if your dial is set at the 2.5 mark, there should be exactly four stitches in 1cm length of stitching . If there isn't, then the sewing machine dial isn't calibrated. Either you use it like that knowing the error and compensating when selecting the stitch length, or you calibrate it yourself. The easiest way is adjusting the dial by attempts until you get the 4 stitches per cm exactly, next unscrew the dial knob screw, taking the dial knob out and insert the dial back again with the mark aligned with the 2.5 mark; then put the screw back in and tighten it securely.

PT: Os ajustes de comprimento do ponto são muito semelhantes entre as máquinas de costura domésticas e as industriais, no entanto há algumas particularidades em relação ao ajuste nas industriais. A escala do botão de ajuste nas industriais deve estar calibrada em milímetos, como tal quando o botão está em 1, corresponde a um ponto de 1mm, em 2 é 2mm e assim por diante. É fácil deduzir que se o botão estiver nos 2.5, 1cm de pesponto deve conter exatamente 4 pontos. Se isto não acontecer é porque o botão não está bem calibrado e têm duas alternativas: continuam assim e dão o devido "desconto" quando cosem, ou calibram vocês mesmas o botão, que não é difícil: basta ir fazendo tentativas até 4 pontos caberem exatamente em 1cm e com o botão na posição resultante (mais ou menos do que 2.5) desapertam o parafuso que tem no centro do botão e tiram-no. Depois voltam a encaixá-lo mas com a marca alinhada exatamente nos 2.5 e apertam o parafuso no seu lugar.
EN: This is all I wanted to talk about regarding the adjustments on thread feeding mechanism of industrial sewing machines, and I hope you'll find the information useful and interesting. I din't go into much detail regarding the tension unit because this article would become too long. Next article within this series will address the fabric feeding mechanism adjustments! Stay tuned!
---
PT: E é tudo o que queria referir quanto aos ajustes da alimentação das linhas nas máquinas industriais, espero que tenham gostado e achado interessante e útil. Não entrei em detalhe relativamente ao tensor, pois tornaria o artigo demasiado extenso e maçudo,... O próximo artigo nesta série vai ser dedicado aos ajustes na alimentação do tecido (também referida como arrasto simples neste caso específico). Mantenham-se atentos!


No comments:
Post a Comment