EN Summary: After the coat's main modules are completed, it's time to assemble everything together, starting with the sleeves. Read the complete article on tanysewsandknits.blogspot,com and please support this blog by turning off any ad blockers.
---
PT Sumário: Depois de confecionar os módulos principais do casaco, comecei a juntar todas as partes, começando pelas mangas. Leiam o artigo completo em tanysewsandknkits.blogspot.com e por favor apoiem o blogue desativando eventuais bloqueadores de anúncios.
EN: The tailored sleeves have been finished with the buttoned vent and the lining. The sleeve hems were catch-stitched from the inside and the sleeve heads were already stitched with two-row parallel loose long stitches for easing the sleeve cap into the armhole (this was done both on the fabric and the lining sleeves).
The next step is setting in the sleeves (fabric) into the armhole. I start by pinning the sleeves into position, from the armhole side, matching all the notches first (on the sleeve there's a shoulder notch, a underarm seam notch and the front notch). Then I pull the stitches to ease the sleeve cap, distributing the ease as evenly as possible; I insert a pin every inch (approximately), always from the armhole side because I prefer stitching with the armhole side up (I believe it's more precise and also the sewing machine feed dogs will help to evenly distribute the sleeve cap ease and avoid any unwanted gathers). While stitching I'm always careful to remove each pin as the needle gets close.
---
PT: As mangas de alfaiate foram acabadas com a abertura abotoada e o forro. As bainhas da manga foram pregadas no interior com pontos cruzados à mão e as cabeças das mangas foram preparadas com duas filas paralelas de pontos soltos, tanto nas mangas como no seu forro, para depois as embeber nas cavas.
O passo seguinte é pregar as mangas (em tecido) nas cavas do casaco. Começo por prender as mangas às cavas com alfinetes sempre do lado das cavas, primeiro nos piques de aposição (as mangas têm um pique para a costura do ombro, um para a costura debaixo da cava e um outro que marca a frente). Depois puxo as linhas dos pontos soltos de modo a embeber a cabeça das mangas, distribuindo tudo uniformemente, e prendo com alfinetes mais ou menos de 2.5 em 2.5cm. Os alfinetes são colocados pelo lado da cava porque prefiro coser à máquina com este lado para cima (parece-me mais preciso e além do mais, os dentes de arrasto da máquina ajudam a embeber a manga por baixo e evitar pregas indesejadas). Ao coser retiro sempre os alfinetes antes da agulha da máquina lhes passar por cima.


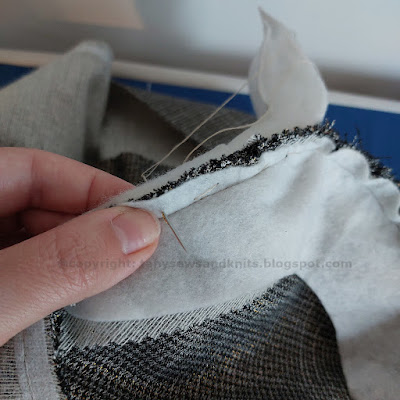
EN: A tailored sleeve will always benefit from extra padding at the sleeve cap to achieve a smoother round effect at the top of the sleeve, so besides interfacing the sleeve cap, I also attach fleece sleeve heads after setting in the sleeve, stitched at the seam allowance close to the armhole seam. There are alternatives, like adding a self-fabric "cigarette" (click here to learn this easy technique). ---
PT: Uma manga de alfaiate fica sempre melhor se tiver um pouco de enchimento extra ao nível da cabeça da manga, por isso, além de entretelar o topo da manga, acrescento uma "cabeça de manga" separada feita de um tecido fofo. Esta peça é cosida na margem de costura da cabeça da manga, mesmo junto à costura. Como alternativa pode também usar-se um "charuto" feito do próprio tecido do casaco (podem aprender esta técnica fácil num post anterior - clicar
aqui).
EN: I simply pin the sleeve head in place inside the sleeve, matching its upper edge with the sleeve's allowance edge, and stitch over it with the armhole side up, removing the pins as I go.
---
PT: Prendo a cabeça da manga com alfinetes por dentro da manga, fazendo coincidir a sua beira superior com a beira da margem de costura da manga, e coso depois à máquina com o lado da cava virado para cima, retirando os alfinetes antes que a agulha os possa atingir.
EN: It's time to provide the shoulder with some structure; this Burda pattern was designed to use a thick shoulder pad; without it, the coat's shoulders will colapse in an unflattering way. These are the shoulder pads that I'm using (thick but very soft and moldable at the same time):
---
PT: Este molde foi concebido para levar chumaços espessos, sem eles os ombros vão colapsar de uma forma pouco favorecedora. Estes são os chumaços que vou usar, que apesar de espessos são também bastante maleáveis e fofos:
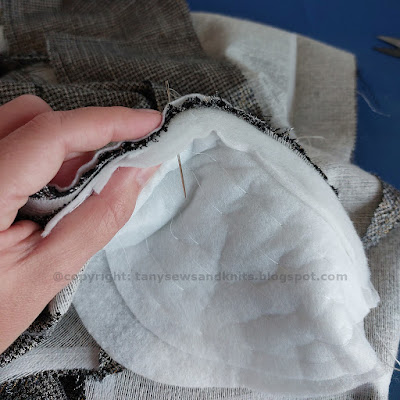
EN: The technique I like best when attaching shoulder pads is tacking their edge to the armhole with long running stitches first, making the pad's edge match the edge of the armhole's seam allowance; when the shoulder pad is well placed, I add a thread bridge at the shoulder seam near the neckline so the shoulder pad gets some room for setting in at the right place. There's a very similar technique demonstrated in one of Angela Wolf's sewing classes on Craftsy.com, the "Tailoring Ready-to-Wear: the jacket". I start the running stitches from the shoulder out to the sides, one side at a time, keeping the shoulder pad more or less in its final rounded shape, while accommodating the armhole seam to it, not the other way around. ---
PT: A técnica que gosto mais de usar ao pregar os chumaços é alinhavar o seu extremo com pontos corridos ao topo da cava, começando desde o ombro para os lados, um lado de cada vez. É importante fazer coincidir a orla do chumaço com a orla do valor de costura da cava e, quando o chumaço se encontra bem preso desta forma na sua posição correta, acrescento uma "ponte de linha" no extremo interior do chumaço, sobre a costura do ombro perto do decote. Esta "ponte de linha" permite ao chumaço mover-se ligeiramente e assentar na posição correta ao usar o casaco. A Angela Wolf demonstra uma técnica muito parecida numa das suas aulas na plataforma Craftsy.com:
"Tailoring Ready-to-Wear: the jacket". Começo os pontos corridos sempre desde o meio do chumaço para os lados, mantendo o chumaço na sua posição final arredondada e acomodando a cava ao chumaço, não o inverso.
EN: Stitching from the center to the side:
---
PT: A coser do meio na direção de um dos lados:
EN: Stitching from the center to the other side:
---
PT: Agora a coser do meio para o outro lado:
EN: Finally adding the thread bridge at the shoulder seam near the neckline, after checking the right position of the shoulder pad on the dressform:
---
PT: No final, depois de verificar sobre o manequim de costura que o chumaço está bem colocado, é só coser a "ponte de linha" na costura do ombro perto do decote:
EN: Here's how the armhole with the sleeve attached looks like seen from the front:
---
PT: Aqui está a cava com a manga pregada vista de frente:
EN: Here's how the armhole with the sleeve attached looks like seen from the back:
---
PT: Aqui está a cava com a manga pregada vista de costas:
EN: This crucial step is now completed; next I will attach the inner body shell to the front/lapel edges of the coat and the collar to the neckline. Stay tuned for more updates soon!
---
PT: Este passo crucial está acabado e a seguir vou coser a parte interior do corpo à parte exterior ao longo das orlas da frente e lapelas, e na continuação pregar a gola. Mantenham-se atentos porque em breve terei atualizações!


No comments:
Post a Comment