EN Summary: This article describes the remaining inside finishing procedures before the project is completed. If you like the contents of this blog, the best way to support it is by disabling any ad blockers. Thank you!
---
PT Sumário: Este artigo descreve os acabamentos finais no interior do casaco, antes de dar o projeto como concluído. Se gostas do conteúdo deste blogue, a melhor forma de o apoiar é desativar os bloqueadores de anúncios no browser. Muito obrigada!
EN: At this stage in the construction, all the modules of the coat are assembled together (outer body shell, inner body shell, sleeves and collar) except the lining in the sleeves, which is not yet sewn to the lining armholes and the facings, which are not yet tacked in place. The front bottom corners are finished, yet the remaining coat's hem isn't finished yet; the lining isn't stitched around the back vent either.
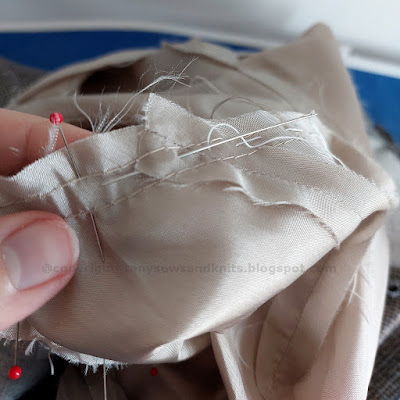
So what's the first thing to get done while the lining and the facings are hanging free inside the coat? The answer is stitching the lining sleeves to the lining armholes because this operation needs a lot of maneuvering space and it wouldn't be as easy to do this with the facings already tacked down in place. I start by reaching in between lining and coat and pinning the lining sleeves to the lining armholes, taking care that the lining sleeves are not twisted and all the notches match. The lining sleeve cap should be eased to the armhole with the help of the previously stitched double-row of long loose stitches.
---
PT: Nesta fase da confeção, todos os módulos do casaco já estão montados em conjunto (corpo exterior, corpo interior, mangas e gola) exceto as mangas em forro, que ainda não foram cosidas às cavas do forro, e as vistas, que ainda não estão completamente fixadas no casaco por dentro. Os cantos inferiores da frente já estão acabados, mas o restante da bainha ainda não; o forro também ainda não está cosido à volta das vistas da abertura atrás.
Então qual é a primeira operação que se deve fazer enquanto o forro ainda não está cosido às bainhas e as vistas ainda não estão fixadas por dentro? A resposta é coser as mangas em forro às cavas do forro, pois esta operação precisa de muita margem de manobra por dentro entre o forro e o casaco e não seria tão fácil de fazer se as vistas e o forro já estivessem fixados no interior. Começo por meter as mãos entre o forro e o casaco por dentro e agarrar as mangas e as cavas em forro, alfinetando-as com cuidado de forma a que todos os piques coincidam e que as mangas não fiquem torcidas. As cabeças das mangas em forro devem ser embebidas na cava com a ajuda da dupla fila de pontos longos e soltos que já tínhamos cosido com antecedência.

EN: It looks messy and it really is; as I stated before, there is a lot of maneuvering around the lining armhole to be able to stitch it by sewing machine. The lining is a very thin fabric and with all the turning and twisting, some pins could be inadvertenly lost inside the coat, which is not good! So the safest way is to hand-baste the armholes to the sleeves with long running stitches, removing the pins as you go.
---
PT: Parece o que realmente é, uma confusão; como referi anteriormente, para coser à máquina à volta das cavas nestas condições é preciso manobrar o casaco virado, e com todo este movimento, sendo o forro um tecido muito fino, pode acontecer que alguns alfinetes se soltem e até se percam no interior do casaco inadvertidamente, o que é muito mau! A forma mais segura é substituir os alfinetes por alinhavos, como se vê (à medida que se cose os pontos corridos à mão, vão-se retirando os alfinetes).
EN: Having the lining sleeves safely basted into the lining armholes also allows to check one final time that the sleeve lining is not twisted by turning the coat into the right side, before stitching by machine:
---
PT: Ter as mangas em forro alinhavadas nas cavas em forro também dá segurança para verificar se as mangas não ficaram torcidas, virando tudo para o direito antes de coser à máquina:
EN: Back to the inside in between the coat and the lining, you'll have to twist and move the entire coat around while stitching, but now there isn't the risk of losing pins in the process:
---
PT: Voltando ao avesso entre o forro e o casaco, vão ter de girar e manobrar o casaco todo enquanto cosem, mas agora já não há o risco de perderem alfinetes durante o processo:
EN: Here's the lining armhole and sleeve neatly sewn together by sewing machine (the basting threads and the loose long stitches have been removed):
---
PT: Aqui têm a cava com a manga do forro cosida à máquina (os alinhavos e os pontos de embeber já foram retirados):
EN: There's still some tacking to do to the lining armhole, so it won't pull the lining when the coat is put on or taken off, but first I need to hand-tack the facing edges in place from the inside (once again needing all the maneuvering space I can get). With the coat well set on a dressform, I hand basted the facings edge through all layers so nothing gets out of place while I reach inside:
---
PT: As cavas do forro ainda têm de ser fixadas às cavas do casaco para evitar que o forro repuxe ao vestir ou despir o casaco, mas antes tenho de prender as orlas das vistas ao casaco por dentro (uma vez mais é bom ter todo o espaço de manobra que for possível). Com o casaco no manequim, alinhavo as vistas no lugar prendendo camada exterior à interior, assim mantendo tudo na posição correta enquanto viro o casaco para prender as vistas pelo avesso:
NOTE: With the facings secured in place by hand-basting, the top buttonhole and the front buttons can be stitched in place.
---
NOTA: Com as vistas fixadas na posição correta com alinhavos já é possível bordar a casa de botão debaixo da gola e pregar os botões na frente.
EN: I then proceed to reach inside the coat lining and catch-stitch all around the front and back neckline facings. This step is optional but I believe the more the inner shell is tacked to the outer shell, the more the coat will feel luxurious and well finished when worn; it will keep its form better, and become more sturdy without any unwanted shifting when moving with the coat on.
---
PT: A seguir volto ao avesso para coser as orlas das vistas ao casaco com pontos cruzados à mão. Este passo é considerado opcional por alguns, mas na minha opinião quanto mais a camada interior estiver presa à exterior, maior será a qualidade do casaco que se sente ao usá-lo, pois manterá melhor a sua forma e as partes não saem do sítio quando nos movimentamos com o casaco vestido.
EN: Next the lining should be fixed to the coat at the underarm and the top of the shoulder, and for this purpose I like to use some sort of thread bridges, to maintain a little room for movement:
---
PT: A seguir fixa-se o forro ao casaco no topo e na base das cavas; para este efeito gosto de fazer umas "elos de linha" ou "pontes de linha" para que haja sempre uma pequena folga de movimento:

EN: The remaining finishing is the hem and the lining around the vent. The industrial approach to sew the hem is leaving an opening on a lining seam which is not apparent (one of the sleeve seams or the center back ease pleat seam if there is one) to be able to turn the entire coat/lining inside out to sew the hem by sewing machine and then catch-stitch it by hand to the coat; the coat is turned back to the right side through the opening, which will be stitched closed in the end. I personally don't like this approach because it wrinkles the whole thing and it's messy to turn everything through a small opening with all the inside structure involved. I always prefer working by reaching inside from a section of the lining hem left unstitched doing this section by section if necessary; when done I stitch the remaining lining opening to the hem with invisible stitches (ladder stitches).
In this case, I also have the vent to go around so I start by building a 1cm (3/8") "ease pleat corner" on both sides of the back lining which are to be attached to the vent facings (see these finished corners in the last photos). I turn the lining edge up, right side to right side and I stitch for 1cm (3/8") leaving 1cm (3/8") hem allowance on top (only the lining is stitched; the drawing of the mitered corner is there only for context). Then this corner is turned to the right side. I hope the following hand drawing is better than words to explain it:
---
PT: O acabamento que falta é coser o forro na bainha e à volta da abertura das costas. A maneira "industrial" de aplicar o forro nestas condições é deixar uma costura no forro aberta (de preferência nas mangas ou no fundo da prega do meio de trás do forro, se esta tiver uma costura), para virar o casaco todo do avesso e coser forro à bainha à máquina, e a bainha à mão ao casaco; depois vira-se o casaco de novo para o direito e cose-se/fecha-se a costura do forro que usámos para virar. Pessoalmente não gosto desta abordagem porque engelha o casaco todo e é muitas vezes complicado virar o casaco de dentro para fora com toda a estrutura, chumaços, etc. Prefiro trabalhar sempre com uma secção da bainha do forro aberta, para meter a mão por dentro e puxar o resto da bainha para coser, mesmo que seja por partes. No fim fecho a abertura, basicamente cosendo o forro à bainha com pontos invisíveis à mão ao longo da secção que restou aberta.
Neste casaco, para complicar, também existe a abertura atrás que é preciso contornar por isso começo por preparar uma prega horizontal de folga com 1cm em cada lado do forro do meio das costas, confecionando um canto nas extremidades do forro que se vão coser às vistas da abertura (podem ver estes cantos terminados nas últimas fotos). Para isso viro o forro para cima 2cm, direito contra direito, e coso 1cm (só o forro é cosido, o canto mitrado que aparece desenhado é só para contextualizar), deixando outro 1cm de margem. Este canto é virado para o direito antes de coser o forro à bainha. Espero que o diagrama abaixo seja melhor do que as palavras para explicar o que fiz:

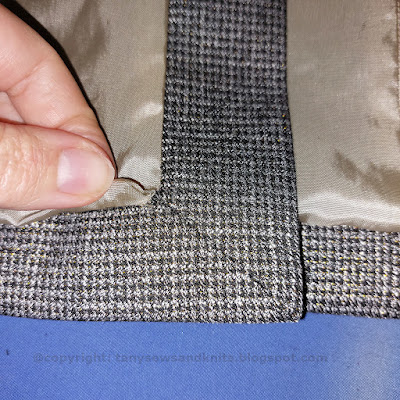
EN: Basically I started from one bottom corner along the hem (stitched lining to hem by sewing machine, then catch-stiched the hem down), then repeated the same process up the vent, leaving the top vent lining to be stitched by hand, then stitched down the vent by sewing machine followed by acth-stitching, then repeated the process again at he hem, stopping near the other front bottom corner. The top of the vent lining and the small remaining unstitched lining at the vent are stitched by hand with small invisible stitches. Here's how it looks when finished:
---
PT: Basicamente comecei numa ponta junto ao canto inferior da frente, cosendo o forro à bainha com a máquina de costura e depois a bainha à mão com contos cruzados; repeti o processo da bainha até ao topo da abertura, deixei o forro sem coser no topo, continuei a repetir o processo do topo da abertura até à bainha, e depois na bainha até quase até ao outro canto da frente (tive de deixar uma parte aberta para poder ir por dentro coser a bainha ao casaco à mão). A última parte do forro no topo da abertura e na bainha foi cosida à mão com pontos invisíveis. Fica assim depois de terminado:
EN: Note that there's also a horizontal ease pleat on the lining above the vent (if there's no ease pleat, the lining could pull at the vent top, for example when sitting down with the coat on, and rip apart):
---
PT: Notem que acima da abertura o forro também forma uma pequena prega horizontal de folga (a folga é necessária para evitar que o forro repuxe o topo da abertura, por exemplo quando nos sentamos com o casaco vestido, e assim evitar que o forro esgace):
EN: Here are the small lining ease pleat corners at each bottom of the vent:
---
PT: Aqui têm os pequenos cantos da prega de folga do forro na bainha em cada lado da abertura:
EN: This is it! After a final steam press, the coat is finished. This week the weather has been rainy and dark so I couldn't take proper photos of the finished coat with natural light; I'll do so as soon as the weather improves.
I hope this series of articles on the construction of this coat have been useful and enlightening... It takes a lot of time and effort to take pictures as I go, edit them and write the accompanying text in English and Portuguese. I really hope you guys appreciate it.
Thank you all for visiting and for the lovely comments!
---
PT: E é isto! Depois de um último assentar a ferro com vapor, o casaco está finalmente pronto. Esta semana tem estado um tempo chuvoso e escuro, e não tenho tido oportunidade de tirar fotos do casaco pronto com luz natural; logo que o tempo o permita, tratarei do assunto.
Espero que esta série de artigos tenha sido útil e esclarecedora... Tirar fotos à medida que costuro, editá-las, escrever os textos em Português e Inglês, são tudo coisas que tomam muito tempo e esforço, por isso espero mesmo que apreciem.
Obrigada por aparecerem e pelos simpáticos comentários!


1 comment:
Thanks again! I certainly appreciate all this info. I'll have to study it, especially the hemming which seems to have been machine stitched. I cannot imagine how much time all the languages translation takes! I have learned so much from your blog! 😊 Heather in Colorado
Post a Comment