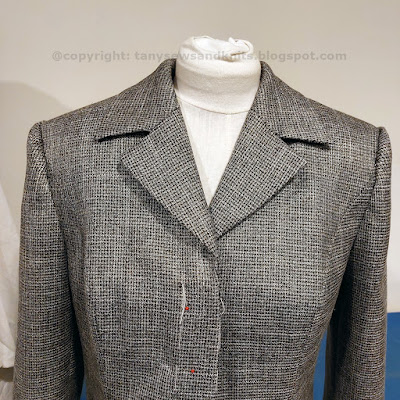
EN Summary: That's a really beautiful notched collar, don't you guys agree? To learn how I achieved this result, keep reading the full article on tanysewsandknits.blogspot.com, and support my work by disabling your browser's ad blocker.
---
PT Sumário: Ficou uma gola de alfaiataria bem bonita, não acham? Para aprenderem como chegar a este resultado, continuem a ler o artigo completo em tanysewsandknits.blogspot.com. Para apoiarem o meu trabalho basta desativar os inibidores de anúncios no navegador (browser).
EN: At this point we have the outer body shell with the sleeves attached (the sleeve lining is still unattached) and the next step is joining the inner body shell, right sides facing with the outer body shell, stitching along the lapels (starting at the collar placement notch) and the front edges right to the bottom hem; the right front hidden placket edge is left unstitched.
---
PT: Nesta fase temos a parte exterior do corpo já com as mangas cosidas (as mangas do forro ainda não estão cosidas nas cavas) e o próximo passo é unir a camada interior do corpo com a parte exterior, direito contra direito. Começa-se a coser no pique de junção da gola, ao longo da lapela e das orlas da frente até à bainha; a orla da carcela escondida não se cose.
EN: After the lapel and front edges are stitched, it's important to grade the seam allowances and clip the lapel corner. The lapels allowance is trimmed on the outer body shell and the front edge allowance is trimmed on the facing side. It makes sense because the lapels are showing the facing side while the edges are showing the main body side when the coat is finished.
---
PT: Depois de cosidas as orlas e lapelas, é importante gradar as margens e aparar os cantos das lapelas. Nas lapelas as margens são aparadas do lado da parte exterior do corpo, enquanto nas orlas da frente é a margem da parte interior do corpo que é aparada. Faz sentido pois quando o casaco estiver terminado, nas lapelas é o lado interior do corpo que fica à vista, enquanto nas orlas da frente é a parte exterior do corpo.
EN: I also under-stitch the front edges and lapels as far as I can reach (the under-stitching is done on the side which isn't visible: the front facings are under-stitched below the lapels, while the lapels are under-stitched on the outer body shell side).
---
PT: Também faço um pesponto de girar ao longo das orlas da frente e lapelas, até onde consigo chegar (o pesponto de girar fica sempre do lado que não é visível, i.e., do lado das vistas ao longo da orla da frente e do lado da parte exterior do corpo nas lapelas).
EN: Before turning everything to the right side, the collar must be attached between the facings and the outer shell at the neckline. The undercollar is stitched to outer shell while the upper collar is stitched to the inner shell (facings). The notches need some skill and practice to get done neatly: the notch points should be stay-stitched and clipped on both outer and inner shells so they work well as pivot points.
---
PT: Antes de virar tudo para o lado direito temos de pregar a gola às vistas e a parte exterior do corpo, ao longo da linha do decote, formando um ângulo com as beiras pequenas. A gola inferior é cosida à parte exterior do corpo e a gola superior é cosida à parte interior (vistas). Os cantos de viragem necessitam alguma habilidade e prática para ficarem perfeitos: eu costumo reforçar estes cantos nas vistas e parte exterior com um pesponto, antes de os golpear. Assim consigo fixá-los com precisão no ângulo da gola e rodá-los sobre esse ângulo.
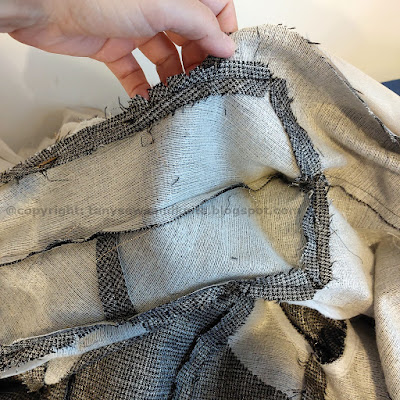
EN: Next the collar seams should be carefully pressed open, with the help of a tailor's ham underneath:
---
PT: A seguir devem-se assentar as costuras abertas com o ferro, com a ajuda de um presunto de alfaiate por baixo:
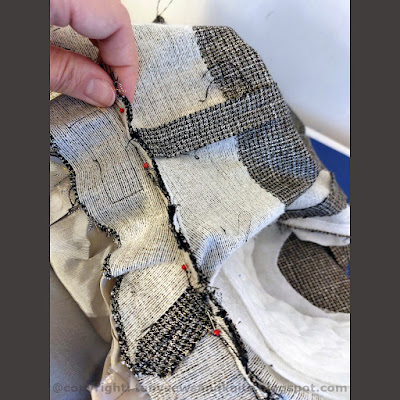
EN: Now the coat can be turned right side out and all the edges/lapels pressed neatly. There's one last step to finishing the collar though: remember it is attached separately to inner and outer shells and it is important that the collar stays secure at the neckline without shifting, so the neckline seams (facings and outer shell) should be fixed together somehow. There are several methods, line backstitching in the ditch both seams together by hand from the right side, but I find that there's a quicker and equally effective technique: stitching the overlapping neckline seam allowances together from the inside. First I pin the seam allowances together as seen below:
---
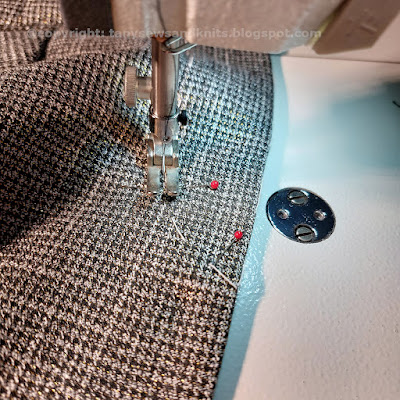
PT: Agora o casaco já pode ser virado para o lado direito para assentar a ferro as orlas da frente e das lapelas. Há ainda um último passo para terminar a gola: lembram-se que a gola foi cosida em separado à camada exterior e interior, certo? É preciso garantir que no decote estas duas costuras coincidem e ficam fixadas uma à outra. Há vários métodos, um dos quais é fazer um ponto atrás à mão pelo direito exatamente sobre as duas costuras, prendendo-as, mas há uma alternativa mais rápida e igualmente eficaz: coser as margens de costura sobrepostas pelo avesso. Primeiro prendo as margens abertas com alfinetes:
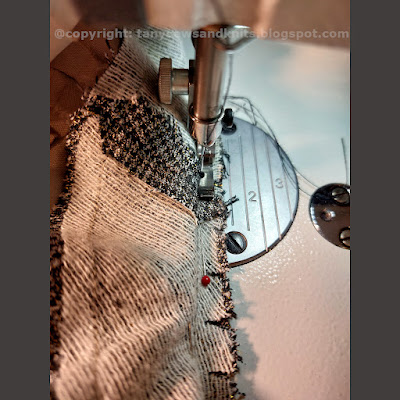
EN: Next, with the help of a zipper presser foot, I stitch them together by machine close to the neckline seam (they can also be handstitched together with a running stitch instead, btw):
---
PT: A seguir, com a ajuda de um calcador para fechos, coso-as uma à outra mesmo junto à costura do decote (em vez de coser à máquina também podemos coser à mão com um ponto corrido):
EN: One more thing is needed to finish up the right front edge: topstitching the hidden button placket:
---
PT: Ainda falta fazer algo para terminar a orla direita da frente: pespontar a carcela dos botões escondidos:
EN: I hope you guys were able to understand how everything has come together this far. There's still a lot to do: embroidering the buttonhole at the top of the hidden placket, working the bottom facing/hem/lining corners, attaching the lining sleeves to the lining, tacking the facings, hem and the lining from the inside, working the lining around the back vent and hem, and stitching in the buttons. Until next time, Happy Sewing to all!
---
PT: Espero que até aqui tenham percebido como todas as peças se juntaram. Ainda há muito que fazer: bordar a casa de botão que fica no topo da carcela escondida, trabalhar os cantos de junção inferiores (bainha/vistas/forro), pregar as mangas em forro ao forro, fixar as vistas, bainhas e forro ao casaco por dentro, fixar o forro à volta da abertura atrás e também pregar os botões. Até à próxima e boas costuras!




No comments:
Post a Comment