English (uncheck the other box and check this one)
Antes de mais MUITO OBRIGADA pelos vossos comentários e feedback positivo quanto à jaqueta feita com o molde do Paco! Depois de um projecto demorado e minucioso, se puder gosto de descomprimir, aproveitando para dar vazão a outros projectos mais rápidos e simples, os quais nem sempre tenho tempo de mostrar. Tenho, por exemplo, explorado dois moldes simples que resultaram tão bem que utilizei-os mais do que uma vez. Já viram o conjunto azul noite no meu blogue de guarda-roupa; para o fazer usei malha estável acetinada azul escura e os seguintes moldes:
BurdaStyle Fevereiro 2010 mod112A:

BurdaStyle Agosto 2010 mod123:

O resultado foi um conjunto muito prático, que tanto serve para usar em casa como para sair, com outras peças sobrepostas:

Depois de concluir a jaqueta do Paco peguei nos moldes e fiz outro conjunto, desta vez em preto e com as mangas do top em napa:

As calças assentam-me tão bem (não é fácil encontrar nas lojas umas calças que me assentem na perfeição), que resolvi pegar novamente nos moldes da calça e fiz mais umas de napa castanha (já me viram a usá-las aqui):


E por fim fiz também umas pretas, mas para variar, em vez do fecho ao lado, usei um fecho exposto na costura da frente, modificando também o cós:

Nesta última foto podem ver um top branco, para esse não utilizei qualquer molde; podem vê-lo novamente junto com as calças pretas:


Podem ver-me a usar o top branco aqui, junto com a saia de napa castanha que mostro a seguir:


Esta saia foi confeccionada utilizando o seguinte molde, apenas encurtando-o no comprimento cerca de 23cm:
BurdaStyle Agosto de 2010, mod128

Outra coisa que fiz com o tecido de folhinhos (desta vez em negro) foi uma saia muito simples, apenas com uma costura atrás:

O elástico compra-se feito, na medida da cintura menos um pouco. O tecido aos folhos tem 150cm de largura, compra-se na altura necessária e ajusta-se ao avesso do elástico através de pequenas pregas igualmente distribuídas. Para coser basta passar um ponto de ziguezague pelo direito do elástico. Para terminar só é preciso coser a costura de trás, fechando a saia. Não é necessário fazer bainhas nem outros acabamentos. Podem ver-me usar a saia aqui.

Este é o avesso:

Também me falta falar de uma capa em azul-escuro, que podem ver aqui, mas essa vai ser explicada à parte a seguir. Fiquem bem!
BurdaStyle Fevereiro 2010 mod112A:

BurdaStyle Agosto 2010 mod123:

O resultado foi um conjunto muito prático, que tanto serve para usar em casa como para sair, com outras peças sobrepostas:

Depois de concluir a jaqueta do Paco peguei nos moldes e fiz outro conjunto, desta vez em preto e com as mangas do top em napa:

As calças assentam-me tão bem (não é fácil encontrar nas lojas umas calças que me assentem na perfeição), que resolvi pegar novamente nos moldes da calça e fiz mais umas de napa castanha (já me viram a usá-las aqui):


E por fim fiz também umas pretas, mas para variar, em vez do fecho ao lado, usei um fecho exposto na costura da frente, modificando também o cós:

Nesta última foto podem ver um top branco, para esse não utilizei qualquer molde; podem vê-lo novamente junto com as calças pretas:


Podem ver-me a usar o top branco aqui, junto com a saia de napa castanha que mostro a seguir:


Esta saia foi confeccionada utilizando o seguinte molde, apenas encurtando-o no comprimento cerca de 23cm:
BurdaStyle Agosto de 2010, mod128

Outra coisa que fiz com o tecido de folhinhos (desta vez em negro) foi uma saia muito simples, apenas com uma costura atrás:
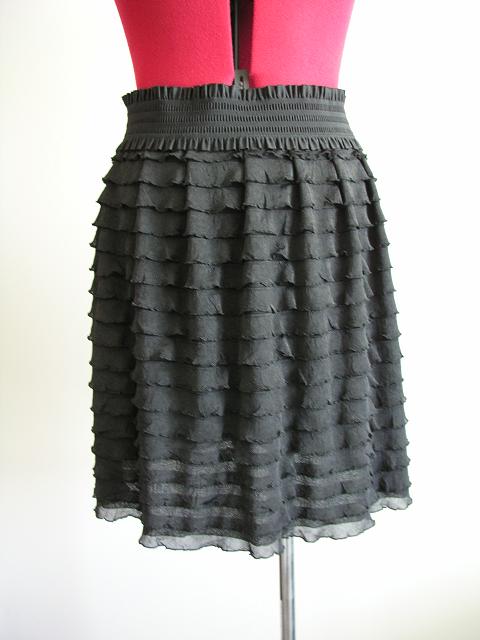
O elástico compra-se feito, na medida da cintura menos um pouco. O tecido aos folhos tem 150cm de largura, compra-se na altura necessária e ajusta-se ao avesso do elástico através de pequenas pregas igualmente distribuídas. Para coser basta passar um ponto de ziguezague pelo direito do elástico. Para terminar só é preciso coser a costura de trás, fechando a saia. Não é necessário fazer bainhas nem outros acabamentos. Podem ver-me usar a saia aqui.

Este é o avesso:

Também me falta falar de uma capa em azul-escuro, que podem ver aqui, mas essa vai ser explicada à parte a seguir. Fiquem bem!
Before proceeding with today’s subject I want to thank your comments and positive feedback on the jacket I made using Paco’s pattern, it meant a lot to Paco and me knowing that our work is so highly appreciated! After completing a big project that demanded a lot of work and attention to detail, I like to decompress making a few “quickies”, simple and fast projects. I don’t always have time to review everything I make and I tend to focus the attention on the more elaborate garments, trying to show the step by step procedures when can afford the time. As for less time consuming projects, I’ve been reusing some patterns that really worked out well IMO. I’ve shown you the midnight blue set here; to make it I used glossy stable knit and the following patterns:
BurdaStyle Feb2010 mod102A:
BurdaStyle Aug 2010 mod123:
The end result was a very comfortable and practical set that can be worn as loungewear or layered with other pieces to produce a more refined look:
Then I got into Paco’s jacket and when I was finished it inspired me to produce one more set using the same patterns and the same fabric, only in black. The top’s sleeves were made of black pleather:
I tell you guys, these pants fit me so perfectly that I just couldn’t put this pattern aside; I had to make some brown pleather skinny pants too (I’m wearing them here):
Ok, so I really love the fit and I could use some black pleather pants too… But I could make them a little different for a change, right? So instead of the side lapped zipper I opted for a front exposed zipper, altering the waistband accordingly:
In the previous photo you can see a white top; I didn’t need a pattern for this one, just some pretty frilled jersey and some plain jersey in the same color for the sleeves:
You can see me wearing the white top here, together with this brown pleather skirt:
This skirt was made using the following pattern, shortened by approximately 9 inches.
BurdaStyle Agosto de 2010, mod128:
Using the same frilled Jersey, only this time in black, I also made a quick skirt, it has only one seam at the back:
The waist elastic is special purpose to be exposed like this. I bought the desired lengh of frilled jersey, made a few pleats dividing the fabric equally and pinned it to the wrong side of the elastic; then I zigzagged over the right side of the elastic, securing the fabric underneath. The last thing to do was to stitch the back seam on both elastic and fabric. There’s no need of hemming or any other seam treatment. You can see me wearing it here.
This is the wrong side of the waistband:
I also made the midnight blue cape, but it will be the subject of a separate post; see you guys soon!
BurdaStyle Feb2010 mod102A:
BurdaStyle Aug 2010 mod123:
The end result was a very comfortable and practical set that can be worn as loungewear or layered with other pieces to produce a more refined look:
Then I got into Paco’s jacket and when I was finished it inspired me to produce one more set using the same patterns and the same fabric, only in black. The top’s sleeves were made of black pleather:
I tell you guys, these pants fit me so perfectly that I just couldn’t put this pattern aside; I had to make some brown pleather skinny pants too (I’m wearing them here):
Ok, so I really love the fit and I could use some black pleather pants too… But I could make them a little different for a change, right? So instead of the side lapped zipper I opted for a front exposed zipper, altering the waistband accordingly:
In the previous photo you can see a white top; I didn’t need a pattern for this one, just some pretty frilled jersey and some plain jersey in the same color for the sleeves:
You can see me wearing the white top here, together with this brown pleather skirt:
This skirt was made using the following pattern, shortened by approximately 9 inches.
BurdaStyle Agosto de 2010, mod128:
Using the same frilled Jersey, only this time in black, I also made a quick skirt, it has only one seam at the back:
The waist elastic is special purpose to be exposed like this. I bought the desired lengh of frilled jersey, made a few pleats dividing the fabric equally and pinned it to the wrong side of the elastic; then I zigzagged over the right side of the elastic, securing the fabric underneath. The last thing to do was to stitch the back seam on both elastic and fabric. There’s no need of hemming or any other seam treatment. You can see me wearing it here.
This is the wrong side of the waistband:
I also made the midnight blue cape, but it will be the subject of a separate post; see you guys soon!


