EN Summary: In this article I am introducing the blazer, more specifically how I created a light inner structure. I'm also listing some simple alterations that I've made to the pattern. Keep reading the full article, originally published on tanysewsandknits.blogspot.com.
---
PT Sumário: Neste artigo vou apresentar-vos o blazer, em particular como lhe criei uma estrutura/reforço interior leve. Também vou falar de algumas alterações simples que fiz ao molde. Continuem a ler o artigo completo, orininalmente publicado em tanysewsandknits.blogspot.com.
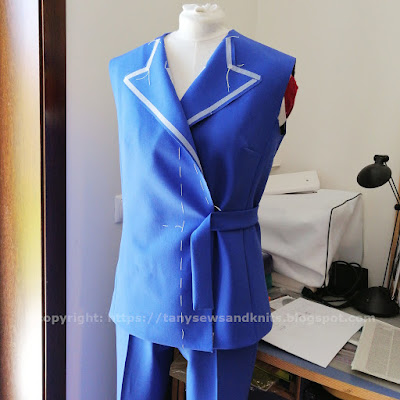
EN: This pattern is featured in the November 2017 BurdaStyle magazine (together with the pants I've made earlier) and it's a semi-belted fully lined blazer with cross-over front and notched collar, side panels and two-piece tailored sleeves with buttoned vents. The "semi-belt" is caught in the back side panel seam and adjusted with two metallic D rings applied to the right front edge at waist level. I love the design and in my opinion it only lacks pockets, an easy enough fix to be made. I cut size 40.
---
PT: Este molde vem na revista BurdaStyle de Novembro de 2017 (juntamente com as calças que fiz anteriormente) e trata-se de um blazer forrado de trespasse que fecha na frente com um cinto parcial fixado na costura lateral atrás e ajustado por duas argolas tipo D aplicadas na orla da frente direita ao nível da cintura. Tem gola de bandas tipo alfaiate, paineis laterais e mangas de duas folhas estilo alfaiate com aberturas abotoadas nos punhos. Gosto bastante do modelo e para ser perfeito só lhe faltam os bolsos (uma questão com fácil resolução). Cortei o tamanho 40.
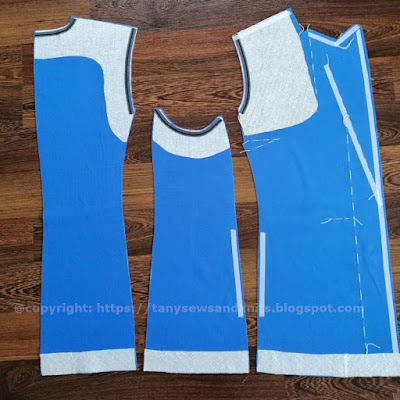
EN: Regarding the inner structure of this blazer, Burdastyle instructions mention interfacing the facings, hem allowances, all collar pieces, armholes and sleeve vents; usually it would also mention interfacing the entire front, but in this case I believe it's not desired or necessary because there are no buttonholes, plus the blazer is belted so there's no need for a strong inner structure to hold its form. The inner structure depends on the fabric, of course, and if the fabric in question was too soft, I would probably interface it all with light knit interfacing, but that is not the case with my blue fabric. I did however improved the light structure by adding the fusible tapes and the chest shield. Notice I taped the front and collar edges, along with the roll line. I've also predicted in-seam pockets on the front side panel seam so I taped those too. The neckline and armholes were further reinforced with fusible tape which has a center chainstitch (specific for reinforcing curved seams), the black tape in the photos. The chest shield was cut on the bias and the shoulder seam was taped on top of the shield to further stabilize it.
---
PT: Quanto aos reforços deste blazer, as instruções da revista Burdastyle mencionam entretelar as vistas, todas as peças da gola, cavas, decote, margens das bainhas e guarnições das aberturas das mangas; normalmente também indicaria entretelar as frentes integralmente, mas neste caso acredito que nem é necessário ou desejável pois o blazer não leva casas de botão na frente e além do mais é para ser usado com o cinto apertado, ou seja, as frentes têm de ser leves e maleáveis para um bom caimento. Como é óbvio a escolha dos reforços depende sempre da escolha de tecido e se este fosse muito fino todas as peças deveriam ser entreteladas com entretela termo-colante fina, de malha. Não é o caso do meu tecido azul, por isso não entretelei as frentes integralmente e segui as recomendações, à parte de adicionar reforços adiconais com fita termo-colante e também um escudo de peito ao nível do ombro. Notem que as orlas da frente e a linha de dobra da lapela/banda levam fita para orlas. Também resolvi acrescentar bolsos metidos na costura da frente com o painel lateral, pelo que apliquei fita aí também. A linha do decote e das cavas levaram fita vieseline especial para costuras crurvas (tem um ponto-cadeia para reforço adicional), em preto para poderem diferenciar nas fotos. O escudo de peito foi cortado em viés e a linha do ombro foi estabilizada por cima da entretela também com fita para orlas.
EN: I did some modifications to the cut of the collar pieces. The pattern includes separate upper and under collar pieces, along with the collar stand; the difference between upper and under collar is that the upper collar is slightly bigger to accommodate the roll of the cloth. Both collar pieces are shown in the cutting layout cut on the fold. I prefer the under collar to be cut and interfaced on the bias, with a center seam instead. I find it improves greatly the shape of the finished collar, so that's what I did. All collar pieces are shown in the next photo, interfaced side up:
---
PT: Alterei um pouco o corte das peças da gola. O molde inclui peças diferentes para a parte de cima e parte de baixo da gola ( a parte de cima é ligeirmanete maior para acomodar a dobra do tecido na gola), mas ambas as partes são mostradas no plano de corte cortadas na dobra do tecido. Eu prefiro que a peça inferior da gola seja cortada em viés e com uma costura central no meui; acredito que a gola tem um caimento mais perfeito assim. Abaixo podem ver todas as peças da gola, com o lado entretelado para cima:
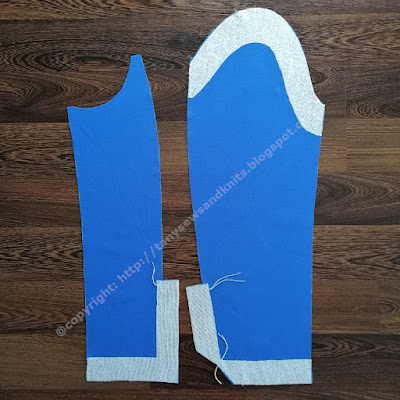
EN: I also interfaced the sleeve caps as shown; it makes easing the sleeve cap into the armhole much easier, producing a neater result with less apparent gathers. Additionally I modified the cutting of the sleeves (the hem allowances and vents) to be able to obtain a mitered corner on the upper sleeve vent. I used what I've learned from DP Studio's pattern making method and blazer patterns to cut the sleeves and the sleeve lining in such way that I could assemble it all by machine. I was also planning to leave the sleeve vent open without buttons, as featured in DP Studio's "Louise vest" Le801.
---
PT: Também entretelei as cabeças das mangas como mostrado abaixo; na minha opinião este passo torna o processo de embeber a cabeça das mangas na cava mais fácil e reduz aqueles franzidos indesejáveis que por vezes se obtêm. Adicionalmente também modifiquei o corte das margens e guarnições da abertura da manga para depois confecionar um canto mitrado na esquina da parte superior da manga. Usei o que aprendi com o método de corte DP Studio e com os seus moldes de blazer também para cortar o forro das mangas de tal maneira que depois possa coser tudo à máquina ao forrar o blazer. Tal como no blazer Louise (Le801), o plano é deixar a abertura da manga sem botões.
EN: I am using industrial soft tailoring methods to sew this jacket (the fabric and the intended result aren't exactly compatible with traditional tailoring methods). I cut all pieces with 3/8" seam allowances and 1"5/8 hem allowances (chalk marked on the fabric because Burdastyle patterns don't include allowances). The planning, tracing, cutting, interfacing and marking of all pieces (not forgetting the trial model or muslin which precedes it all, if considered necessary) - the so called prep work - are the most time-consuming steps of the sewing process; if all has been done precisely and correctly, the construction process goes on easily and swiftly afterwards.
NOTE: I published an inspirational article on blue pants suits, over at Tany et La Mode, so you guys can check it out if desired. Thank you all for dropping by!
---
PT: Neste projeto estou a usar métodos industriais de alfaiataria moderna (o tecido e o resultado pretendido não são exatamente compatíveis com métodos tradicionais). Cortei todas as partes do blazer com 1cm de margem de costura e 4cm de margens de bainha, marcadas no tecido com giz, pois os moldes Burdastyle não incluem margens nem bainhas. O planeamento, traçado do molde, o corte, aplicação de reforços e marcações (para não mencionar a confeção de um modelo de prova que precede tudo isto, se necessário) - o chamado trabalho preparatório - é de facto o que toma mais tempo no processo de confeção. Se tudo tiver sido feito corretamente e com precisão, a costura propriamente dita desenrola-se rapidamente e sem problemas.
NOTA: No Tany et La Mode escrevi um artigo inspiracional sobre fatos azuis, que podem ir espreitar se quiserem! Obrigada por aparecerem e pelo apoio!


2 comments:
As always, GREAT prep work & beautiful results!!!
Thank you for sharing with us how you achieve such beautiful results!
Post a Comment