
EN Summary: Resuming the construction of DP Studio Le302a, the next step after completing the slanted hip pockets on each front panels is inserting the front-fly zipper, finishing the front for assembly. Join me in the fully illustrated tutorial.
---
PT Sumário: A seguir à confeção dos bolsos na lateral das frentes das calças DP Studio Le302a, a fase seguinte é a aplicação do fecho na braguilha, terminando assim as frentes. Juntem-se a mim em mais este passo-a-passo completamente ilustrado.
EN: Some of the preparatory steps were shown in the previous post (front-fly extensions should be interfaced and raw edges finished/overcasted); I also like to thread trace the center front line on both fronts as a reference (the advantage of the thread tracing is being visible on both right side and wrong side of the piece). The front-fly facing piece is also interfaced and folded length-wise; then its raw edges should also be finished/overcasted. I'm using a 7" zipper according to pattern specifications so it should fit right in.
---
PT: Alguns dos passos preparatórios já foram mostrados no post anterior (entretela das extensões da braguilha e acabamento das orlas); também gosto de marcar com alinhavos a linha do meio-da frente para referência durante a montagem do fecho (a vantagem dos alinhavos é que são visíveis tanto do direto como do avesso). A vista da braguilha também deve ser entretelada e dobrada ao meio no sentido do comprimento; depois as orlas devem ser acabadas (menos a dobra). Estou a usar um fecho de 18cm, de acordo com as especificações do molde, por isso deve encaixar sem qualquer ajuste.

EN: The front crotch should be stitched prior to the zipper instalation, holding the two fronts together below the zip insertion. The zipper should be pinned to the front-fly facing as shown bellow; the zipper is right side up with the zipper teeth at 3/4" distance from the folded edge of the facing; the top zipper ends are at a little more than 3/8" from the facing top edge (because in this case, the top seam allowance is 3/8"). This facing and zipper are to be attached to the left front as worn for women and this piece should have a line marked along the front-fly extension at 3/8" distance from the center front line. I did the marking with chalk so you can see which line is which:
---
PT: O gancho das duas frentes deve ser cosido antes de aplicar o fecho, unindo as fuas frentes. O fecho deve ser preso (com alfinetes ou alinhavos) à vista da braguilha como se segue: o fecho fica virado para cima sobre a vista, com os dentes a uma distância de 2cm da orla dobrada; a trava superior do fecho deve ficar a um pouco mais de 1cm da orla superior da vista (porque neste caso a margem de costura é 1cm). A vista com o fecho pegado vai ser aplicada na frente esquerda (lado esquerdo quando se veste), porque se trata de uma calça feminina; na frente esquerda marca-se uma linha na extensão da braguilha a 1cm da linha do meio da frente (marquei a giz para se ver a diferença):

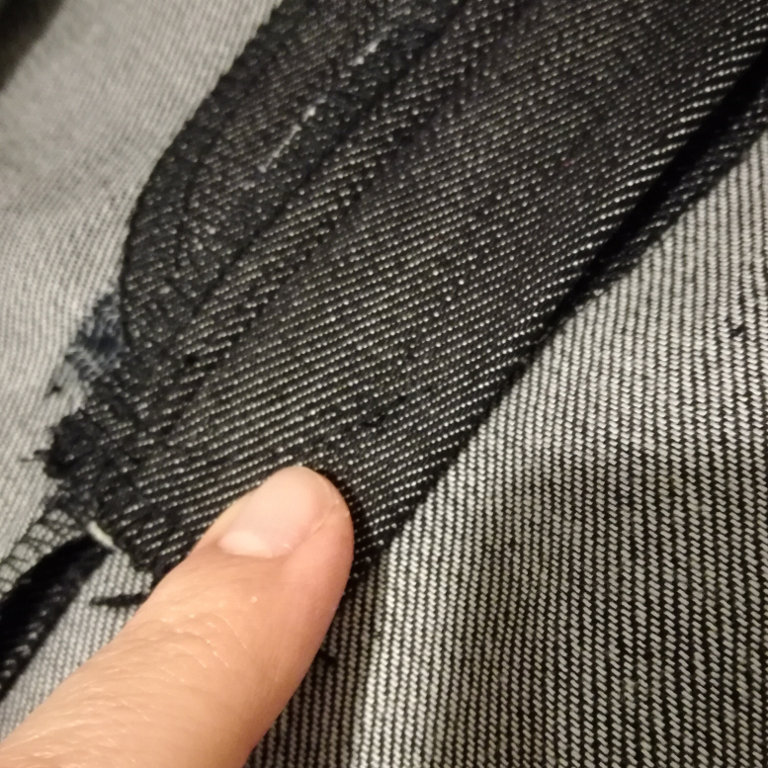
EN: The next step is flipping the facing and placing it on top of the left front (right side), aligning both top edges and pinning or basting it in place; the following stitching line should match the chalk line, holding the zipper tape and the facing to the front-fly extension. The zipper teeth can be felt as you pass your fingers over the facing and they should be next to the chalk mark, to its right:
---
PT: O próximo passo é virar a vista com o zipper para cima do lado direito da extensão da braguilha, prendendo tudo com alfinetes, fazendo coincidir os dentes do fecho mesmo ao lado direito da linha marcada com giz (podem levantar a vista/fecho e ir alinhando à medida que alfinetam). O objectivo é que a próxima costura passe sobre a linha marcada com giz, prendendo a fita do fecho junto aos seus dentes.

EN: Use a zipper foot to stitch down the facing, as the zipper tape is sandwiched in between the front-fly extension and the facing; if you stitch next to the zipper teeth inside (to the left of the zipper foot), the stitching should match the chalked line:
---
PT: Usem um calcador para fechos para coser a vista à extensão da braguilha, prendendo a fita do fecho no meio das duas; se coserem mesmo junto aos denets do fecho (que se sentem por baixo da vista, à esquerda co calcador), a costura deve coincidir com a linha marcada a giz:

EN: Then flip the facing around; the front-fly extension gets folded back underneath; top-stitch the previous seam, holding all thickness. The zipper is now positioned at 3/8" from the center front (thread-traced line), to the inside so it gets hidden by the right front of the pants later:
---
PT: Gira-se a vista para fora, e a extensão da braguilha para dentro por baixo; passa-se um pesponto junto ao fecho, prendendo todas as camadas. O fecho fica assim posicionado a 1cm além do meio da frente (marcado com alinhavos), para depois ficar escondido pela parte da frente direita:

EN: To finish the right front-fly facing both center lines should be matched; close the zip first; in this case I pinned both thread-traced lines together on the right side of the pants:
---
PT: Para fazer o acabamento da parte direita da braguilha, os centros da frente direito e esquerdo devem posicionar-se coincidentes; primeiro fechar o fecho; depois alinhei as duas linhas alihavadas e prendi com alfinetes:

EN: Next the other zipper tape (which hasn't been stitched yet) should be stitched to the right front-fly extension alone (not catching the front); hold it together with the front-fly extension and move the right front out of the way to the left, as seen in the following photos:
---
PT: Em seguida a fita do fecho que ainda não tinha sido cozida deve ser cosida à extensão da braguilha direita (não prendendo a frente; segurar extensão e fita juntas e mover a frente direita para debaixo do trabalho como se vê nas fotos:

EN: Stitch both layers together right next to the zipper teeth using a zipper foot:
---
PT: Coser as duas camadas rente aos dentes do fecho, usando o calcador para fechos:

EN: Now it's time to top-stitch the right front (put the facing out of the way to the right, underneath!). I like to chalk trace using a ruler and a french curve to get an accurate line; the stitching line should be distanced from the center fold while still catching the right front-fly extension underneath (not the facing!):
---
PT: Agora pode-se passar o pesponto na frente direita (colocar a vista fora do caminho para a direita por baixo). Gosto de marcar esta linha a giz com a ajuda de uma régua e de um escantilhão, para ficar bem certa. A distância ao centro da frente deve ser tal que ainda apanhe a extensão da braguilha direita por baixo (a vista não!):

EN: As you can see, the facing is not caught under with the top-stitching (the bottom top-stitching around the curve can catch the facing though; for this to happen the top-stitching is done in two steps: first the straight section and then the curved section with the facing in place):
---
PT: Como podem verificar, a vista não fica presa no pesponto (no entanto a parte inferior do pesponto, na curva, pode apanhar a vista ajudando a manter a vista no lugar; neste caso o pesponto é realizado em dois passos, primeiro a parte superior e depois a curva inferior, já com a vista no lugar):

EN: Besides the top-stitching, and because the bottom of the front-fly opening is subject to stress, I also stitch two tacks (narrow/short zigzag stitch), holding the facing in place:
---
PT: Além do pesponto, a parte de baixo da braguilha deve ser reforçada com uma ou duas "moscas" (ponto ziguezague estreito e curto), pois é um ponto sujeito ao stress de vestir e despir as calças:
EN: Here is the finished front-fly zipper opening, which concludes the front portion of the pants! Next I will address the back of the pants, namely the single-welt pocket on the right back as worn.
---
PT: Aqui têm a braguilha terminada, o que concluí a confeção da frente das calças! A seguir irei mostrar os detalhes de confeção da parte de trás, nomeadamente o bolso de uma pestana posicionado na parte direita (ao usar).

EN: I take this chance to wish Couture et Tricot's followers/subscribers, fellow sewists and friends a MERRY CHRISTMAS! Thank you all for being on that side! xoxo
---
PT: Aproveito a deixa para desejar a todos os seguidores/subscritores, companheiros da costura e amigos do Couture et Tricot, um FELIZ NATAL! Obrigada a todos por estarem desse lado! xoxo


2 comments:
Your pictures & explanations are always excellently detailed & so clear. You do the fly a little different to my normal procedure, so I will try your method next time! I LOVE reading your blog & have learned a lot, so please continue to inspire us all! I wish you & yours a wonderful Christmas with many of God's blessings for 2018.
Thanks, Rosalind. I also so the fly slightly differently, but I thought I should try the method suggested in the pattern instructions for a change,... The results were quite good, so I will probably stick to this method!
Post a Comment