EN Summary: Today I'm reviewing a lingerie set that I've made, using a Bra Making Kit specifically for Simplicity 8229 Madalynne wired bra. I've made a test bra first, after applying some alterations to the pattern that I knew I'd need, and then tweaked the pattern a little further so it would fit me better on the cups. This is a long picture heavy post, so grab yourself a cup of tee and keep reading!
---
PT Sumário: Hoje vou escrever sobre um conjunto de lingerie que fiz, usando um kit para soutien especifico para o molde Simplicity 8229 (Soutien com aro da Madalynne). Depois de fazer algumas alterações que sabia à partida que ia necessitar, confecionei um soutien de teste, que me permitiu melhorar (customizar) o molde ainda mais para me assentar melhor nas copas. Este artigo é longo e com muitas fotos, por isso preparem uma chávena de chá e disfrutem!
EN: The pattern, notions and initial alterations: The Simplicity 8229 is a lingerie pattern for a vertical seam wired cup full band bra, originally lined with stretch mesh or Powernet, and a pair of simple classic briefs to match. You'll need at least 8" wide stretch lace (at least for the bigger sizes), Powernet for the back band, bra lining (stretch mesh or powernet; for bigger cup sizes use sheer cup lining or 15Den instead), one 3x3 hook and eye for bras, bottom band picot edge plush elastic (I'd recommend 1/2" or 3/4" wide), narrower picot edge plush elastic for the upper band (typically 3/8" wide; get additional length for the panties), narrow elastic or clear elastic for stabilizing the cup neckline if desired/needed, strap elastic and one pair of sliders and rings to match the strap elastic. You'll also need a pair of underwires to mach your cup size, and wire channeling. Other materials are the Stretch needle size 75/11 (my favorite for lingerie sewing), Polyester thread in matching colors (my favorite is Guttermann Mara 120, thinner than regular thread) and non-permanent spray adhesive (optional but very useful to line the bra). For the panties, besides the extra 3/8" plush back picot edge elastic, you'll need lycra or any other knit with good stretch and recovery. I bought a BraMaking kit from BWear.se (click here) which includes the lace, Powernet, 15Den lining and all the elastics, wire channeling and findings needed for the bra, excluding the underwires which have to be purchased separately. The lycra for the briefs is not included in the kit.
---
PT: O molde, aviamentos e alterações iniciais: O Simplicity 8229 é um molde para um conjunto de lingerie constituido por um soutien de cobertura total vom aros e banda inteiriça, com copas de costura vertical, no original forrado com mesh ou Powernet, e um par de "cuecas" de cintura alta (em portugal, cueca é o mesmo que calcinha no Brasil, tá?). Vão precisar de renda elástica com mínimo 20cm de largura (pelo menos para os tamanhos maiores), Powernet para a banda atrás, forro de soutien (no original é usada Powernet ou mesh, mas com copas maiores há a necessidade de um suporte mais forte e então podemos usar forro tricô 15Den fininho (tem pouca ou nenhuma elasticidade e é praticamente transparente), um fecho de colchetes para soutien com 3x3 colchetes, elástico especial para soutiens (tem um lado "fofo" para ficar em contato com a pele) com cerca de 1,3cm de largura para o cós do soutien, elástico de soutiens de 1cm de largura para cavas e parte superior da banda (têm de ter mais deste elástico se quiserem fazer as cuecas do conjunto), elástico de silicone ou elástico de 4mm para estabilizar o decote das copas (opcional, mas deve usar-se em copas grandes, acima de B), elástico firme para as alças e um par de argolas e passadores da largura do elástico das alças. Também vão precisar de aros e "manga/canal para aros". Se quiserem fazer as cuecas vão precisar de lycra ou outra malha com bastante elasticidade e elástico adicional de 1cm. Outros materiais necessários são as agulhas Stretch 75/11 (as minhas favoritas para coser lingerie), linha de poliéster (a minha favorita é a Mara 120, mais fina que a linha normal) e cola em spray não-permanete (opcional mas muito útil para unir o forro às peças antes de as coser). Comprei um kit para fazer o soutien de BWear.se (aqui) que vem com a renda, Powernet, forro tricot, elásticos, manga para aros e todas as miudezas necessárias para o soutien, exceto os aros, que devem ser comprados separadamente. A lycra e o elástico para as cuecas foram também comprados à parte.


EN: For any lingerie pattern, it's better to trace the pattern on oak tag, or trace it on pattern paper and glue it on oak tag, then cut around the cutting lines. It makes the process of transferring it to the lingerie fabrics much easier because you can use pattern weights and a rotary cutter or trace it on the fabric using a chalk wheel/very sharp shalk pencil and then scissors. I also prefer a single layer cutting layout. Bellow are the pattern pieces for the bra; based on my measurements I would have cut the 36C, but by comparing the pattern with my Pin-up Girls full band classic bra (customized to my size), and after reading other reviews which stated that the pattern runs small, I traced the 38D instead. I also narrowed the bridge by 1/4" to match the bridge width of the classic band bra, which I know works best for me.
---
PT: Para qualquer molde de lingerie, é melhor traçá-lo em cartolina ou traçá-lo em papel e depois colar em cartolina; os moldes rígidos facilitam bastante o traçado depois nos tecidos, pois pode-se usar pesos e um x-ato rotativo, ou giz afiado e depois cortar os tecidos com a tesoura. Também prefiro cortar com o tecido simples (não dobrado). Na foto seguinte podem ver as peças do molde. Baseada nas minhas medidas teria cortado o 36C, mas como o meu soutien não será tão elástico (devido ao forro estável), resolvi comparar com o molde Pin-up Girls que já sei que me serve e o tamanho mais aproximado era o 38D (também confirmei com outros artigos sobre o soutien que este molde é mais pequeno que o normal). Também estreitei a "ponte" (o centro do soutien) 6mm, para ficar da mesma largura do soutien Pin-up Girls, o qual sei que me assenta bem à frente.

EN: My first iteration with this pattern went rather well; I made a test bra which turned out perfectly wearable, yet the neckline was a little snug (this is recurrent so I must conclude my breasts are wide and fuller on the upper cup than average); bras are a little different than garments because you have to make them from start to end using the right materials before you can be certain of how they fit so the test garment pretty much looks (is!) a real finished bra
---
PT: A minha primeira iteração com o molde correu bastante bem; fiz um soutien "de teste" que assenta quase na perfeição exceto que fica um pouco justo no decote (este parece ser um problema recorrente pelo que concluo que o meu peito é mais cheio e largo em cima do que a média). Apesar de justo, o soutien é perfeitamente "usável". Esta é uma diferença entre a confeção de soutiens e de roupa: só se sabe se um soutien vai servir depois de este estar praticamente concluído com os materiais corretos, ou seja, o teste é um soutien confecionado com todos os materiais e não uma "prova faz de conta" que depois se deita fora.

EN: In spite of knowing this bra may not fit, I used "good materials", like medium powernet on the back band, and good quality elastics and straps. I used Duoplex for the frame and stretch lace on the cups lined with sheer cup lining (the lace came from the Craftsy kit used on my first bra and wasn't wide enough so I used this tutorial from Emerald Erin - click here - on how to use narrower lace). I also added a little lace applique on the side of the front band (I hate wasting lace and just had to use every bit I could):
---
PT: Apesar de saber que este primeiro soutien podia não servir, usei materiais "bons", como a Powernet na banda atrás, Duoplex na ponte e lateral integradas, e galão de renda elástica forrada com forro de tricot fino nas copas (a renda vinha no kit Craftsy que usei para fazer o meu primeiro soutien e era demasiado estreita, por isso usei este passo-a-passo da Emerald Erin para a poder utilizar - clicar aqui). Também apliquei um pouco de renda na lateral (há que aproveitar todos os bocadinhos que sobram,...):

EN: The next photo shows the inside of the cups on my test bra: the cups are lined and the seams are encased in tricot tape; the neckline edge is stabilized with very narrow elastic zigzagged down to the edge. I also top-stitched the channeling twice, as seen on RTW bras:
---
PT: Na próxima foto podem ver o interior das copas do soutien de teste: estão forradas com tricot muito fino e as costuras estão rematadas com fita de tricot; o decote foi estabilizado com elástico fininho, cosido com um ziguezague estreito; também pespontei a "manga dos aros" duas vezes, como se vê nos soutiens comprados:

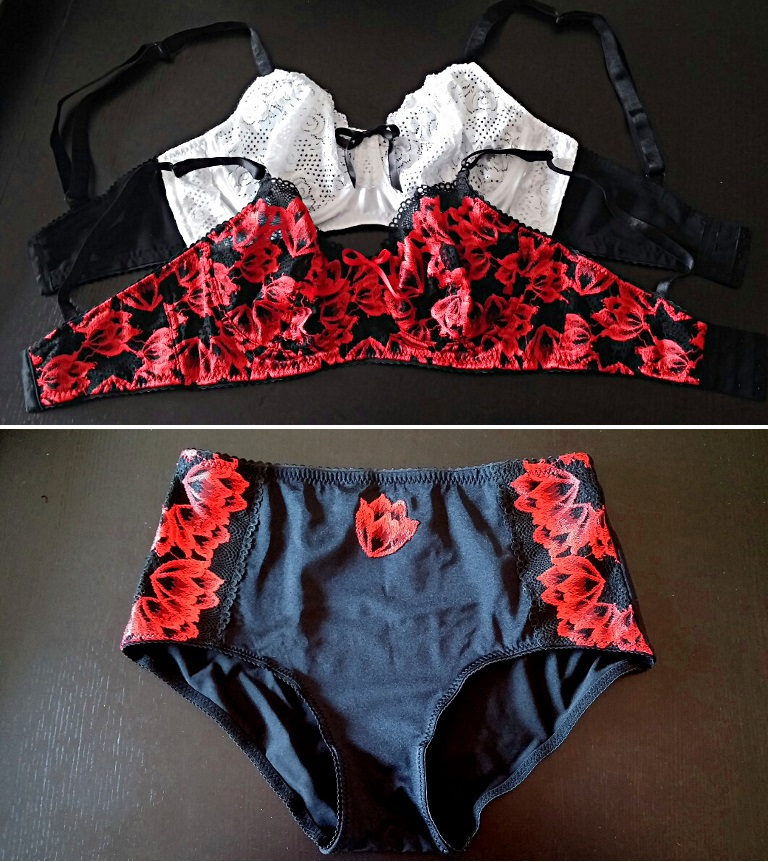
EN: There's also a YouTube video by Madalynne explaining how to sew the bra and panties, very useful if you are a beginner (click here); I complemented the video with what I've learned from the bra making classes on Craftsy (click here for my list of learning resources on bra making). After my test bra I was ready to move on to the "final" lingerie set made from the beautiful red tulip lace:
---
PT: Há também um video no Youtube da autoria da Madalynne que mostra como se cose o soutien (aqui); complementei a informação no video com o que aprendi dos cursos Craftsy (cliquem aqui para a minha lista de recursos relacionados com a confeção de soutiens). Depois de concluir o soutien de teste, prossegui com a confeção do conjunto definitivo, usando a renda com tulipas vermelhas:

EN: Here are the final alterations to the pattern (narrowing the bridge by 1/4" - which I had made to start with - and widening the neckline by 3/8" on the cup front, by cutting and spreading):
---
PT: Podem ver abaixo as alterações finais ao molde (estreitamento da ponte - já tinha feito à partida - e alargar o decote 1cm na copa interna, fazendo um corte perpendicular à orla e afastando o recorte de maneira a alargar o decote):

EN: One very important fact to remember with this pattern is that all seam allowances and elastic edge allowances are 1/4"; since my elastics are wider than 1/4" and it's easier to sew them on the first pass by aligning the elastics with the edge, I added the extra to the pattern pieces (front band shown below and also on the back band). On the top the elastic is 3/8" wide (adding 1/8" to the 1/4" included) and on the bottom my elastic is 3/4" wide so I added an extra 1/2":
---
PT: Um facto a não esquecer com estes moldes de lingerie da Simplicity é que incluem margens de costura de 6mm, incluindo nas margens que levam elásticos. Como os elásticos que usei são mais largos e é mais fácil cosê-los na primeira passagem alinhando o elástico com a orla do tecido, acrescentei o extra ao molde (na foto abaixo estão a ver a lateral, mas fiz também o mesmo na banda atrás). O elástico em cima é de 1cm, por isso acrescentei 4mm; em baixo é de 1.8cm, então acrescentei 1.2cm:

EN: Another important detail to take into account when sewing lace lingerie is how to align the pattern piece with the lace and making sure the lace scallops match at the junction seams. To achieve this you must mark the seam allowance on the pattern (the top doesn't have allowance because it's the lace edge):
---
PT: Outro detalhe importante quando cosemos com renda é o alinhamento dos bordos da renda nas costuras de junção. Temos de marcar no molde a margem de costura incluída na costura de junção (o topo não tem margem porque é o bordo na renda):

EN: Then, when placing the pattern on top of the lace, you should make sure that the edge matches the lower points of the lace (LoPoL) and also that the SA mark matches a LoPoL; this is made on both front cups and side cups, so when you stitch them together, the edge will be a continuous scallop without breaks.
---
PT: Depois, quando colocamos o molde na renda, temos de o colocar de forma a que o bordo coincida com os pontos baixos da renda (LoPoL - Low Point of Lace) e também que a linha onde se cose coincide com um destes pontos, tanto na copa do meio como na lateral; assim, quando cosemos as peças uma à outra, a orla do decote fica com um aspeto contínuo e não "quebrado".

EN: The cutting layout should also reflect the fact that all the lace pieces should be mirrored left and right; the layout presented in the instructions is for a single edge lace; if you're using a lace gallon you should flip the pattern horizontally and cut it from the opposing edge, taking care that both left and right pieces are perfectly symmetrical. Here's an excellent article that addressing cutting layouts, namely using double-edge lace gallons (click here).
---
PT: O plano de corte deve também refletir simetria na peça final; o plano de corte apresentado no molde é para renda com um só bordo; se usarem renda com dois bordos, têm que virar o molde na horizontal e colocá-lo no bordo oposto. Aqui têm um excelente artigo que entre outras coisas fala deste assunto com muito detalhe (clicar aqui).

EN: I also want to mention how useful the spray adhesive is for joining the lace and lining together and keep them joined while handling. I used it a little differently than recommended: first I cut all lace pieces and then I sprayed their wrong side with the adhesive; finally I laid down all the pieces on the lining and cut the lining around the cut edges. As an alternative you can pin the lace pieces to the lining, cut around the edges leaving 1/2" margins on the lining, and then machine-baste making sure the lace layer is facing down on the sewing machine.
---
PT: Também queria mencionar quão útil é a cola em spray para unir o forro à renda e permitir um manuseio mais fácil das duas camadas juntas. Usei o spray de maneira diferente do indicado no molde: cortei primeiro as peças em renda, depois apliquei o spray no seu avesso e coloquei-as sobre a peça de forro; depois cortei à volta de cada peça já colada ao forro. Em alternativa, se não tiverem este tipo de cola, podem usar alfinetes para prender as peças em renda ao forro e depois cortar deixando margens de 1,5cm no forro; depois é só alinhavar à máquina (ponto muito comprido e tensão frouxa na linha da agulha) perto das orlas e recortar o excedente de forro. Ao alinhavar à máquina, o forro deve ficar para cima e a renda para baixo (em contato com o arrasto).

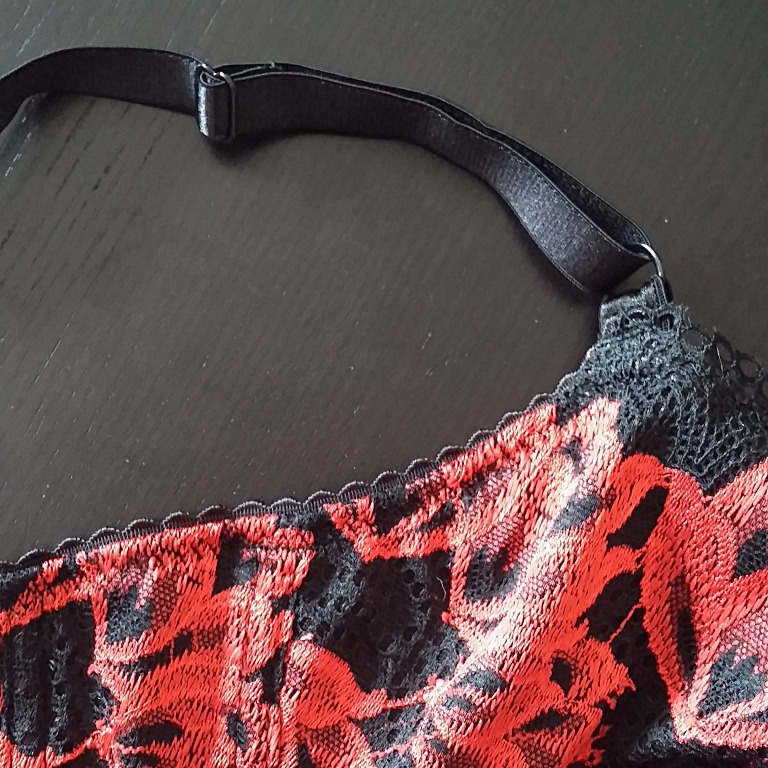
EN: Bra Finishing details - Here's the upper band/armhole picot edge elastic; for this bra I decided to place the ring and the slider on the front (it's easier to adjust the bra while wearing it). The ring is stitched to the end of the armhole edge using a loop of strap elastic:
---
PT: Acabamentos do soutien - Aqui têm o elástico que remata a parte superior da banda e a alça; neste soutien resolvi colocar as alças ao contrário do indicado, com o anel e o passador virados para a frente porque é mais fácil ajustar as alças com o soutien posto. O anel é aplicado no fim da cava com um pequeno loop de elástico das alças:
EN: Here's the bridge detail where you can clearly see the double row of top-stitching on the wire casing and the embellishing ribbon bow that I've added:
---
PT: Aqui têm o detalhe da ponte, onde se vê clarapente os dois pespontos paralelos na manga dos aros e também o laço de fita que acrescentei:

EN: On the back band (theband is made of lace lined with Powernet on this bra), I left a tail of strap elastic down to meet the bottom band elastic. This finish will help preventing the straps from sliding down the shoulders and it's a more robust and professional finish on a straight back band.
---
PT: Na parte de trás do soutien (a qual é feita de renda forrada com Powernet), em vez de fixar a alça apenas ao topo da banda de trás, fixei-a no topo e em baixo. Esta operação ajuda a mater as alças na vertical sem escorregarem dos ombros e é um acabamento mais robusto e profissional numa banda a direito como esta.

EN: Here's the back/front band joining seam, finished with a piece of wire casing, as per Madalynne's video tutorial:
---
PT: Podem ver a junção lateral acabada com manga de aros, tal como sugerido no video da Madalynne:

---
PT: A seguir podemos ver o avesso da copa, com o elástico de silicone a estabilizar o decote:
EN: On this final bra I used Madalynne's method of encasing the cup vertical seam and then top-stitching it with a zigzag:
---
PT: No soutien final usei o método da Madalynne para conter as margens dentro da costura vertical das copas e depois finalizar a costura com um ziguezage estreito:

EN: The briefs - I cut size M per my body measurements but I think these panties were designed for only 10% reduction factor so they fit but could be tighter in my opinion. Next time I'll cut size S. Another detail that I find missing in these patterns are the lines of direction of greater stretch or DoGS; I added them to my oak tag pattern, as you can see (fabrics can stretch in a single direction or have more stretch in one direction and the pattern should be laid out on the fabric accordingly); again, the seam allowances are 1/4" so take this into account when sewing in the elastics or adjust them to the elastics width.
---
PT: As cuecas altas: Cortei o tamanho M de acordo com as minhas medidas, mas acabei por concluir que estas cuecas estão desenhadas com um fator de redução só de 10% e eu prefiro um pouco mais, portanto na próxima vez vou cortar o tamanho S. Outra coisa que falta nestes moldes é as linhas de direção de maior estiramento do tecido (DoGS em Inglês). Há tecidos que só esticam numa direção, ou que têm mais elasticidade numa direção, e o molde deve ser colocado no tecido tendo esse fator em consideração. Mais uma vez, as margens são todas de 6mm e devem ter isso em consideração quando coserem os elásticos (ou então ajustarem as margens de acordo com a largura do elástico que utilizam).

EN: My only alteration to the briefs was adding the lace applique (no wasting the lace!); the applique was first glued to the front at the sides, using the spray adhesive, and then zigzagged along the scallops:
---
PT: A minha única alteração foi acrescentar as aplicações de renda (para não desperdiçar nada!). A renda foi colada aos lados da frente com a acola em spray e depois fixada permanentemente ao longo do rebordo ondulado com ponto ziguezague:

EN: Lastly I had one lace tulip left and used it on the center front, first cutting around the tulip with some margin left, then gluing it in place, zigzagging around its edges and then trimming out the edges of the lace close to the stitches:
---
PT: Por fim aproveitei uma tulipa para embelezar a frente, primeiro recortando-a com margens, colando com a cola-spray, cosendo com ziguezague a toda a volta e finalmente recortando o excedente rente aos pontos ziguezague:

CONCLUSION: This is a very long post, but I really had this much to say about this project! Hopefully you guys find the information useful and perhaps it inspires you to try lingerie making :). I have a few more lingerie sets to review, so stay tuned!
---
CONCLUSÃO: Este é um artigo loooongo, mas tinha tanto para dizer e não quis deixar nada de fora. Espero que achem a informação útil e, quem sabe, vos possa animar a tentar fazer a vossa lingerie! Ainda tenho alguns conjuntos mais para mostrar (esperemos que os posts não sejam tão compridos como este!), por isso mantenham-se atentos!


3 comments:
Thank you for the helpful information. One question, did your bras fit?
Sueann: you're welcome :). Yes, as I stated in my article, the test bra fits, yet it's a little snug on the neckline so I corrected the issue on the final bra. It helps having a pattern which fits already to compare with, before cutting into fabric. I compared the frame of the Simplicity with my Pin-Up Girls pattern, which was already customized and fits perfectly. This has allowed me to save some initial trial and error with the Simplicity bra.
Que conjunto lindo! Deve também ser extremamente confortável. Ter roupa interior feita à medida é um luxo que poucas pessoas têm. Mais uma vantagem de saber costurar. Talvez um dia eu tente esta área também. Parabéns!
Post a Comment