 Plano de corte:
Cutting layout:
O tipo de imitação de pele que estou a usar para o casaco leopardo tem o lado de pelo muito semelhante ao veludo e a parte de dentro é de malha, embora o tecido em si não seja elástico. Em modelos confeccionados com este tipo de tecido ou com veludo, a primeira coisa a ter em atenção é a direcção do pelo. Se passarem a mão no tecido ao longo do seu comprimento e o toque dele for macio e a superfície tiver um aspecto brilhante, então a direcção do pelo é na direcção do movimento da mão. Na direcção contrária o pelo levanta e se olharmos para uma peça de tecido cuja direcção do pelo é para cima em vez de para baixo, a superfície vai parecer mais escura e não brilhante. Podemos então concluir que se colocarmos os moldes para que o pelo corra de cima para baixo o aspecto do tecido será muito diferente de que se os colocarmos com o pelo a correr para cima. O importante a reter é que devemos ser consistentes, isto é cortar todas as peças (mangas, corpo, gola) seguindo a mesma direcção, para o aspecto do tecido ser uniforme. No caso do veludo prefiro cortar sempre contra o pelo, para a cor ficar mais rica e o resultado ser uma cor intensa e não brilhante; no caso do casaco leopardo resolvi cortar a favor do pelo pois o tecido apresenta algumas variações longitudinais na direcção do pelo o que causa uma textura ondulada, que é muito mais evidente se olharmos para o tecido com o pelo a correr para cima:
The kind of fake fur that I'm using for the leopard coat has a pile surface very similar to velvet and the back (warp) is knitted instead of woven (yet this fabric doesn't stretch, it's pretty stable on both directions). The first thing to consider when sewing pile fabrics is the nap (nap, in this case, refers to the direction of the pile). If you cut the pieces without considering the nap, they will look mismatched since the fabric looks different according to the pile direction. An easy way to determine the nap is running your hands across the pile: one way feels smooth the other way feels rough. Smooth corresponds to "on the nap" and rough to "against the nap". The fabric cut on the nap will look shinier and the fabric cut against the nap will have a deeper and richer color. If you cut the garment so the pile runs down you will have a shiny effect; on the contrary, if you cut it with the pile running up, you'll get a darker and intense color. The important thing to keep in mind here is consistency; either you cut the entire garment on the nap or against it. When sewing velvets I usually prefer the against the nap layout but in this case this fabric has some crosswise pile variations that become too obvious if the pile is running up:
 Para evitar este efeito tão pronunciado, cortei o casaco todo com o pelo a correr para baixo.
To avoid the waving lines I decided to go with a "on nap" layout (pile running down).
Corte do tecido/ Cutting the fabric:
Os tecidos com pelo tendem a deslizar se os dobrarmos com o pelo para dentro; para garantir uma melhor precisão, não cortei o casaco com o tecido dobrado mas sim estendido (o que implica cortar duas partes simétricas de cada molde da frente, das mangas, etc.). Para as costas e partes da gola, que seriam cortadas na dobra, usei o molde para alinhavar em redor a parte direita e depois o mesmo molde virado ao contrário para a parte esquerda das costas, mantendo uma linha alinhavada no centro.
Usei uma tesoura de alfaiate grande para cortar o tecido. Em algumas imitações de pelo mais comprido e avesso em tecido é mais fácil usar uma lâmina ou estilete, mas neste caso não foi preciso.
When you join together the pile surface of two layers of fabric, the fabric tends to slide on a given direction; because of this fact it's better to cut on a single layer layout instead of having the fabric folded lengthwise (this implies cutting each pattern piece and it’s symmetrical, except for those pieces that are to be cut on the fold). For the pattern pieces intended to be cut on the fold I thread traced the outlines first, then unpinned the pattern and flipped it to the other side through its center line and thread traced the other side.
Fur cutting the fabric I used my large shears. On some fake fur fabrics it's easier to use a razor blade or a very sharp knife. This was not the case here; I did well with my shears.
Marcações/Marking:
Alinhavei todas as linhas e marcações relevantes na parte do avesso de todas as partes: linhas de aposição, centro de trás e da frente, linha de aposição u corte dos bolsos, etc.
I thread traced all the outlines and relevant markings like notches, CB, and CF lines, pocket opening/placement lines, etc.
Construção/Construction:
Alguns tecidos com pelo são mais difíceis de coser do que outros (depende muito da composição do tecido, da uniformidade do pelo e do seu comprimento). Como as superfícies de pelo uma contra a outra numa costura tendem a deslizar e a mover-se, é preciso ter alguns cuidados extra. Em alguns tipos de tecido é conveniente usar um pé calcador de arrasto regular:
Some pile fabrics are easier to work with than others (it depends on several factors, like the composition, the pile evenness and the pile length). If you join two right sides of a pile fabric, as to sew a seam, the fabric will slide eventually so extra careful is needed. On some difficult to align fabrics, using a walking foot is a must:
 No meu caso este tecido portou-se bem e bastou alinhavar e prender com alfinetes:
In this case my fabric behaved reasonably well and all I did was carefully basting the layers together and use pins to keep the two layers from shifting:
 As costuras curvas e em viés nas partes da frente e costas (decote e cavas) foram reforçadas com fita de algodão estreita para não darem de si; esta fita foi alinhavada juntamente com a costura antes de a coser à máquina:
The curved and bias seams on the front and back parts (collar and armholes) were all reinforced with thin cotton tape that was basted along with the seams before stitching them by machine:
 Também é aconselhável coser ao longo da direcção do pelo (neste caso de cima para baixo, por ex., as costuras laterais começando nas cavas e acabando na bainha), para que o tecido não se mova tanto pelos dois lados em pelo estarem em contacto directo.
Directional sewing is very important here: when sewing a seam it is better to sew on the nap direction (in this case the pile is running down so, as an example, the side seams are sewn from the armhole to the hem); this prevents the fabric from shifting so much.
Reforcei as zonas da abertura dos bolsos, as vistas e as bainhas com entretela macia que cola a baixa temperatura; as bainhas foram reforçadas com tiras de entretela cortada em viés, desta vez reforçando a área onde se vai coser à mão a bainha, mas sempre ultrapassando cerca de 1cm a beira da bainha:
The pocket placement area, the facings, the under collar, both collar stand pieces and all the hems were interfaced with low temperature fusing interfacing. For the hems I used bias cut strips wide enough to reach the hem stitching and to cross the hem line (this time most of the interfacing strip is fused above the hem line and not below it at the hem allowance):
 Os valores de costura não desfiam, e como o casaco irá ser completamente forrado, deixei-os sem remate. Em alguns casos podem coser-se à mão abertos, pois os pontos à mão não são visíveis do lado direito por causa do pelo.
The SAs don't ravel and the coat will be completely lined so I left them as raw edges. They can be tacked in place so that they remain open (the stitches won't show on the right side).
Como o tecido é volumoso, deve-se ter especial cuidado a reduzir o volume das costuras; as costuras redondas devem ser golpeadas; seguem-se alguns exemplos:
This is a bulky fabric so extra attention is given to reducing bulk; round seams should be clipped and notched as necessary. A few examples follow:

 Para coser usei agulhas de ponta romba (especiais para malhas) nº11/80.
I used round tip needles (for knits) size 11/80.
Passagem a ferro / Ironing:
Alguns tecidos de pelo nem devem ser passados (deve-se fazer sempre alguns testes em sobras de tecidos antes). No meu caso o tecido pode ser passado a temperatura baixa mas sem vapor. Para passar a ferro tecidos com pelo existem umas tábuas especiais com uma superfície de pequenas agulhas (parecem as escovas de tratar os pelos dos cães e gatos), para que ao passar o pelo não fique acamado. E como não tenho uma tábua de agulhas, forrei a minha tábua com o resto de tecido que sobrou, com o pelo para cima. Sempre que tive de usar a almofada de alfaiate e o rolo de costuras também os cobri com a imitação de pele. Pelo contra pelo, o tecido não acama ao passar.
Some pile fabrics shouldn't be ironed at all so you should run some tests on scraps before you assume you can iron them. In the present case the fabric can be ironed but no steam should be used. There is a special gadget for ironing pile fabrics, the needle board or velvaboard. It consists on a surface covered with small metal needles that prevent the pile from being crushed when ironing the fabric on the wrong side (the pile merges with the needles). I don't have a needle board and I was unable to find it on sale everywhere I looked so instead of using it I covered my ironing board with a large remnant of the fake leopard fur, with the pile facing up. Having pile against pile when ironing also prevents it from crushing. When I had to use the seam roll or the tailor ham I also covered them with the fabric.
 Aqui têm uma espreitadela à gola pronta:
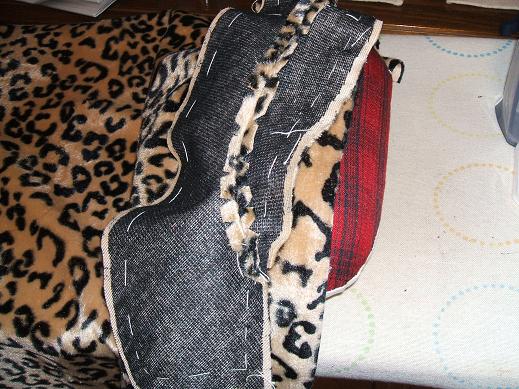 Aqui têm uma espreitadela à gola pronta:
Here's a sneak view of the collar:
 Até à próxima!
See you next time!
 Até à próxima!
See you next time!


23 comments:
TANY I HAVE NO WORDS!!!! I can't WAIT to see the completed project! BEAUTIFUL SO FAR!!!!!!!!
Mmmmm . . . so beautiful. I actually saw some fabric like this the other and thought of your coat, and was tempted to buy some, but refrained. There can only be one great leopard coat in the world!
Your tips are excellent and timely as this is the season people are sewing with this type of fabric.
This is going to look stunning. The style you have choses is good - well styled around the neck and shoulders. Thanks for all the tips!
*sigh* Can I be you when I grow up! No seriously, I want to sew like this! Tany this is absolutely stunning...both me and my DD are drooling onto my keyboard looking at the sneak peek...ohmygosh!
Tany, that coat is gorgeous already! I actually purchased a RTW coat similar to this around 11 or 12 years ago. These styles are classic!
Oh, Tany, how beautiful! My personal rule of thumb with faux fur is to imagine how it would be on an animal.
For example, when I pet my cats, the "grain" of their fur runs downwards from the head to the tail. I feel that our faux fur garments should mimic this.
Tany, your coat is beautiful and I can't wait to see you model it for us!!!
I am so excited to see the whole thing! Thanks for the tips on using this type of fabric.
Thank you so much for sharing all those details with us. I am sure, your coat is looking very elegant.
The pictures of the steps to reduce bulk are very helpful.
Best wishes,
Katrin
é tao lindo! gosto do corte das mangas,´normalmente compro as caisolas com este corte pois ficam melhor nos meus ombros!
bjnh
Só truques! Nunca me passou pela ideia que fazer um casaco com pelo fosse tão cheio de promenores. Sem dúvida uma grande dica para quem decidir fazer este tipo de trabalhos. A gola deixou-me com "água na boca". Fiquei curiosa para ver o resultado final do casaco!
Bjs
Mónica
Tany, your sneak preview is so gorgeous, I can't wait to see the entire coat. Thank you for all the details, your blog is a wealth of information.
This looks soooo great! Thank you for all the tips, they are very useful.
Your models looks wonderful.
Susan
Tany.- Te está quedando "bárbaro" este abrigo. Cuando lo lleves puesto te sentirás como "Maria Callas", una diva....... enhorabuena por tan estupendo trabajo, quedo ansioso de verlo terminado. Abrazos, Paco.
Wonderful tips on working with the pile. The necessity for pins/basting in both directions relative to the seamline is something I really try to emphasize with students. It keeps the fabric from shifting in either direction.
What beautiful shaping in the collar/shoulder area!
Adoro este padrao lindo,
sempre imita�ao claro!!
as tias aqui de Espanha,sao fas.
um bocado exageradas,o mesmo padrao da cabe�a aos p�s.
que susto amiga!!!
Estou curiosa pra ver o teu!
Vai ficar lindissimo,imaginooooo!!!
bjs.
Thanks for the tutorial and your clear instructions help me better understand on nap and against nap.
Dear Tany, I may not be a fan of animal prints, but this coat is going to be fantastic!
You revived a memory of my Grandma telling me how when she first sewed with velvet, she sewed it along the pile and it made it look so much less beautiful than the other way around. She was an apprentice at the time, she must have been 16 so that was in 1925... One of the very few memories she has managed to tell me. All the apprentice seamstresses were making the same coat out of velvet, for a bunch of customers, but only one sewed it against the pile and what a difference it made! You are so right, choosing to sew with the pile up or down makes a great difference to the finished look.
Thank you for giving so many tips on handling and sewing such a challenging fabric! Your coat is going to be amazing.
Big hugs, and have a wonderful day!
I desperately want to make something in a animal print fabric (of some kind)-and your coat is not helping me choose a project-its just added to the list of possibilities-it looks fantastic-I am constantly amazed by your output-brilliant.
The tutorial on sewing the fake fur was well done. The coat will be beautiful I am sure. I have a question about thread tracing. Do you thread trace through the pattern tissue paper? Could you explain that please.
Obrigada a todas! Thank you all!
I'd like to welcome Nancy (nanflan) and Susan to Couture et Tricot! Thank you for your kind words!
Kelroc: I usually don't include the seam allowances on my paper patterns so it's easier to thread trace around the pattern outlines; I did a few posts sddressing my method of thread tracing: if you go to the sidebar, where all the labels are listed, and if you click on the label "conj. preto - black ensemble", you'll get a list of posts; the one on top has links to "Thread tracing: part one, part two and part three" and you can access each of these posts and see exactly how I thread trace my BOWF/PAtrones garments. I hope this helps!
Olá Tany,
Fiquei muito contente de ver que gostas-te :)
Tb estou a adorar o todos os teus trabalhos.
Não tenho tido muito tempo para hobbies... Entre trabalho, dança, curso de comptadores... Namorado.
Mas vou tentando criar algo com as mãos.
Um beijo grande para ti!
Post a Comment