EN Summary: I couldn't end my winter sewing season without a magnificent overcoat. Keep reading the full article on tanysewsandknits.blogspot.com to find out everything about this project.
---
PT Sumário: Não poderia dar por terminadas as costutras de Inverno sem um magnífico sobretudo. Leiam o artigo completo em tanysewsandknits.blogspot.com para saberem tudo sobre este projeto.
EN: It all started with the fabric: the high quality coat-weight wool with navy/brown/green wide vertical stripes had been gifted to me by Dominique Pellen from DP Studio, soon after he began selling designer fabrics on their website. I received a 3 meters coupon (roughly 3.3 yards) of this fabric which is wider than usual (63" wide), so I knew it would be enough for an overcoat. I took my time deciding on the pattern because of the stripes,... I could have used a straight coat pattern and cut the fabric on the lengthwise grain (vertical stripes) but soon after I started entertaining the idea of a horizontal striped coat. The stripes have a defined color sequence so I couldn't cut some pieces upside down to save on the cutting layout, but I definitely was entertaining the idea of a coat with some flare from the waist down, specially with horizontal wide stripes. I remembered this coat from one of my all time Burdastyle magazine issues, which I had made in the short version (view A) back in 2006/2007 (click here). Version B measures around 47 inches on the back from the neck down, so it's quite long. The coat has wide collar and lapels (the collar has a stand), it's single-breasted closing with three large buttons (no buttonholes, there are large snaps underneath), side panels, in-seam pockets and one-piece sleeves with no vents. The coat is slightly defined at the waist and moderately A-line from the waist down. I cut size 40 without any alterations to the pattern itself except the button placement (I've widen the distance between buttons about 3/8"). I also swapped the snaps for bound buttonholes and cut the undercollar in two separate mirrored bias pieces with a center back seam, instead of on the fold.
---
PT: A ideia para este casaco começou com o tecido: pura lã para sobretudos às riscas largas verticais em azul-marinho, castanho e verde (uma peça de 3 metros com 1.6m de largura), oferecida pelo Dominique Pellen de DP Studio, pouco depois deles começarem a vender tecidos de designer no seu website. Ainda passei algum tempo a decidir que molde iria usar com este tecido: as riscas na vertical só poderiam resultar com um corte reto, como tal a determinada altura comecei a pensar na possibilidade de cortar o tecido com as riscas na horizontal, o que já permitiria um corte evasé. Como as riscas têm preceito (uma determinada ordem de cores) não poderia cortar algumas partes invertidas para conseguir um plano de corte mais poupadinho, por sabia que o tecido não ia chegar para cortes evasé muito acentuados. Lembrei-me deste molde de casaco de uma das minhas revistas Burda favoritas de todos os tempos, a edição de Setembro de 2006. Em 2006 já tinha feito este modelo na versão A, a mais curta (podem ver aqui). A versão B mede aproximadamente 122cm atrás desde a base do pescoço, portanto é bastante comprida. O modelo tem gola com pé e lapelas largas, fecha com uma única fila de três botões grandes com molas aplicadas debaixo (sem casas de botão), tem painéis laterais, bolsos metidos na costura e mangas de uma só folha sem abertura nos punhos. A cintura é moderadamente definida e tem um corte evasé pouco acentuado da cintura para baixo, portanto perfeito para a metragem que tinha ao dispor e para as riscas horizontais. Cortei o tamanho 40 sem alterar o molde em si, a não ser no posicionamento dos botões, que espacei mais 1cm entre si. Quanto ao corte, cortei a gola inferior em duas partes em viés espelhadas, em vez de a cortar na dobra do tecido como indicado. Também decidi fazer casas avivadas em vez de utilizar molas por baixo dos botões.

EN: I used mostly modern tailoring techniques and industrial sewing methods for making this coat (fusible interfacings & tapes, standard width seam & hem allowances) yet I also used some couture techniques; the fabric was cut using a single layer layout, with all the pieces aligned horizontally with the stripes, cutting one side of the coat first. Then I cut the other as a mirror image using the first cut pieces as patterns. I used tailor tacks and running stitches to mark any relevant lines (darts, center front lines, buttonhole placement lines, etc.).
---
PT: Usei técnicas de alfaiataria modernas (entretelas e fitas termo-colantes) e técnicas de costura industrial (margens e bainhas de largura standard, ordem de confeção otimizada) para confecionar este casaco, mas também algumas técnicas tradicionalmente usadas em alta-costura, como cortar primeiro um lado do casaco em tecido singelo (sem dobrar), alinhando todas as peças na horizontal com as riscas, e depois usar essas peças cortadas para cortar o seu simétrico (o outro lado do casaco). Também fiz todas as marcações essenciais com alinhavos (pinças, linhas do meio da frente, casas de botão, etc).

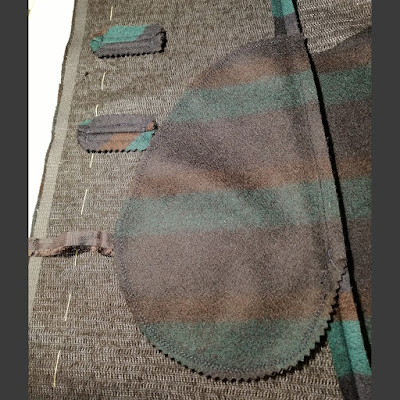
EN: The in-seam pockets were sewn using Paco Peralta's excellent tutorial (click here). In this case, the inner pocket bag was cut of fashion fabric (not lining plus fabric facing like Paco did, which is also correct), being careful to match the stripes with the coat panels, while the outer pocket bag was cut out of lining and stitched a little far into the front panel's seam allowance. This is done so the lining fabric is not seen as you put the hands into the pockets while wearing the coat. ---
PT: Os bolsos metidos na costura foram confecionados seguindo os passos do excelente passo-a-passo do Paco Peralta (clicar
aqui). No meu caso, a fundura mais interna foi cortada do tecido do casaco (tendo o cuidado de coincidir nas riscas com os painéis do casaco) e não apenas com uma vista de tecido como no passo-a-passo do Paco (o que também é correto), enquanto a fundura de cima foi cortada de forro e cosida um pouco para dentro da margem de costura. Isto é feito para o forro não ser visível quando se enfiam as mãos nor bolsos ao usar o casaco.


EN: On the wrong side the inner pocket bag is facing up (the side that is cut of fashion fabric) and if you look closely, it will be noticeable that I used a double row of stitching to stitch together the pocket bags; in the photo you can also observe that I used a piece of lining selvedge to tack the pocket bag to the center front edge, so it doesn't shift out of place while wearing the coat. At this point the bound buttonholes were almost completed (lacking the final finishing after the facings are attached). I used another of Paco's tutorials to sew the bound buttonholes (click here). ---
PT: No avesso do casaco pode ver-se as funduras (é visível a cortada em tecido) e se olharem com atenção podem constatar que cosi as funduras juntas duas vezes para reforçar. Podem também observar que usei um pouco de aurela de forro para prender as funduras ao meio da frente; isto evita que o fundo dos bolsos se mova e saia do lugar enquanto se usa o casaco. Neste estágio da confeção também se podem ver as casas avivadas quase prontas (falta o acabamento que é feito à mão depois de colocar as vistas da frente). Para confecionar as casas usei outro passo-a-passo do Paco, que podem consultar
aqui.
EN: Now let's take a look at the finished coat so I may highlight some of its features, starting with the front of the coat:
---
PT: Agora vou mostrar os detalhes do casaco terminado, para poder evidenciar alguns dos detalhes da sua confeção, começando pela frente do casaco:
EN: I had these three buttons in my notions stash for a while (they were intended for another coat, but then I ended up opting for another set of buttons and these were kept aside). It's actually a a smaller mother-of-pearl button fit into a larger marbled button which a slot for the smaller button:
---
PT: Os três botões vieram do meu stock e já os tinha há algum tempo; comprei-os para outro casaco, mas na altura acabei por optar por um outro conjunto de botões e estes ficaram de lado. Se repararem, são dois botões e não um só: o botão marmoreado grande tem um encaixe onde fica o botão mais pequeno de madrepérola:
EN: The buttons also have a smaller stay button on the inside. Don't forget to stitch the buttons with enough "button-stand" (gap between the button and the front of the coat) to accommodate the thickness of the overlapping front, otherwise the buttons will sink in as the coat is buttoned (not a very professional look in my opinion).
---
PT: Os botões também levam uns pequenos botões "âncora" no avesso. Ao coser os botões, lembrem-se sempre de incorporar um "pé-de-botão" com altura suficiente para a espessura da frente do casaco com a casa-de-botão; se não fizerem isso os botões afundam com o casaco abotoado (criando um aspeto muito amador, na minha opinião).
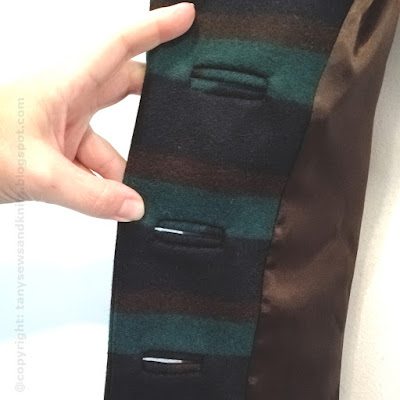
EN: Here are the finished buttonholes; the welts are not even with the stripes because they are cut on the bias:
---
PT: Podem ver as casas avivadas terminadas; os vivos não coincidem com as riscas porque são cortados no viés:
EN: Here's the wrong side, where the buttonholes where finished by hand (slashing an opening on the facing with little "V" shaped corners, then turning the edges to the inside and slipstitching by hand around the welts of the buttonhole).
---
PT: Aqui podem ver o lado da vista, onde o acabamento foi feito à mão (abre-se a abertura com os cantos em forma de "V", vira-se as margens para dentro e cose-se tudo aos vivos com pontos invisíveis à mão).
EN: Another finishing detail is the bottom corner where the front facing, the lining and the hem of the coat meet; this particular finishing is accomplished with the industrial method of bagging a lining, thoroughly illustrated in yet another Paco Peralta's tutorial (check it out here). Oh, I realize now that I forgot to mention that brown charmeuse from my stash was used for the lining. ---
PT: Outro detalhe de acabamento é o canto inferior da frente, onde a vista, o forro e a bainha do casaco se encontram. Este tipo de acabamento em particular consegue-se com o métrodo industrial de coser um forro a um casaco ou jaqueta, brilhantemente ilustrado em mais um passo-a-passo do Paco (
aqui). Ah, e esqueci-me de mencionar que forrei o casaco com cetim castanho, do meu stock.
EN: Here's the side view of the coat. The sleeves, as I had mentioned before, are one-leaf sleeves, which is OK for an overcoat (a less fitted sleeve is preferred) and also make the process of matching the stripes a little easier.
---
PT: Aqui têm o casaco visto de lado. As mangas, como já tinha mencionado, são de uma só peça, o que está bem para um sobretudo (as mangas não precisam de ser tão ajustadas ao braço), além de que o processo de casar as riscas fica um pouco mais facitado.
EN: Here's another shot at the in-seam pockets:
---
PT: Mais uma vista dos bolsos metidos na costura:
EN: Getting back to the sleeves, I used my usual methods for reinforcing the sleeve cap (tailoring shoulder pads, sleeve-head "cigarrette" and interfacing the top of the sleeve). In this case the sleeve should be cut so the horizontal stripes are even with the stripes of the coat. To achieve this I made sure the stripes matched on the bottom of the armhole and front notch as I cut the sleeves. ---
PT: De volta à mangas, usei os meus métodos habituais para reforçar o ombro e a cabeça da manga (chumaços de alfaiate,
cabeça-de-manga "charuto" e entretela na cabeça da manga). Neste caso também é importante garantir que as riscas da manga ficam niveladas com as riscas do corpo do casaco, e para isso basta fazer coincidir o padrão no fundo da cava e no pique da frente.
EN: Here's the back view of the coat:
---
PT: Aqui têm o casaco visto de trás:
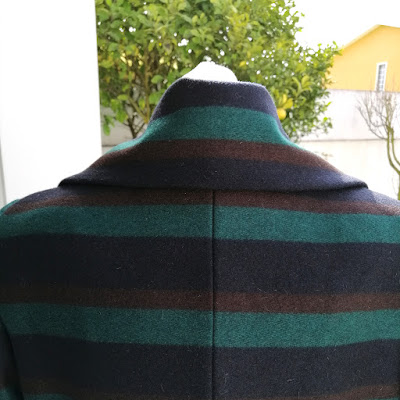
EN: Here's the collar seen from the back:
---
PT: Aqui têm o detalhe da gola vista de trás:
EN: The upper collar was cut slightly larger to accommodate the turn of the cloth; the seam that joins the upper collar to the under collar was further under-stitched (pressing the seam allowances to the under-collar side and top-stitched close to the seam-line), so the edge is rolling to the inside and the under-collar is not seen (the same technique was applied to the lapels and front edge, under-stitching the lapels on the front side and the front edge on the facing side, by the way):
---
PT: A parte superior da gola foi cortada com uma margem maior para ter mais tecido (necessário para a gola virar bem para baixo sem deixar ver a parte inferior da gola). A costura que une a gola superior à inferior também leva um pesponto de girar (margens assentes para o lado da gola de baixo e pespontadas rente à costura), o que ajuda a conseguir o efeito de orla limpa sem se ver a parte de baixo da gola (já agora, a mesma técnica de "girar" foi aplicada nas lapelas onde o pesponto é feito do lado da frente; e nas orlas da frente, onde o pesponto fica no lado das vistas):
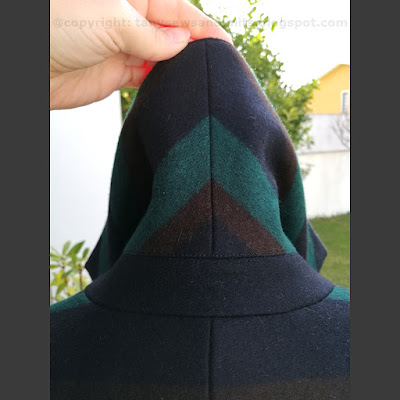
EN: To achieve a smoother roll of the collar, I cut the under-collar in two pieces with a center back seam; the two pieces are cut on the bias and mirror each other:
---
PT: Para a gola enrolar para baixo de uma forma mais suave, cortei a sua parte de baixo em duas partes com uma costura central; estas partes são cortadas no viés e espelham-se, como podem ver:
EN: I am really satisfied with this overcoat; the fit is perfect (not too tight so I can use it as an over-garment) and I am really happy to have cut the fabric crosswise to get the stripes on the horizontal. The overcoat's overall vibe reminds me of the Christian Dior Fall 2019 RTW collection, with the deep blue/green color palette and the omnipresent stripes/plaids, so privately I'm calling it my Dior inspired coat, although it doesn't resemble any particular coat in that collection (I think it would fit right in, though!). I hope you have enjoyed this article and come back for more! Don't forget to support my work by disabling you ad-blocker, thanks! ---
PT: Estou satisfeitíssima com este sobretudo; assenta mesmo bem, sem ser demasiado justo que me impeça de o usar por cima de outras roupas. Também estou contente com a minha opção de cortar o tecido atravessado, para conseguir as riscas na horizontal; creio que valoriza o resultado final. Este sobretudo lembra-me a
coleção de pronto-a-vestir Outono 2019 de Christian Dior pelas cores profundas em verde e azul, e as riscas horizontais que juntamente com o xadrez, prevaleceram nessa coleção. Em privado chamo a esta peça o meu casaco inspirado em Dior, embora não seja parecido com nenhum casaco em particular da coleção (mas acho que se encaixava lá muito bem!). Espero que tenham gostado de mais este trabalho e voltem para mais. Não se esqueçam de desativar o bloqueador de anúncios para apoiarem o trabalho que apresento aqui. Obrigada!


12 comments:
This is one of the greatest things you have ever shown, I love it.The amount of thought and detail of cutting is perfection. Such a perfect and interesting use of the stripe fabric, I can't think of enough compliments to praise you. FANTASTIC!!!
Fabulous.
Thank you so much for explaining how you decided to cut out the coast and for showing the various steps of construction. And you are quite correct in saying it would fit into a designer’s winter line -it’s stunning.
Maravilloso, me encanta como te ha quedado, es una costura perfecta. BESICOS.
Wow. This is beautiful. The things you make bring me such joy you'd think I had access to them. Such precise work. This is perfection.
Afrinista
Just beautiful, Tany. Thanks for sharing the details of your beautiful work!
Thank you ladies for warming my heart today!
Muchas gracias Arish!
Absolutely exquisite. As always. Thanks for posting.
So interesting, and so nice to see the 'old school' methods being used. I say 'old school' because I was taught these methods back in the 1960s and have used them ever since.
I love your neatness and those buttons - beautiful.
I only recently 'found' you, thanks to La Sewist mentioning your blog.
Exquisite tailoring!
Beautiful coat and stunning tailoring! I like that you used a horizontal stripe which would not be the expected use. It works beautifully! I like your detailed work, that takes a lot of time, but is well worth the effort, especially when the finished garment is so beautiful. Thanks so much for sharing.
I just don’t have the words for your coat. My jaw dropped and I’m still trying to pick it up. The stripes are just exquisite and those buttons, what can I say. Just gorgeous. Your work is always so impeccable and inspiring but this coat, well, I just love it, so perfect. I don’t think I’ve ever seen stripes matched so perfectly. Thank you for sharing
Post a Comment