2014#23 – The flared green shorts – Calções evasé verdes


Description: flared shorts with hip level seam, slant side pockets and side invisible zipper. 

Pattern: BurdaStyle July 2014 model 112 (traced size 38) 

Fabric used: Green synthetic crepe (unknown composition but I suspect polyester microfiber) 

--- 

Descrição: Calções evasé com costura ao nível da anca, bolsos de encaixe na diagonal e fecho invisível na costura lateral. 

Molde: BurdaStyle Julho 2014, modelo 112 (tracei o tamanho 38)
 
Tecido: Crepe verde de composição desconhecida (suspeito que seja microfibra de poliéster)

Project notes: I started this project about three weeks ago but I've put it on hold until last weekend due to some neck pain that I've been feeling. The fabric was cut; all I needed to do was applying the interfacing, do some thread tracing and stitch all the pieces together. The shorts came along very nicely, but, of course, there are a few details I’d like to point out. 

--- 

Notas do projeto: Comecei os calções há 3 semanas mas interrompi porque comecei a sentir algumas dores no pescoço. Neste fim-de-semana retomei-o e uma vez que o tecido já estava cortado, foi só aplicar entretelas, fazer as necessárias marcações e começar a coser. A confeção segundo as indicações da Burda decorreu sem problemas, mas há alguns pontos que gostaria de salientar.

The pockets do have a tendency to open up and the pocket bags show a little, falling out of place; I think this type of pockets was not the best choice for a model which is close fitting through the waist to the hip. 

--- 
 
Os bolsos abrem um pouco de lado e vê-se o forro; os sacos do bolso têm tendência a sair do lugar. Creio que este tipo de bolsos não foi a melhor opção para um modelo justo da cintura à anca.

The zipper insertion along the waistband and the side seam where the pocket is placed is doable, but you need to be very precise so every seam will line up perfectly, including the horizontal hip seam. 

--- 
 
O fecho no prolongamento do cós na costura lateral onde fica um bolso consegue fazer-se, mas potencia alguns problemas; é preciso coser com muita precisão para que todas as costuras fiquem alinhadas, principalmente do cós e da costura horizontal da anca.

Here’s the waistband on the wrong side along the zipper, sewn according to the instructions: 

--- 
 
Eis o aspeto do cós do avesso, ao longo do fecho lateral, confecionado de acordo com as instruções:

Finally, for this model, I strongly suggest faced hems, especially if the fabric is thin like the one I used; I interfaced the facings with lightweight knit interfacing. 

--- 

Finalmente sugiro que para este modelo usem guarnições na bainha, principalmente se usarem um tecido fino como o que eu usei. Reforcei as guarnições com entretela de malha fininha.

And that’s it, hopefully you’ll see me wearing these shorts sometime next weekend if you follow my wardrobe blog Tany et La Mode! Thank you so much for all your support and please forgive my lack of updates (my neck has been killing me and sewing makes it worst). Hugs to all!

---

E é isto, possivelmente terão oportunidade de me ver a usar estes calções no próximo fim-de-semana, se seguirem o meu outro blog Tany et La Mode. Muito obrigada pelo vosso apoio e perdoem-me a falta de updates por aqui, não é por falta de vontade de costurar!

2014#22 – The beige pencil skirt – A saia travada bege


(Pictures of me wearing the skirt are published on my wardrobe blog (click here)) 
  
Description: Three-panel front pencil skirt with high-waist, belt-carriers, self-fabric belt and in-seam vertical welt pockets, has topstitching along the waistline and hem and invisible zipper on the back seam. 
  
Pattern used: BurdaStyle 04/2014, model 114; I cut size 38. The fabric used is cotton pique. 
  
--- 
  
(Fotos minhas a usar a saia foram publicadas no meu blogue de estilo pessoal (clicar aqui)) 
  
Descrição: Saia travada com três painéis frontais, cintura alta, passadeiras para cinto, cinto feito do mesmo tecido e bolsos avivados metidos nas costuras verticais da frente. Tem também a bainha e a cintura pespontadas e um fecho invisível na costura de trás.
  
Molde usado: BurdaStyle 04/2014, modelo 114: cortei o tamanho 38. O tecido é piqué de algodão.

Alterations: The main alteration was not making real pockets; I figured that when wearing the skirt, especially when sitting down, the pockets would open up into a not so flattering feature, so I sewed the welts but instead of adding the pocket bags, I pinned a rectangle of interfaced fabric on the wrong side (un-interfaced side facing the pocket opening) and topstitched along the welts on the right side. I also added a full lining to the skirt because by my experience, it gets less wrinkles and wears much better if lined. The other minor change was adding a row of topstitching perpendicular to the belt carriers (note the red lines on the line-drawing above), so the belt wouldn’t come out of place. You can see some of these details in the next pictures: 
  
--- 
  
Alterações: A principal foi não fazer os bolsos “a sério” pois pensei logo que a usar a saia iam abrir, principalmente porque passo muito tempo sentada, e não ia ficar um efeito bonito. Então confecionei as aberturas avivadas como normalmente, mas em vez de acrescentar os sacos do bolso, coloquei um retângulo de tecido entretelado por baixo das aberturas (sendo que o lado sem entretela/direito do tecido fica contra as aberturas) e pespontei pelo direito à volta dos vivos. Também acrescentei um forro à saia, pois a minha experiência diz que as saias forradas vestem melhor e engelham-se menos. A outra pequena alteração que fiz foi pespontar as passadeiras do cinto perpendicularmente (como mostram as linhas a vermelho que desenhei no esquemático), para que o cinto ficasse no lugar. Podem observar estes detalhes nas fotos que se seguem:


Conclusion: The skirt came out exactly as I had envisioned it! It’s a really great pattern, I highly recommend it! You guys have a great week ahead and thank you for visiting! 
  
--- 
  
Conclusão: A saia ficou exatamente como a tinha imaginado! Este é um ótimo molde, recomendo-o vivamente! Tenham todos uma ótima semana e muito obrigada por visitarem!

2014#21 – Striped hooded jacket - Jaqueta às riscas com capucho

ETA: click here for photos of me wearing the jacket

DESCRIPTION: The original pattern is for a straight unlined jacket with built-in hood and a single snap closure at waist level; there are no pockets or belt. I've added a full lining, a belt, two patch pockets and four buttons along the front edge, instead of the single snap. 
PATTERN: Burda World of Fashion 2007 model 126 (traced size 38); my magazine is in French because in 2007 Burda wasn't publishing the Portuguese edition just yet. Below you can see a snapshot of the pattern and how the body and hood are cut as a single piece. 
---
Nota: cliquem aqui para verem fotos minha sa usar a jaqueta!

DESCRIÇÃO: O molde original é de uma jaqueta sem forro com capucho e com apenas uma mola de pressão ao nível da cintura; não tem bolsos nem cinto. Acrescentei um forro completo, cinto, dois bolsos-chapa e em vez da mola, quatro botões ao longo da frente.
MOLDE: Burda Tendences Mode, modelo 126 (cortei o 38); a revista é a edição francesa porque em 2007 ainda não se publicava a edição Portuguesa da Burda. Mais abaixo podem ver uma foto do molde, onde se percebe que o corpo e o capucho são cortados numa peça única de tecido.

 Side and back views / Vista de lado e de trás:
 A close-up of the tie-belt / Detalhe do cinto de atar:

For the belt loops I used buttonhole twist thread; there are no side seams and I anchored the loops using two small buttons inside, as you can see below: 
--- 
Para as passadeiras do cinto usei linha torçal; para prender bem sem arriscar esgaçar o tecido (uma vez que não há costuras laterais), usei dois botões pequeninos no interior, como podem ver mais abaixo:

 The patch pockets / os bolsos-chapa:

Here's a view of the lining back fold for wearing ease; I've also tacked the lining to the jacket at the center of the back neck seam (the lining was cut using the jacket pattern excluding the edge facings/ hem facings width and adding SAs, so the hood is also included; hence the need of hand-tacking it at the back neck) and bellow the armholes. 
--- 
Podem ver aqui a dobra do forro no centro das costas; dei uns pontos à mão no centro da costura do decote atrás e também por baixo da costura da cava para prender o forro ao casaco e evitar que se desloque. O molde do forro é conseguido a partir do molde do casaco, excluindo a largura das bainhas /orlas e acrescentando margens de costura, por isso o capucho também fica incluído; é por isto que deve ser preso ao casaco na costura do decote atrás.

CONCLUSION: This project took some time to complete and also I was improvising along the way; I only decided to add the full lining after the jacket was completed so I stitched it to the jacket entirely by hand; then I decided to add the belt and only in the end I felt that just one button at waist level wasn't going to be enough for me. As with the previous project using the same fabric, I took some care matching the stripes, choosing to align them horizontally; I matched the stripes on the patch pockets and also on the sleeves and I am really satisfied with the end result. Have a wonderful weekend guys, and thank you for visiting!

ETA: Just a quick note to mention that I interfaced the edge facings and hem facings and also the pocket placement area and back neckline/shoulder/armhole using fusing tape! There is no mention to interfacing in Burda's instructions, but they do mention using bias tape as hem/facing finishing and also bound the armhole/neck/shoulder allowances, since this is originally an unlined jacket.
---
CONCLUSÃO: Este projeto demorou algum tempo a terminar, pois o meu tempo livre é mesmo muito pouco e além disso foi sendo improvisado à medida que avançava. Por exemplo, só decidi forrar a jaqueta depois desta estar finalizada, por isso tive de coser o forro à mão à jaqueta. Depois disso é que achei que ficava bem com um cinto; finalmente concluí que apenas um botão era pouco e acrescentei os restantes. Tal como as calças do mesmo tecido que mostrei anteriormente, tive o cuidado de alinhar as riscas de forma a coincidirem perfeitamente ao longo da frente e entre as mangas e o corpo da jaqueta, optando pela direção horizontal. Também fiz com que as riscas dos bolsos coincidissem, de forma a parecerem quase invisíveis. Fiquei muito satisfeita com o resultado final, valeu bem a pena o tempo que demorou a fazer. Tenham todos um ótimo fim-de-semana e obrigada por visitarem!

Apenas uma nota adicional: apliquei entretela às orlas da bainha e nas orlas da frente, assim como fita de entretela nas costuras das cavas, ombro e decote atrás. As instruções da Burda não mencionam qualquer entretela, apenas dizem para usar fita de viés para o acabamento das orlas, decote atrás e costuras de aplicação das mangas, uma vez que a jaqueta original não é forrada.

2014#20 – Black&white striped pants – Calças às riscas brancas e pretas

DESCRIPTION: Wide leg pants with side seam shifted to the front, in-seam pockets, shaped waistband and fly-front zipper. 
 
Note: You can see photos of me wearing the pants here; also note that I've skipped project 2014#19: it’s an eyelet midi skirt that I've reviewed here (full tutorial); 
 
PATTERN: BurdaStyle 2013/12 model 103; I've used this pattern before (click here and here) but this time I’m cutting a size smaller (36) and also keeping the original model without alterations (on my previous versions I altered the shifted side seam into a side panel). 
 
--- 
 
DESCRIÇÃO: Calças de perna larga com costura lateral deslocada para a frente, bolsos metidos na costura, cós enformado e carcela com fecho. 
 
Nota: podem ver fotos de mim a usar as calças aqui; notem também que saltei o projeto 2014#19: é uma saia midi rodada feita de tecido bordado Inglês cujo passo-a-passo completo foi publicado no meu outro blogue (ver aqui).
 
MOLDE: BurdaStyle 2013/12, modelo 103; Já tinha usado este molde antes (ver aqui e aqui), mas desta vez cortei o tamanho abaixo (36) e também usei o molde sem alterações (nos projetos anteriores tinha-o alterado para ter painéis laterais).

There’s little to add to what I've said before about this pattern; this time my main concern was matching the stripes. The extended back was cut with the stripes aligned vertically and the narrower front panels were cut with the stripes aligned horizontally. Bellow you can see the waistband, back and front: 
 
--- 

Não há muito a acrescentar ao que já disse sobre este modelo; desta vez a preocupação principal foi casar as riscas e manter a simetria do modelo. O painel de trás que se estende para a frente foi cortado com as riscas ao alto e o painel reduzido da frente com as riscas horizontais. Abaixo podem ver o cós, atrás e à frente:

 The front-fly zipper / A carcela com fecho:

 The inseam pockets / Os bolsos metidos nas costuras:


CONCLUSION: I really love the visual effect of the horizontal/vertical stripes! Earlier today I also finished a wooded jacket (kind of a parka actually) using the same striped fabric; stay tuned for the upcoming review! Thank you all so much for visiting!
 
---
 
CONCLUSÃO: Adorei o efeito visual das riscas horizontais/verticais neste modelo! Hoje ainda consegui acabar uma jaqueta com capuz (uma espécie de parka) usando este mesmo tecido; estejam atentos porque não devo demorar muito a publicá-la! Muito obrigada a todos por visitarem!

2014#18 – Shattered effect white jumpsuit – Macacão branco efeito “estilhaçado”


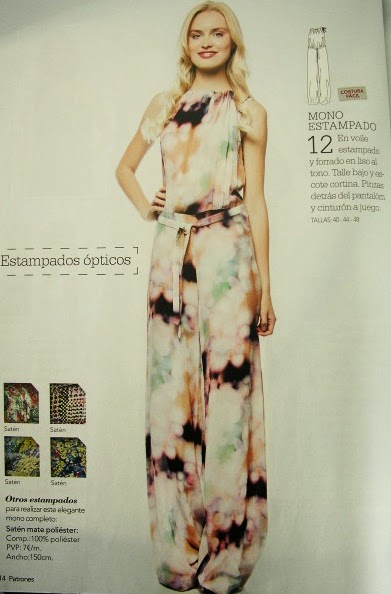
Description: Loose fitting jumpsuit has gathered tie-string neckline and tie-belt; I cut the pattern with some modifications and also adapted it to the fabric type that I used, which is very different from the sheer double-layer fabric used on the original model. More pictures of me wearing the jumpsuit were published here.
Original pattern: Patrones nº336, model 12; I cut the size 40, which is one size down to my usual Patrones size (after measuring the pattern, also taking into account that my fabric has some stretch into it) 
--- 
Descrição: Macacão solto com decote franzido por uma tira de atar; alterei um pouco o molde tendo em conta o tecido que usei, bastante diferente das duas camadas de voile usadas no modelo original. Mais fotos minhas a usar o macacão foram publicadas aqui.
Molde usado: Revista Patrones nº 336, modelo 12; cortei o tamanho 40, que é um tamanho abaixo do tamanho Patrones que costumo usar (o sistema de tamanhos não é igual ao da Burda), depois de medir o molde e de ter em consideração que o tecido que usei tem elasticidade.


Alterations: I shortened the pants by about 8 inches, substituted the neckline tie-string by black elastic, skipped the tie-belt adding some belt looks on the side also made of black elastic and an elastic belt (made of wider back elastic tacked on the pants’ back seam to keep it permanently in place). The elastic and the stretch fabric that I used allows me to get into the jumpsuit without having to untie/tie any strings or belts 
--- 
Alterações: Encurtei as calças uns 20cm, e em vez das fitas de atar no decote usei elástico preto; em vez do cinto de atar fiz umas passadeiras de cinto nos lados usando o mesmo elástico preto e passei um cinto feito de elástico mais grosso, que prendi na costura do meio de trás das calças para o manter no lugar. O facto de o macacão ser feito de malha elástica (tipo neopreno) e de ter usado os elásticos permite-me vestir o macacão sem ter de desamarrar/amarrar fitas ou cintos.


Conclusion: Nice and trendy jumpsuit that was easy and quick to make! The final result is quite different from the original model but I rather like my version best!
---
Conclusão: Um macacão giro e muito na moda que foi fácil e rápido de fazer! O meu resultou bastante diferente do modelo original, mas adorei o resultado e creio que gosto mais da minha versão!

2014#17 – The swallows set part 2: the pants – Conjunto andorinha parte 2: as calças


(pictures of me wearing the swallow were published here
 
Description: Ankle length pants with faced waistline; the original have side pockets with enclosed buttoned side closure and one back single welt pocket. I skipped both these details and used just the base pattern for my pants with overlapped side zipper instead. 
 
Pattern used: BurdaStyle 2014/04 model 116. 
 
Fabric: Black swallows print neoprene-like knit. 
 
--- 
 
(fotos minhas a usar o conjunto foram publicadas aqui
 
Descrição: Calças pelo tornozelo com cintura com vista incorporada; as originais têm bolsos metidos nas aberturas laterais abotoadas (estilo marinheiro) e um bolso avivado atrás; utilizei apena o molde base das calças, omitindo estes detalhes e aplicando um fecho na lateral. 
 
Molde: BurdaStyle 2014/04 modelo116. Material: malha tipo neopreno estampada com andorinhas.
 
Material: malha tipo neopreno estampada com andorinhas.

Here are a few details of the finishing of the pants which were very easy and quick to make (because I skipped the more elaborated details; I believe that it was the best choice for this type of fabric). The faced waistline: 
 
--- 
 
A seguir têm alguns detalhes do acabamento das calças que foram fáceis e rápidas de fazer (muito devido a ter eliminado os detalhes mais elaborados, mas creio ter feito a opção mais acertada dadas as características deste material). A cintura com vista metida e pespontada:
The side-zipper / o fecho na lateral:


The hemming process is quite simple because this knit doesn't run: simply fold the hem allowance to the inside, topstitch it using a narrow zigzag stitch and trim the excess: 
 
--- 
 
Fazer as bainhas é muito fácil pois esta malha não se desmancha; basta dobrar para dentro, pespontar (com um ponto de ziguezague longo e estreito) e aparar o excedente:

There isn't much to say about this pattern: it’s a great basic pattern for pants and I will definitely try the original version with side pockets/closure later. I have yet another sewing review to write (I'm a little behind on reviewing my finished projects) so stay tuned for more! Thank you all so much for reading! 
 
--- 
 
Não há muito mais a dizer sobre este molde, exceto que é um ótimo molde-base; muito provavelmente farei as calças com os detalhes originais, mas utilizando outro tecido. Entretanto tenho ainda mais um projeto para mostrar (ando um pouco atrasada com os artigos de costura), por isso fiquem atentos! Muito obrigada por visitarem!

2014#16 – The swallows set part 1: the top – Conjunto Andorinhas parte 1: o top


Pictures of me wearing the Swallows set are published here.
Description: Overlapped front top with 3/4 sleeves and bounded neckline. 
Pattern Used: BurdaStyle 2014/04, model 115, I cut a 38 without any alterations. I cut the back piece on the fold, omitting the back seam.
Fabric: Neoprene-like swallow print knit in pale pink. I also got the coordinating fabric in black and I plan on making the short pants (BurdaSTyle 2014/04 model 116) with it. 
--- 
Fotos minha sa usar o conjunto Andorinhas foram publicadas aqui.
Descrição: Top com mangas a ¾, frentes sobrepostas e decote avivado. 
Molde: BurdaStyle 2014/04 modelo 115, cortei o tamanho 38 sem modificações. Cortei as costas na dobra do tecido, omitindo assim a costura do meio de trás por não ser necessária.
Tecido: Malha tipo neopreno rosa-claro com estampado de andorinhas. Também tenho a malha coordenada em preto e planeio fazer as calças do conjunto (BurdaStyle 2014/04 modelo 116) com esta malha.


This was a fun and easy top, I am very happy with the end result. Being easy doesn't mean you don’t need to be precise; the mitered corner should be flat and perfect, the top-stitching should be at a constant distance from the edge (I used long & narrow a zigzag stitch to top-stitch). 
--- 
Este top foi fácil e divertido de fazer e fiquei muito satisfeita com o resultado. O facto de ser fácil não implica desleixo nos acabamentos: o canto da frente deve ficar plano e perfeito, o pesponto ao longo das orlas deve estar a uma distância constante das mesmas (para pespontar usei um ponto ziguezague de comprimento 2,5 e largura 0,5).

The outer front edge should match the armhole seam exactly at the shoulder, not being caught by the armhole stitching or being apart from it: 
--- 
A orla de for a da frente deve coincidir exatamente com a costura da manga no ombro, não ficar presa nessa costura nem ficar afastada:

I highly recommend this pattern and I think it will work with a multitude of fabrics, so I plan on using it again. Stay tuned for the pants review and for pictures of me wearing the set at Tany et La Mode, coming up soon! 
--- 
Recomendo vivamente este molde e sei que resultará com vários tipos de tecido, como tal planeio usá-lo mais vezes. Fiquem atentos para o artigo sobre as calças dos conjunto e para fotos minhas a usá-lo, muito em breve no Tany et La Mode!