Wearing the beanie and scarf that I've just finished knitting - A usar o gorro e o cachecol que acabei de tricotar
More outfit photos were published here!
(click here for the project notes)
---
Mais fotos do conjunto aqui!
(clicar aqui para as notas acerca do projeto)
A quick & simple knitting project – Um projeto de tricô simples e rápido
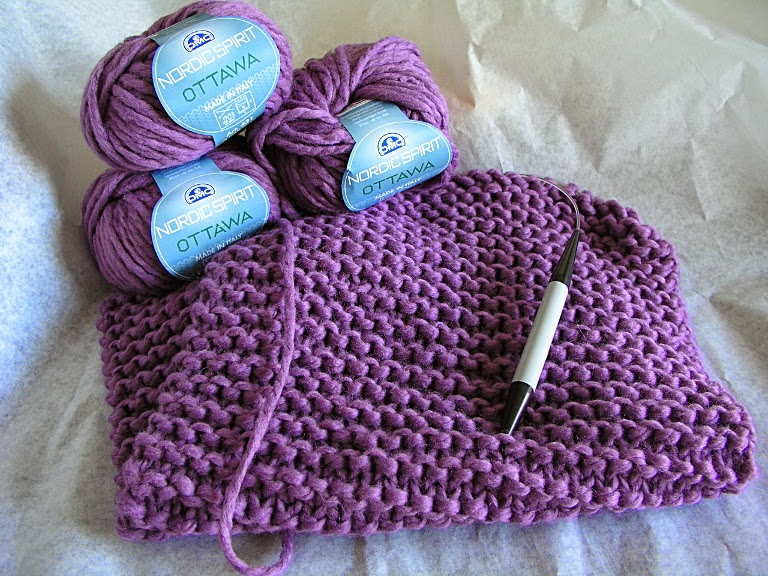
Hello dear reader and friends, I’m just getting back "in business" after a long absence,… Life hasn't been easy on me lately and unfortunately I haven’t been able to update this blog or even sew/kit as much as I’d wish. Today I have a finished knitting project to share, a quick and easy garter stitch beanie. I used three skeins of DMC Nordic Spirit Ottawa yarn in violet and size 13 circular needles (10mm) to knit a garter stitch rectangle. I casted on 42 stitches and knitted for 11 ½ inches then bind off leaving a long yarn trail. I threaded the long train into a blunt needle and then stitched in-and-out along bound off edge. I pulled to gather top of the hat, gave it a few more stitches to secure it well and sewed the seam, shifting sides middle way (because of the turn-up).
---
Olá queridos leitores e amigos, estou de volta após uma longa ausência… A vida não tem sido fácil por estes lados e infelizmente não tenho podido atualizar o blogue, nem sequer costurar/tricotar tanto quanto desejaria. Hoje tenho um projeto de tricô muito fácil e rápido para partilhar, um gorro muito simples e rápido de fazer todo tricotado em liga com agulhas e lã grossas. Usei três novelos de lã Nordic Spirit Ottawa da DMC, cor violeta, e agulhas circulares de 10mm para tricotar um retângulo em liga. Montei 42 malhas e tricotei por 29cm, rematando todos os pontos e deixando uma ponta de fio comprido. Depois de enfiar a ponta de fio numa agulha romba para lã grossa, enfiei-a através dos pontos rematados e puxei, franzindo o topo do gorro. Dei alguns pontos para segurar bem e continuei a coser a costura central do gorro, tendo o cuidado de trocar o avesso pelo direito a meio da costura porque o gorro tem uma dobra para fora.
Using 5-6 7 more skeins I’m also knitting a matching scarf: cast on 25 stitches and knit in garter stitch until getting the desired length, then bind off (note: I used size 17 needles to knit the scarf). I really loved the end result with this chunky yarn and the vibrant violet color and perhaps I'll knit another set like this using a different color. It’s the ideal project to keep the hands busy while watching your favorite TV series in the evening (I’m able to knit without looking down to my hands).
---
Usando mais 5 a 6 7 novelos estou a fazer um cachecol a condizer: montei 25 malhas em agulhas de 12mm e estou a tricotar em liga até atingir o comprimento desejado. Adoro o resultado desta lã grossa e a cor violeta, e não ponho de parte fazer um conjunto igual noutra cor. Este género de projetos são ideais para manter as mãos ocupadas enquanto se vê televisão à noite (uma vez que consigo tricotar sem ter de olhar para o trabalho em mãos).
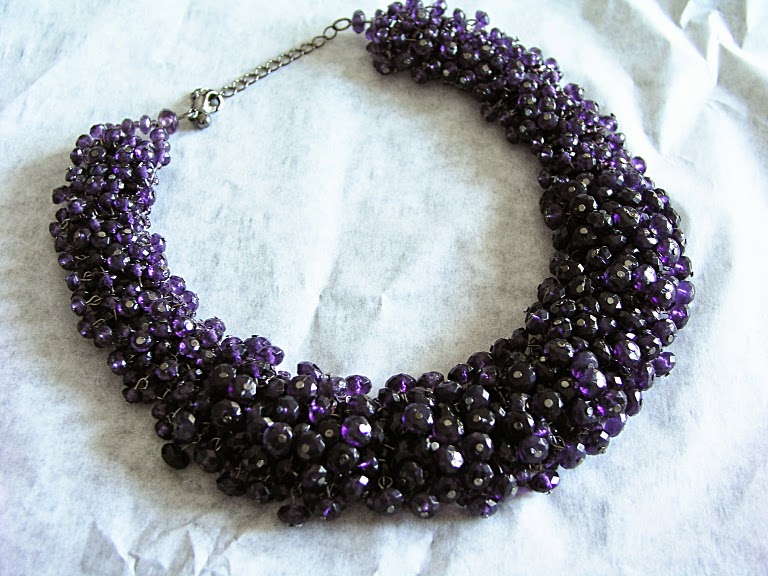
In spite of the simplicity of the project, ideal for the beginner knitter, I found the result to be quite stylish and I can’t wait to wear this set (keep an eye out on my wardrobe blog for an upcoming outfit featuring the beanie and the scarf). I also got this beautiful necklace as a gift and its color complements my knitting set beautifully, don't you think?
---
Apesar da simplicidade do projeto, ideal para as principiantes, achei o resultado muito bonito e com muito estilo, mal posso esperar para usar o conjunto (fiquem atentas ao meu blogue de estilo pessoal!). Também recebi este colar lindíssimo de presente, cuja cor complementa muito bem o gorro e o cachecol, não acham?
On the sewing side I'm working on a coat (BurdaStyle 11/2014, model 111), hopefully I’ll get it finished in a week or two. You all have a wonderful week ahead, and thank you so much for visiting!
---
Quanto à costura, estou a trabalhar num casaco (BurdaStyle 11/2014, modelo 111), espero tê-lo acabado em uma ou duas semanas! Tenham uma ótima semana e muito obrigada por aparecerem!
Burda Vintage (the 50’s): did you get yours already? – Burda Vintage (Anos 50): Já têm a vossa?
The Portuguese edition is out today! There are eleven vintage style multi-size patterns featured in this magazine (see the full preview here) and my favorites are the following:
---
A edição portuguesa está hoje nas bancas! Nesta revista encontram onze moldes estilo vintage (cada molde é fornecido em vários tamanhos, ao estilo da revista BurdaStyle); podem ver a coleção completa clicando aqui. Os meus favoritos são os seguintes:
Note: this is not a sponsored post; all images are courtesy of burdastyle.pt.
---
Nota: Este artigo não foi patrocinado; todas as imagens são de burdastyle.pt
2014#26 – Faux leather vest (BurdaStyle 10/2010_mod129), V2.0 – Colete de imitação de pele com pelo, V2.0
Pattern: BurdaStyle 10/2010_mod129, cut size 38 (note: I've already sewn this pattern before in 2010, click here for V1.0)
Description: Shearling leather vest has raw edges, cascade collar and overlapped seams. The vest is tied to the waist.
Material: This time I used dark brown faux leather with fur on the wrong side, a much thicker material to sew with; I used a leather needle (#100), regular thread on the bobbin and buttonhole twist thread on the needle. The stitch length used was 4mm. My sewing machine behaved surprisingly well and I will probably sew with this faux leather again, if I can still find it on sale.
---
Molde: BurdaStyle Portuguesa nº5/2010 (Outubro 2010), modelo 129 (nota: já tinha feito este modelo em 2010, podem ver a versão 1.0 clicando aqui). Cortei o tamanho 38.
Descrição: Colete em carneira com orlas a fio, gola cascata e costuras sobrepostas. Tem tiras para atar à cintura.
Material: Desta vez usei imitação de carneira castanha-escura (com pelo no avesso), um material bastante mais grosso do que tinha usado da primeira vez (comprei na Feira dos Tecidos em Aveiro). Usei uma agulha especial para pele nº100, linha normal na bobine e torçal na agulha. O comprimento do ponto usado foi 4mm. A minha máquina portou-se surpreendentemente bem neste projeto, por isso não descarto a possibilidade de voltar a trabalhar com este material.
Side and back views / Vista lateral e das costas:Back collar seam / Costura de trás na gola:
Shoulder seam / Costura dos ombros:
The waist ties are made of pre-folded corduroy bias tape, folded lengthwise and top-stitched:
---
As tiras de atar são feitas de fita de viés de bombazine dobradas no sentido do comprimento e pespontadas:
Now I must eagerly wait for the colder winter days to wear my my new vest! Thank you so much for reading!
---
Agora só me resta esperar por dias mesmos frios para poder usar o meu novo colete! Obrigada a todos por aparecerem!
Me wearing V8946 today - Hoje, a usar o vestido Vogue 8946
2014#25 – Close-fitting dress with front pleats detail (V8946) – Vestido justo com detalhe pregueado na frente
Pattern: Vogue 8946
Description: (from voguepatterns.mccall.com) Close-fitting, partially lined dress has front seam/dart detail, pleats, narrow hem and back-zipper; view C has back slit. I’ve made view B (size 12) with a few modifications.
---
Molde: Vogue 8946
Descrição: Vestido justo parcialmente forrado tem na frente costuras/pinças com pregas, bainha estreita e fecho atrás; a opção C tem uma racha atrás. Fiz a opção B (tamanho 12) com algumas modificações.
Fabric: blue neoprene-like fabric with satin finish (this knit fabric has some body, yet it also has a fair amount of stretch).
Alterations: Given the fabric thickness and stretch ability, I didn't need to add the back zipper; I also didn't need to add the partial lining to the front; these factors made the construction pretty straight forward and quick. In spite of my body measurements indicating a size 16, due to my previous experience with these patterns and knowing that I have a long torso and broad chest (also taking into account the fabric fair amount of stretch and previously measuring the flat pattern just to be sure) I cut size 12, tapering to a 16 on the armhole height and chest width; I cut the sleeve on size 16 to fit the slightly increased armhole height and depth.
Seam treatment: used a narrow/long zigzag stitch and left the SAs raw. For the neckline I cut a 1,5 inch wide strip of fabric enough to cover the neckline circumference and used to bind the neckline after trimming off the SA.
---
Tecido: malha acetinada tipo neopreno (a malha tem algum corpo, não é fina; no entanto é bastante elástica no sentido transversal).
Alterações: Dado que o tecido é grosso e bastante elástico não precisei nem de aplicar o fecho atrás, nem de forrar a frente do vestido, o que tornou a construção bastante mais rápida e fácil. Apesar das minhas medidas indicarem usar o tamanho 16, dada a minha anterior experiência com moldes vogue, o facto de a malha ser bastante elástica e eu ter um torso alto e peito largo (é claro que também medi o molde para confirmar), cortei o tamanho 12, aumentando para um 16 na largura do peito e na altura do ombro. A manga foi cortada no tamanho 16 para encaixar na cava que ficou ligeiramente mais alta e profunda.
Tratamento das costuras: usei um ponto ziguezague de 2mm comprido por 0.5mm de largura para todas as costuras; para rematar o decote cortei uma tira no sentido da largura da malha, com cm de largura e comprimento suficiente para cobrir a circunferência do decote. Depois de cosidas juntas as extremidades da tira, prende-se ao decote (depois de aparar as margens de costura deste) com alfinetes, direito contra direito, e cose-se à largura desejada do vivo; vira-se a tira para dentro contornando a beira do decote e prende-se com alfinetes; para finalizar cose-se exatamente por cima da costura em redor de todo o decote e apara-se o excesso da tira no avesso.
Conclusion: Really love the end result and the fact that this was a quick & easy project. I highly recommend this pattern if you’re in for this style of dress. Now all I need is some proper fall weather to be able to wear this dress! Thank you all so much for reading!
---
Conclusão: Gostei bastante do resultado final e do facto de ter sido fácil e rápido de fazer. Recomendo vivamente este molde se gostarem deste género de vestidos. Agora só é preciso que venha o Outono a sério, para poder estrear este vestido! Muito obrigada a todos os que passam por aqui!
2014#24 – Green flower print sheer blouse – Blusa verde estampada com flores
Description: Blouse with straight faced neckline, wide sleeves and dropped shoulders. The original neckline has some sort of edge piping which I omitted. I also narrowed the neckline facings. I wanted something easy and straight forward to use this leftover fabric for, which I bought because I was quite fond of the print and color.
Pattern: Patrones Magazine nº238, model 27; though my size on this magazine corresponds to a 42, only sizes 40, 44 and 48 were featured. I could have traced the in between size (click here for a tutorial on how to trace in between sizes), but figured it wouldn't be necessary for this loose-fitting design, so I traced the 44 directly out of the pattern sheet.
---
Descrição: Blusa com decote reto com vista, mangas largas e ombros caídos. O original tem uma espécie de vivo no decote, que resolvi omitir, mantendo apenas as vistas, que estreitei tanto quanto possível. É um top básico e fácil, ideal para usar o retalho de tecido sobrante que comprei por gostar do estampado e da cor.
Molde: Revista Patrones nº238, modelo 27; embora o meu tamanho nesta revista seja o 42, na folha de moldes apenas são fornecidos os tamanhos 40, 44 e 48. Poderia ter traçado o tamanho intermédio (têm aqui um tutorial de como proceder), mas como este modelo é bastante solto, resolvi traçar o 44 diretamente da folha de moldes.
Alterations: Besides omitting the neck edge piping (it would be done using 1cm wide bias strip of self-fabric pressed in half lengthwise and stitched between the neckline and the facing), I also added a center back seam. The instructions don’t mention any kind of back or side slit on the neckline and after carefully measuring the neckline pattern on the round, there was no way I could slip this top through my head; it was either cutting a slit and bind it with a bias strip or adding a CB seam, which was easier and quicker.
---
Alterações: Além de omitir o vivo do decote (seria feito com uma tira de tecido de 1cm de largura cortada em viés, dobrada ao meio no sentido do comprimento e aplicada entre o decote e a vista), acrescentei uma costura no meio das costas. As instruções não falam de qualquer tipo de abertura adicional no decote, e como já tenho alguma experiência com estes moldes da Patrones, medi o decote para ver se realmente não precisava de abertura. Confirmei o que já desconfiava, nunca iria conseguir enfiar este top pela cabeça. A solução seria fazer uma abertura cortada no tecido e debruá-la com viés ou, mais fácil e rápido, coser uma costura a meio das costas.
Next there's a series of detail photos of the finished neckline:
---
A seguir têm uma série de fotos detalhando o decote da blusa:
As for seam finishing I used my serger and all the hems were simply turned inside, pressed and topstitched.
---
Quanto ao acabamento interior das costuras, usei a corte-e-cose e as bainhas foram simplesmente assentes a ferro para o avesso e pespontadas pelo direito.
Last notes:
This is a polyester sheer fabric which surprisingly behaved quite well; nevertheless a few things to take into account are: low temperature iron with no steam, the use of a
pressing cloth between the iron and the fabric, careful choice of interfacing
(I used thin knit interfacing which fuses at low temperatures without steam), a
thin machine needle and ALWAYS testing the stitches on scraps of fabric on both
sewing machine and serger. Next there’s a photo of me wearing the top with the
matching shorts and if you care to see a few more outfit photos, check them out
at my wardrobe blog (click here). Thank you all for reading, happy sewing!
---
Notas finais: Este tecido é muito fino e de poliéster, por
isso há que ter em atenção alguns detalhes: usar temperatura baixa sem vapor no
ferro de engomar, usar sempre um tecido próprio para passar entre o ferro e o
tecido da blusa, escolher com cuidado a entretela (usei entretela fina de
malha, que cola a baixa temperatura e sem vapor), usar uma agulha fina na
máquina e testar SEMPRE as costuras nos retalhos sobrantes, tanto na máquina de
costura como na corte-e-cose. A seguir têm uma foto minha a usar a blusa com os
calções que mostrei no post anterior; se quiserem ver mais fotos do conjunto, podem ir ao
meu blogue de estilo pessoal (clicar aqui). Muito obrigada por seguirem,
felizes costuras!
Subscribe to:
Posts (Atom)
-
EN Summary: Tailoring is definitely my favorite sewing expertise and I believe I achieved a match made in heaven with this wool tweed and th...
-
EN Summary: Today I have for you the Portuguese/ English translation of an excellent article written by the professional Couturier/Tai...
-
Português English (uncheck the other box and check this one) No sábado de manhã consegui avançar um pouco nas mangas do casaco, aplicando-lh...
-
EN Summary: This blazer features a notched collar with collar stand and a neckline hidden dart. In this article I will try to demonstrate t...
-
EN Summary: There are several methods to neatly finish the bottom front corners and I have tried quite a few. Here’s a step-by-step descr...
-
EN Summary: In this article I am demonstrating how I finished the Parisian Jacket bound buttonholes on the facing side of the jacket (in...