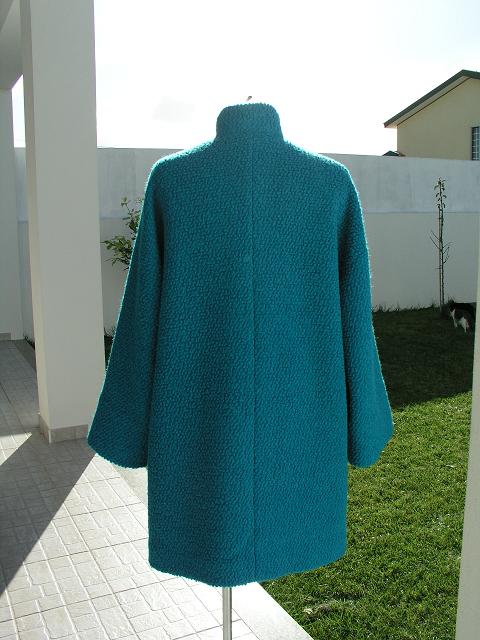
2011#37 – “Abrigo T” (pattern by Paco Peralta)

Português
English (uncheck the other box and check this one)
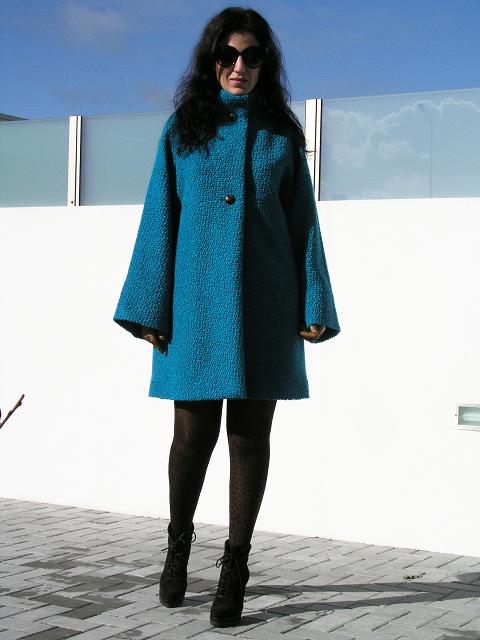
(mais fotos de mim a usar o casaco aqui)

Descrição: Casaco amplo em forma de “T”. Este modelo tem um encaixe na frente e uma gola “em pé” com casa de botão na costura. Os ombros são caídos e as mangas largas têm duas opções: compridas ou a ¾ com uma dobra (no molde da manga estão marcadas as linhas de corte para as duas opções, assim como as diferentes linhas de corte para o forro da manga). Tem bolsos metidos na costura lateral e é completamente forrado.

Molde: Original Alta-Costura de Paco Peralta (disponível para compra aqui). O molde está escalado em 3 tamanhos (P, M e L – ver especificações na página ETSY do molde), eu cortei o M. É fornecido numa folha contínua de papel vegetal e contém já margens de costura (1,5cm) e bainhas (5cm), pronto a cortar e a colocar sobre o tecido. Também são fornecidos moldes para cortar o forro do casaco.
Tecido usado: Misto de lã e poliéster, efeito “lã feltrada”, comprado na Feira dos Tecidos a 19,95€/m. Usei 2,15m de tecido, com alguma “ginástica” no plano de corte. Quanto ao forro, leva praticamente a mesma metragem.

Mais fotos do casaco:
Confecção: Este casaco é relativamente fácil de confeccionar (o molde não vem com instruções) e o Paco publicou já alguns passo-a-passos muito úteis:


Artigo sobre a confecção industrial (para verem como se aplica o forro ao casaco, obtendo um acabamento industrial): http://uniquedesignerpatterns.blogspot.com/2008/01/chaqueta-confeccin-industrial.html

Aqui vou listar os principais passos na ordem como os segui e também mostrar o processo de aplicação da gola em pé ao casaco:

1º Apliquei entretela termo-colante suave na gola, nas frentes (ao longo do meio da frente e também na vista incorporada, nas bainhas do casaco e das mangas. Apliquei também tiras de entretela para reforçar a entrada dos bolsos.
2º - Cosi o encaixe da frente às partes de baixo da frente, deixando a abertura para a casa de botão na frente direita e na respectiva vista incorporada
3º - Cosi a costura do meio das costas
4º - Cosi as costuras dos ombros
5º - Cosi as mangas abertas na costura das cavas
6º - Reforcei todo o decote com um pesponto
7º - Cosi as costuras laterais do casaco (deixando as aberturas para os bolsos) e, em continuação, as costuras das mangas
8º - Confeccionei os bolsos metidos na costura
9º - Cosi o encaixe da frente em forro às partes inferiores da frente
10º - Cosi as partes da frente em forro às vistas da frente
11º - Cosi a costura do meio de trás do forro, deixando uma prega como indicado no molde; reforcei o decote com um pesponto
12º – Cosi a costura dos ombros das costas em forro aos ombros da frente+ vistas, obtendo uma abertura circular, onde se aplicará a gola em pé:
13º – Cosi e virei a gola, golpeando nos cantos:
14º - Inseri a gola na abertura, golpeando ao longo dos valores de costura da abertura, reforçados com um pesponto:
15º - Depois de coser a toda a volta (não esquecer de deixar as aberturas para a casa de botão aqui também), dei uns piques nos valores de costura da gola, abri as costuras a ferro evirei tudo para o direito. Cosi as costuras sobrepostas com pontos atrás mesmo na linha da costura e assentei tudo a ferro:
16º - Prossegui com a confecção do forro, cosendo as mangas às cavas e depois fechando a costura lateral e a das mangas na continuação. Deixei uma abertura no forro numa das mangas, para poder virar o casaco depois de aplicar o forro pelo método industrial
17º - Apliquei o forro pelo método industrial, virei o casaco para o direito, alinhavei todas as bainhas no lugar, alinhavei também as vistas da frente à frente na sua posição definitiva, virei de novo para o avesso, cosi as bainhas à mão, cosi as vistas à frente do casaco, tudo no avesso. Depois foi só virar o casaco para o direito pela abertura no forro e fechar a abertura com pontos à mão.
18º - Dei uns pontos invisíveis à mão nas casas de botão e apliquei os botões; depois de uma última passagem a ferro ao casaco e ao forro, o trabalho está concluído!

Modificações ao molde: As mangas na opção A são bastante compridas; acabei por fazê-las mais curtas 6cm, obtendo assim umas bainhas mais largas que permitem usar as mangas com punhos virados, como mostro a seguir:
Mais detalhes:

Os botões são muito giros na minha opinião:
Os bolsos metidos nas costuras:
Eis o forro:
Os cantos em baixo, confeccionados pelo método industrial explicado pelo Paco:
A etiqueta do criador (fornecida junto com o molde) e a minha etiqueta:
Conclusão: Um excelente molde, como aliás o Paco nos tem habituado e para casaco é dos mais fáceis de confeccionar, uma vez que o molde é simples (a gola é bastante fácil, os bolsos idem, e não tem detalhes muito difíceis). Gosto do estilo minimalista e recto, das linhas puras que ao mesmo tempo respeitam a anatomia do corpo e creio que o resultado final foi bem conseguido. Como sempre, podem ver-me a usar este casaco aqui. Beijinhos, obrigada por visitarem e tenham um óptimo fim-de-semana!


(More pictures of me wearing this coat are published here)

Description: Lined T-shaped straight-cut coat, has a front yoke, stand-up collar, in-seam buttonholes and in-seam side pockets. It features dropped shoulder and two options for the sleeves: long or ¾ with turn-ups (there are cutting lines for both options on the pattern, and for the lining as well)

Pattern: Haute-Couture Original by Paco Peralta (available for sale here). The pattern comes graded in three sizes (S, M and L – specifics on the patterns webpage) and I cut the M. It’s drafted by hand on a continuous pattern paper and includes 5/8 seam allowances and 2” hem allowances, ready to be cut and placed on the fabric. The lining pattern is also included.

Fabric: Wool/polyester blend, sort of boiled wool finished, bought locally. I used 2.5 yards of fabric and roughly the same in lining (buy extra fabric, to be safe).

A couple more pictures of the finished coat:

Construction: This is an easy project (I mean for a coat; it’s important to know that this pattern doesn’t include instructions or cutting layouts) and Paco already published some useful tutorials that provide good insight on how to make this coat:


In the present article I will describe the main steps and construction order that I used, showing in more detail the making of the stand-up collar:

1º Apply interfacings (I used soft fusible interfacing, similar to pro-weft interfacing): collar, facings, along center front (roughly facing wide), hem allowances (5 inches wide) and pocket openings.
2º - Stitch the front yoke/facing to the bottom front/facing, leaving openings for the buttonhole on both right front and facing
3º - Stitch the center back seam
4º - Stitch the shoulder seams
5º - Stitch the sleeve pieces to the armholes
6º - Reinforce the neckline stitching near the seam line (you can also reinforce the neckline with fusing tape or a strip of lining selvage; I didn’t because the collar piece is cut on the grain and it is stable enough)
7º - Stitch the side seams (leaving the pocket openings unstitched) and the sleeves seams in a continuous step
8º - Construct the in-seam pockets
9º - Stitch the lining front yoke to the bottom front
10º - Stitch the lining fronts to the front facings
11º - Stitch the lining back seam leaving a fold for ease of movement, as indicated in the pattern
12º –Stitch the lining back to the lining front/facing along the shoulders, obtaining a circular opening, where the collar will be later inserted:

13º – Stitch the collar (folded in half, stitch along the narrow edges not crossing the seam allowance in the collar line, then clip corners and turn to right side)
14º - Insert the collar in the neckline opening, clipping around the reinforced neckline edge;
15º - Stitch all around the collar/neckline (don’t forget to leave the in-seam buttonhole openings where marked on the right front and facing), notch the collar SAs and press the seams open. Turn everything to the right side and backstitch on the ditch around the neckline, making sure the seams match on the right side and lining side. Press one last time
16º - Proceed with the lining construction, stitching the lining sleeves to the lining armholes and then the lining side seams/sleeve seams, all in a continuous step. I left an opening in one of the sleeve seams to be able to turn the coat/lining to the right side once the lining is bagged
17º - I bagged the lining using the industrial method explained by Paco. Turned the coat/lining to the right side and basted the front facings in place, and all the hems; turned the coat/lining to the wrong side again and hand-tacked the hems and the front facing to the front. Turned the coat/lining to the right side, closed the lining opening and removed the bastings
18º - Slipstitched the buttonholes by hand and stitched in the buttons; after one last pressing the coat is finished!

Alterations: The only alteration was shortening the sleeves by a little more than 2”, and because of this I got a wider hem allowance. This way I can also do turn-ups if desired:
More details:

I really love the buttons:
The in-seam pockets:
Here’s the lining:
The facing/hem/lining corner obtained by the industrial bagging method explained by Paco:
The designer’s label (there’s one included with each of Paco’s patterns), along with mine:
Conclusion: This pattern is rated excellent by my book, nothing less should be expected from Paco; everything is carefully marked and labeled, all pattern pieces match perfectly. This coat is fairly easy to make (the collar is very easy, the in-seam pockets are quite straight forward as well; there aren’t any real challenging details). I like the clean straight lines, the minimalistic style yet respecting the body’s anatomical characteristics, and I believe the end result is quite outstanding. As usual, there are more pictures of me wearing this coat here. Have a great weekend and thank you for visiting!

2011#31 – Twisted collar raglan top – Top raglan com gola torcida

Português
English (uncheck the other box and check this one)
Fiz este top a partir de um molde que já usei algumas vezes, o modelo 112 da Burda de Fevereiro de 2010:
Usei uma malha muito original (comprei o retalho na Feira dos Tecidos) de cor cinza claro com um efeito enrugado e ligeiramente transparente. Para tornar o modelo único, fiz algumas alterações: uma gola alta torcida e costuras franzidas nos lados à altura da anca e nas mangas na zona do cotovelo. Mudei o plano de corte (cortando atravessado no tecido) para que as bainhas coincidissem com a aurela do tecido, evitando assim ter de coser bainhas. O molde incluí instruções para cortar uma tira estreita de remate para o decote; usando o mesmo comprimento, cortei esta tira duas vezes (uma para a gola interior e outra para a gola exterior) e muito mais larga (uns 12cm de largura). Cosi as duas tiras, direito contra direito, ao longo de uma das beiras compridas e depois cosi os extremos mais estreitos das duas tiras (direito contra direito), fechando assim a costura das costas da gola. Se fosse coser uma gola alta normal, dobrava a parte interior da gola para dentro e unia as duas partes ao decote, formando a gola; o que fiz foi apenas desencontrar a beira de dentro da gola com a de fora antes de coser tudo ao decote, obtendo assim o efeito torcido, é mesmo muito fácil. Depois é só rematar a costura por dentro e a gola fica pronta.
Para franzir as costuras basta coser com ponto ziguezague elástico de franzir transparente às orlas das costuras por dentro, estas franzirão naturalmente.

Aqui têm mais algumas fotos com detalhes:

NOTA: Encontrei um tutorial de como debruar uma gola com vivo torcido que pode ajudar a perceber como se faz este tipo de gola, pois o princípio é o mesmo: Sew Intriguing - Twisted binding

NOTA2 (2011-11-13): Descobri um tutorial que explica esta técnica também aqui.

Também fiz um par de calças usando o molde McCalls 6404 (vista D), e uma malha estável cinza clara, mas adicionei umas tiras pretas de lado, com cerca de 1,5cm de largura. Queria que as calças não ficassem tão justas (mais ao estilo calça-de-treino) e assim mais confortáveis. Também deixei uma racha na bainha, mesmo na frente da calça, para lhe dar um toque sofisticado, principalmente se usar a calça com sapatos de salto alto (stilletos). Ainda não tenho fotos da calça, mas tenciono brevemente tirar fotos com o conjunto completo para publicar no meu blogue de guarda-roupa.

Finalmente, queria falar-vos de algo que me tem incomodado há já algum tempo (já mencionei o mesmo no meu outro blogue):
Alguns amigos têm-me escrito com queixas de malware/vírus nos meus blogues; posso garantir com toda a certeza que os meus blogues não estão infectados (tenho diagnosticado frequentemente usando as ferramentas Webmaster do blogger). Sei que há alguns problemas de compatibilidade com alguns browsers além do Internet Explorer e não posso garantir que alguns dos links na barra lateral não estejam a despoletar estes avisos. Uma solução seria eliminar a lista de blogues na barra lateral, mas preferia não ter de o fazer. Também ouvi dizer que os contadores de visitas também podem estar a despoletar avisos de vírus, mas o que realmente desconfio é que algumas firmas comerciais de venda de anti-virus estão a despoletar estes avisos para levar as pessoas a adquirir o seu software de protecção.
Por favor digam-me se têm tido experiência de algum destes problemas nos meus blogues. Obrigada.

I made this top from my TNT raglan top base pattern, the February 2010 BWOF model 112:
I used a very original light grey jersey fabric, slightly see-through and with some kind of wrinkle effect on it. I customized this top with a twisted collar and some shirring along the sleeve seam at the elbow and the side seams on the hip area. I changed the cutting layout so the hems coincide with the knit selvage, thus avoiding any hem seaming. The pattern includes instructions for cutting a self-fabric binding tape; instead of the required tape width, I cut the same length but much wider (as wide as the intended collar height); I cut it twice (outer collar plus inner collar). Instead of sewing it like a regular turtle-neck with a seam on the top, I did something different: first joined the two collar pieces wrong sides facing each other and stitched along one of the longer edges; then opened the sewn collar rectangle and joined the narrower edges of the outer and inner collar, wrong sides facing, thus closing the back neck seam in one single step. If you fold the inner collar to the inside, you’ll obtain a regular turtleneck that can be sewn directly to the top’s neckline. What I did differently was shifting the inner collar layer by about 3 inches before stitching the collar to the neckline, it’s this easy.
For the shirred seams, all I did was to zigzag some clear elastic tape over the inner seam allowances.

Here are a few detail pictures for your viewing pleasure:
ETA: I found a tutorial from Liana of Sew Intruguing that applies the same principle used for making the twisted collar: Sew Intriguing - Twisted binding

ETA2 (2011-11-13): Found another great tutorial at Off The Cuff blog, check it out here.

I also made a pair of pants to match this top (2011#31 to be reviewed later if I find the time), using some kind of light grey pontiroma knit. I used McCalls 6404 view D but added a black 1/2 inch wide side panel since I wanted the pants to be more relaxed and not so close fitting. At hem level I also added a front slit. I don’t have pictures of the pants yet but hopefully I’ll be able to photograph the entire outfit later this week and publish it over at my wardrobe blog.

As a side note I want to address something that has been bothering me for some time, I already stated this on my other blog:
Some friends have been writing to me complaining about malware on my blogs; I can assure you all that my blogs are not infected (I’ve been checking regularly using blogger Webmaster tools); there are a few compatibility problems with browsers other than Internet Explorer and I can’t guarantee that some of the links on the sidebar aren’t triggering virus warnings either. One solution would be to eliminate my blogroll on the sidebar but I’d prefer not to do that. I’ve also heard that the visit counters used on most blogs also trigger these warnings, but I also suspect some virus warnings are triggered by commercial entities with the intent of convincing people to buy their anti-virus software. Please let me know by email or comment if you are experiencing any problems with my blogs and again, be reassured that my blogs are malware free. Thanks.

2011#30 – The crimson dress – O vestido carmesim

Português
English (uncheck the other box and check this one)
(mais fotos minhas a usar o vestido aqui)

Modelo original: Revista BurdaStyle 10/2011, modelo 123A
Descrição: Vestido cruzado de comprimento abaixo do joelho, tem mangas ajustadas com fecho invisível no punho, tiras de atar na cintura e um folho lateral drapeado

Tecido usado: crepe carmesim (Feira dos tecidos); podem usar qualquer tecido ou malha suaves com bom cair.

Confecção: Segui as instruções da revista e não tive problemas. A única coisa que fiz a mais foi reforçar as cavas além da orla superior das frentes (pode ser feito com um pesponto ou com fita Termo colante própria). Quanto a mim este vestido tem um grau de dificuldade médio. Vou mostrar alguns pormenores para no caso de o quererem fazer ficarem já a contar com o que vos espera!

O decote cruzado é reforçado por vistas:
Podem ver aqui a terminação da vista (avesso) na frente direita (a que contém o folho), que cobre a pinça posicionada no extremo do pano frontal da saia (à esquerda da vista têm o folho lateral):
Do lado direito podem ver a fita de atar que está presa na costura da pinça:
O lado esquerdo da frente não tem o folho, apenas a tira de atar:
Toda a bainha e orlas da frente (folho incluído) foram acabadas numa orla enrolada pespontada (bainha estreita):
Aqui podem ver um pouco melhor o folho:
Outro detalhe diferente é o fecho invisível nas mangas, colocado na pinça de ajuste das mesmas (se não se sentirem confortáveis na aplicação do fecho podem omitir este detalhe, fechando a pinça normalmente; o punho é suficientemente largo para passar a mão):
No avesso:
A cintura do vestido é ajustada por quatro pequenas pregas pespontadas (duas na frente e duas atrás, onde normalmente se colocariam as pinças de um vestido recto):
Conclusão: O resultado final é bastante aproximado às fotos da revista, no entanto estas dão a ilusão que o vestido é mais evasé do que realmente é. Gostei muito do resultado final e creio que este vestido pode facilmente ser adaptado para se usar no dia-a-dia, bastando por exemplo adicionar um colete de pelo, ou mesmo uma jaqueta mais casual, e botas ou botins. Espero que tenham gostado, uma vez mais relembro que podem ver mais fotos minhas a usar o vestido aqui.

PS – O Couture et Tricot tem agora 500 seguidores no Google Friend Connect (a caixinha de seguidores está na barra lateral direita do blog, se quiserem aderir)! MUITO OBRIGADA a todos(as) os seguidores(as)!

(More pictures of me wearing the dress are published here)

Pattern: BurdaStyle Magazine 10/2011, model 123A
Description: Crossed over dress of midi length, has narrow sleeves adjusted at cuff level by invisible zippers, waist ties and a draped flounce on the right front edge.

Fabric used: crimson crepe (local fabric store); you may use any woven or knit for dresses, providing it has a good drape.

Construction: I followed the magazine’s instructions which were alright IMO, just added some reinforcement around the armholes and upper front edge (the last was mentioned in the instructions though). The reinforcement can be done by stitching on the SA very close to the stitching line or by fusing special purpose interfacing tape. I rate this dress as medium in difficulty level. I’ll show you some details so you’ll know what to expect if you decide to make this dress.

The neckline is faced (upper front edges and back neckline):
Here’s the wrong side of the right front (the one with the flounce); the facing covers a shaping dart in between the front and the flounce (the flounce is on the left, with the topstitched rolled hem):
On the right side you can see the right tie, which is caught in the shaping dart:
The left front doesn’t get a flounce; the left front will be hidden inside the dress:
The hem and lower front edges (including the draped flounce) are all finished with a rolled hem:
I raised the flounce so you can see how it is shaped:
Another detail is the cuff invisible zipper, applied within the sleeve shaping dart. This detail can be omitted because if you stitch the dart without the zipper it will still be possible to slip your hand through the cuffs, they are not too narrow.
The zipper on the wrong side:
I’m not sure you can notice it in the picture, but there is some additional shaping on the waist, managed by four topstitched pleats (two on the front and two on the back) placed where vertical darts would be on a dress:
Conclusion: The final result is pretty close to the magazine’s photos, except the dress is not as A-line as the model pictures may suggest. I really love this dress and already thought of ways of dressing it down (like adding a fur waistcoat or a causal jacket and rough boots, for example). I hope you all liked this dress as much as I did. Again, more pictures of me wearing it are published here. I wish you all a wonderful day, dear friends!

PS – Thanks to you all, the best readers in the world, Couture et Tricot has reached 500 followers on Google Friend Connect! THANK YOU SO MUCH!