EN Summary: In this article I will show details of both outer and inner shells of the boyish blazer, just before assembling them together into the finished "Parfait Dandy" blazer. Keep reading the full article on tanysewsandknits.blogspot.com.
---
PT Sumário: Neste artigo mostro detalhes das camadas exterior e interior do blazer do conjunto "Parfait Dandy", antes de as juntar formando a peça final. Continuem a ler o artigo completo em tanysewsandknits.blogspot.com.
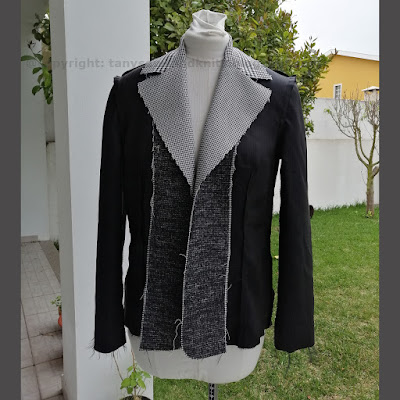
EN: A stay@home Easter break means more time to sew :). Today I was able to assemble all the pieces shown in my previous post into two main units: the outer and the inner shells of the blazer. The outer shell is ready, joining together the fronts, the back, the sleeves and the undercollar; the "cigarette" sleeve heads and the shoulder pads are already installed, as you can see in the nest two photos:
---
PT: Umas férias da Páscoa em casa significam mais tempo para a costura :). Hoje consegui juntar todas as partes que mostrei no
artigo anterior em duas unidades finais: a camada exterior e a camada interior do blazer. A camada exterior juntou as costas com as frentes, mangas e a parte inferior da gola; os
"charutos" e os chumaços já foram instalados, como podem verificar nas duas fotos seguintes:
EN: Here's how the sleeve hangs seen from the side; the cuffs are missing and will be installed in the end to both sleeve and lining together (after the outer and inner shells are stitched together into a single unit):
---
PT: Podem ver como fica a manga de lado; ainda não tem os punhos, que só serão aplicados no final prendendo mangas e forro, depois de coser a camada exterior do blazer com a interior numa peça única, :
EN: Here's the inner shell, joining the lining with the facings and upper collar:
---
PT: Aqui têm a camada interior, que junta as partes em forro com as vistas e a parte superior da gola:
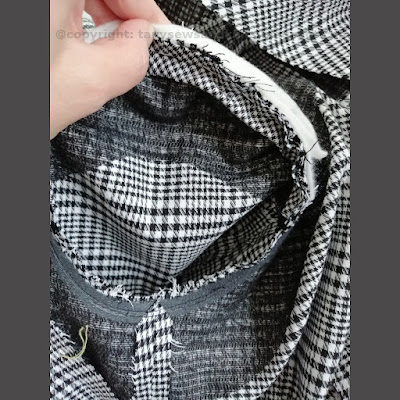
EN: I left a small section unstitched at the bottom of the front facing: it will allow sewing the lining to the hem first and then forming the horizontal lining ease pleat before stitching the facing/hem/lining intersection:
---
PT: Deixei a costura da vista com o forro aberta numa pequena secção em baixo: isto permitirá coser o forro à bainha do blazer primeiro e depois formar a prega horizontal do forro na interseção deste com a vista e a bainha:
EN: Finally I wanted to show the detail of the seam joining the upper collar&stand to the facing; the stitching must be very precise ending exactly at the lapel notch. I usually stay-stitch the inner corner on the facing before clipping it, allowing the facing inner angle to accommodate to the collar outer angle while I stitch them together. The process is exactly the same on the outer shell, when joining the under collar to the blazer neckline.
---
PT: Finalmente quero mostrar o detalhe da costura que une a gola superior com pé às vistas; a costura deve ser muito precisa, terminando exatamente no pique da lapela. Normalmente reforço o ângulo da vista com um pesponto antes de o golpear, o que permite este adaptar-se ao ângulo da gola quando se cosem os dois juntos. A gola inferior cose-se exatamente da mesma forma ao corpo do blazer.
EN: Here's how it looks on the wrong side, with all seams pressed open:
---
PT: Fica assim do avesso, com as costuras assentes abertas:
EN: Next the bagging of the blazer will follow, which means stitching outer and inner layer together at the edges and hem, almost entirely by machine. The facings and hem will then be tacked by hand from the wrong side and next the cuffs will be stitched to the sleeves and lining as one. Finally the buttonholes are made and the buttons are sewn in. I am so looking forward to seeing the finished blazer!
---
PT: O processo seguinte é forrar o blazer à maneira industrial, que significa coser quase tudo à máquina, juntando camada exterior com interior nas orlas e bainha. Depois irei prender à mão as vistas e a bainha pelo interior e aplicar os punhos nas mangas, prendendo o forro das mangas juntamente. Finalmente as casas de botão irão ser bordadas e os botões pregados. Estou bastante ansiosa para ver o blazer terminado!


2 comments:
Is the black fabric underlining or interfacing? What do you typically use? Thanks. I hope you have a nice Easter time.😊
Hi Colo Heather! What you see is thin weft insertion fusible interfacing. I usually use what goes well with the fabric in 1uestion (testing on some fabric samples is a must) according to the tailoring methods that I plan on applying (here I'm using modern tailoring techniques). In my documented projects here on the blog you'll find also traditional tailoring and couture. I've used everything from hair canvas to silk organza underlining :)
Post a Comment