English (uncheck the other box and check this one)
 Este sábado consegui colocar a gola e a parte superior começa a parecer-se com um casaco a sério! O método que estou a usar é muitas vezes referido nas instruções da revista Burda, mas como as explicações são muito sumárias e não há diagramas nem fotos, muitas vezes não é completamente compreendido. Na próxima foto podem ver a parte superior do casaco, em toda a sua glória inacabada; notem como as costuras na linha do pescoço nas vistas e casaco formam uma espécie de “buraco” e notem também que as margens se encontram reforçadas com um pesponto:
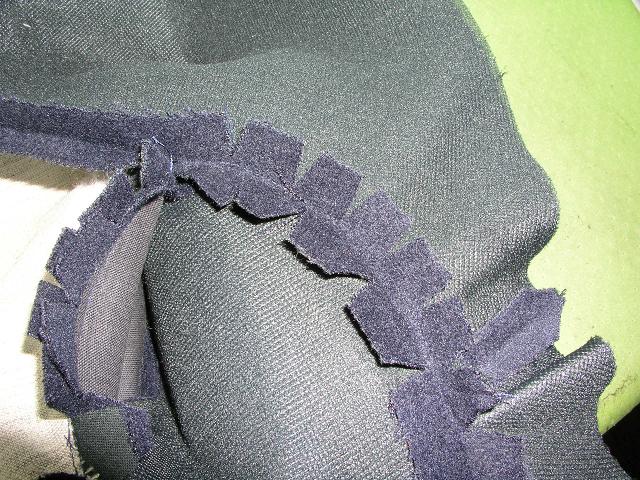
Os valores de costura são golpeados, pois a sua orla redonda tem de se adaptar a uma orla mais recta (a da gola), daí os pespontos de reforço serem necessários:

A gola já pronta é inserida nesse “buraco” e as margens do decote fixas com alfinetes; a parte de cima da gola é presa ao decote das vistas (é fácil ver porque as entretelas são iguais) e a parte de baixo da gola é presa ao decote do casaco. Primeiro fixam-se nos ombros e no centro usando as marcas de referência alinhavadas e depois vamos colocando os alfinetes ajustando as margens perfeitamente sobrepostas, até atingir os extremos da gola. Quem tiver menos experiência e quiser garantir que as costuras estão no sítio ao coser à máquina depois, deve alinhavar estas costuras:

Ao coser, viro o lado que tem os pespontos de reforço para cima e assim posso usar esses pespontos como guia, cosendo ligeiramente do lado de dentro deles. Assim evitamos que os pespontos de reforço fiquem visíveis depois do casaco acabado:

Começa-se por exemplo do lado do casaco, num canto da gola, cose-se uns pontos para trás para reforçar e continua-se até o outro canto, cosendo também aí uns pontinhos para trás (cuidado para não coserem sobre o outro lado da gola, vejam como o puxei para a frente na foto). Repete-se o processo no dado das vistas.

Antes de abrir as costuras do decote a ferro, devemos faze runs cortes em “V” nas margens da gola:

Depois, usando uma almofada de alfaiate, as costuras podem ser abertas a ferro ate ficarem perfeitamente planas:
Finalmente viram-se as lapelas e as vistas para o lado direito e alinhavam-se as orlas, favorecendo sempre o lado visível das mesmas. As margens de costura do decote devem ser escaladas, ou seja, as margens do lado do casaco devem ser aparadas de forma a ficarem mais estreitas que as margens do lado das vistas, para reduzir o volume total das costuras sobrepostas. Depois as duas costuras são fixadas juntas com alfinetes mesmo no meio da costura:

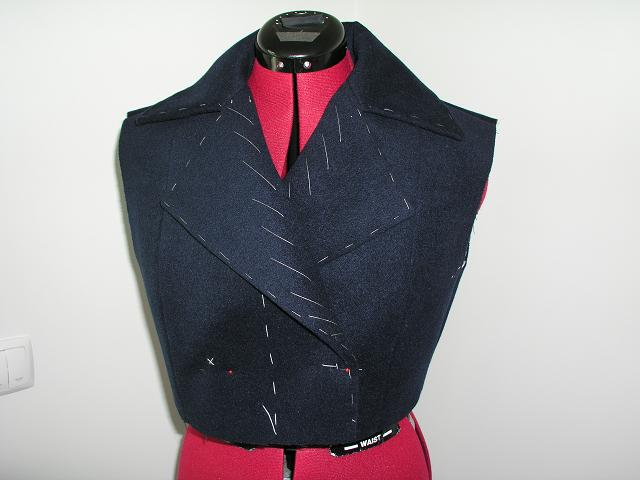
Os últimos passos serão dar uns pontos atrás ao longo das costuras do decote sobrepostas para as fixar permanentemente e alinhavar as lapelas em diagonal, para manter a curvatura. Aqui têm o casaco até agora:
Estou bastante satisfeita com o aspecto da gola e lapelas até ao momento. Em seguida vou fazer as presilhas dos ombros (não precisam de tutorial para isso, certo?) e depois avançarei para as mangas.
Esta sexta a nossa Missy foi esterilizada… Fiquei bastante preocupada e a sentir-me muito mal por a submeter a este sofrimento, mesmo sabendo que será melhor assim, mesmo para ela. Quando a fomos buscar a clínica ela veio muito fraca e cheia de dores, e quase chorei só de a ver assim. No dia seguinte já estava melhor e hoje parece quase “normal”… Isto tudo para dizer que ela também está a usar uma “gola”… Fiquei surpreendida com a facilidade com que ela se adaptou a usar aquilo!
 This Saturday I managed to attach the collar and the upper body is starting to look like a real coat now. This method is often featured in BurdaStyle instructions when sewing some jackets and coats, and because of the lack of detail and illustrations/diagrams, the instructions are often misunderstood. Here’s the upper body in all its unfinished glory; notice that there is a “hole” formed by the facings and the upper body, and also notice that the SAs are stay stitched:
The SAs of the neckline (upper body and facings) should be clipped because they are round shaped and should fit on the less round shape of the collar neckline edge:
The collar is inserted into the “hole” and the neckline edges pinned together; the upper collar is pinned to the facings neckline edge and the under collar to the coat’s neckline edge. Start by pinning together at the center lines and shoulder notches and work your way around the entire collar, taking extra care at the corners. The less experienced should hand baste for more accuracy while stitching by machine later:
I stitch on the coat/facings side so I can use the staystitching as a guide and guarantee that the stay stitching will not be visible when the seam is finished (stitching a scant to the left of the staystitching):
I start stitching at one corner (for example on the coat’s side), backstitch, and continue stitching until reaching the other corner (pull the opposite collar side out of the way as seen in the next picture or you’ll stitch over it), then backstitch again. Repeat on the facings side:
Before pressing the seams flat open, the collar SAs should be notched:
Using a tailor ham, the SAs should be pressed open and lie perfectly flat:
Finally, turn the facings and the lapels to the right side and baste the edges favoring the visible side (facings on the lapels and fronts bellow the roll line), press the edges very carefully. The neckline seam allowances should be graded too (on the coat side they should be trimmed smaller) and then I pinned “facing side” together with “coat side” matching the stitching lines exactly (the pins are in the ditch on both sides):
The final steps are backstitching by hand in the ditch (facings side up), securing those two seams together and diagonal baste the lapels. Here’s the coat so far:
I am very pleased with how it looks so far. Next I’ll sew the shoulder tabs (there’s no need for a tutorial on that, right?) and I’ll move on to the sleeves.
This Friday we had our Missy sterilized… I was very worried about her and feeling awfully for putting her into this procedure, even knowing that it’s for the best. She came home very week and aching, I almost cried. The next day she was feeling better, and today she is almost “normal”… She is wearing a “collar” too, and I was surprised on how well she adapted to it:


15 comments:
Ah tadinha!
Eu não tive coragem...
Bijou já é apavorada de natureza. Acho que se eu fizesse isso com ela, a bichinha tinha um treco!
E eu sempre alimento esperanças de ter gatinhos correndo pela casa. Nestor é que não quer nem saber disso...
Que bom que a Missy se recuperou bem! Felicidades a todos.
Beijos.
Wonderful tutorial, Tany! I have never installed the collar "in the round" like this. I can definitely see the advantages and will bookmark this page. Thanks so much.
This tutorial is greatly appreciated. Thanks for the photos and taking so much time to explain the procedures.
I am making a similar coat and I am finding this really helpful.
What professional looking results! I too am working on a coat and I already know it won't look anywhere near as good as this.
Thanks for this great tutorial. I've never sewn in a collar in the round like this, instead I have sandwiched and sewn the whole lot in one go. Your way looks lots more accurate and more likely to produce flatter results when pressing. Thanks again!
And good for you for being a responsible and caring cat owner.
A gola é mesmo bonita e já faz paracer um casaco!
Quanto à tua gata, imagino o que sentes... Também andamos a pensar em ter um gato (macho) mas terei de fazer algo idêntico e sinceramente não tenho muita vontade.
Bjs
Mónica
La Missy es una valiente...!!! Mira que guapa y que bien que está ya
Looks great and all the careful, yet time consuming work pays off. Aw, Missy kitty is so cute. Yes, taking spraying her now is for a better future for everyone.
Tany, the coat looks great so far! I think you've completed the most dificult part, or this is how it looks like. Thank you for the tutorial!
And Missy is so sweet!
Olga (RO)
Your coat is looking fantastic!!!!!!
tadinha de umas beijoquinhas nela por mim,,
Your coat looks great so far! I'm glad Missy is doing ok --- she looks so cute with her collar!
thank you for spaying your kitty. this veterinarian loves you! she is so cute:):):)
Perfect! I like the way you sew and how you explain it.
Olá Tany,
Lindo trabalho como sempre e também acho uma óptima opção colocar fecho em vez de botões mas gostos são gostos :)
Do que é da Missy :)
sei o que é porque sempre tive gatos e como dizes é por bem dela.
Eles veem meios drogados da operação :) e a mim também me partiu o coração cada vez que passamos por isso :)
Nas gatas é uma operação bem mais delicada do que para os meninos felinos ... Tenho um que foi submetido a pouco e está muito mais limpo e uma das coisas nos macho é que eles se estiverem em liberdade e não forem esterilizados acabam por fugir com a dita "barrasquice":).
Um beijinho grande
Post a Comment