The upper facings on the Burberry inspired coat – As vistas da parte superior do casaco inspirado em Burberry

Português
English (uncheck the other box and check this one)
Mais uma semana de trabalho passou, durante a qual não tive tempo para a costura. Ainda bem que tenho os fins-de-semana. No sábado consegui terminar as vistas da parte de cima do casaco, e tirei algumas fotos para ilustrar o processo. Para entretelar as vistas escolhi uma entretela de malha fina, muito maleável. Aqui têm a vista das costas, a entretela e o molde:

Depois temos as vistas da frente com lapela, a entretela e o molde respectivo:

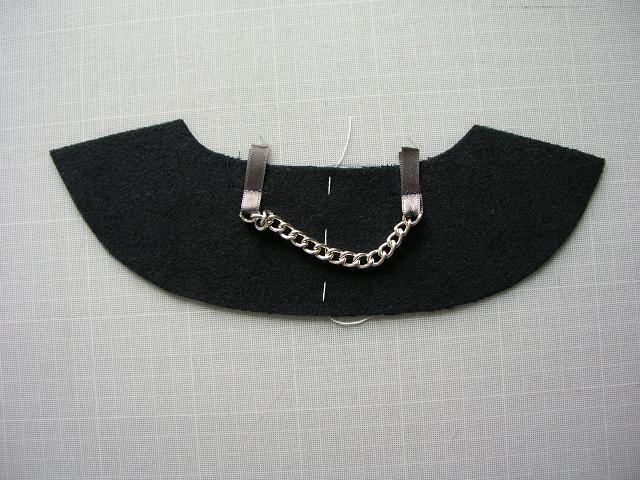
Após colar a entretela com o ferro (seguir sempre as instruções do fabricante, ou quando não as tiverem não se esqueçam de perguntar no local de compra a melhor forma de as aplicar: se devem usar vapor, quanto tempo devem pousar o ferro e exercer pressão, etc. – não se esqueçam, mesmo com as instruções, de fazer alguns testes em restos de tecido), preparei na vista das costas uma pequena corrente de pendurar o casaco; é muito fácil, basta passar fita nos elos extremos e coser a 1,3cm da orla para segurar a fita (estão a ver o direito da vista):
A seguir unem-se as vistas da frente às das costas pela costura dos ombros:

As margens devem ser aparadas, cortadas em viés e abertas com o ferro:

Porquê aparar? Estas margens vão ficar directamente por baixo das margens da costura da costura do ombro do casaco; ao aparamos a largura das margens vamos criar um certo degrade diminuindo o volume das costuras sobrepostas nos ombros, como tenta demonstrar o diagrama seguinte:

O último passo antes de aplicar as vistas às orlas da frente e lapela é reforçar a beira onde depois será cosida a gola. Cose-se a 1,3cm da orla (sendo que a margem completa é de 1,5cm), para depois podermos golpear à vontade e moldar esta margem sobre a margem da gola:

As vistas devem acompanhar a dobra da lapela, o que quer dizer que deverão ter uma certa folga em relação à frente. Para conseguir essa folga, sobrepõe-se a vista sobre a frente, direito contra direito e colocam-se uns alfinetes ao longo da linha de dobra da lapela, segurando a vista por baixo:

Depois vira-se a lapela sobre a linha de dobra, reparem como a vista ficou mais “curta” nas margens:

Fixam-se as margens desfasadas com alfinetes, para depois coser (com a frente virada para cima) desde o sinal de aplicação da gola até abaixo:

As margens da lapela e da orla da frente devem ser escaladas (aparadas em degrade) para uma vez mais diminuir o volume das beiras:

Notem como o final da dobra é golpeado e o degrade, é cortado, ficando as margens da frente maiores (uma vez que da dobra para baixo a parte que fica para fora é a frente):

Outro pormenor é o tratamento na ponta da lapela; vejam como cosi alguns pontos em viés e como as margens estão aparadas:

Para abrir as costuras a ferro (um passo importante se queremos orlas direitinhas e com aspecto profissional) estou a usar uma tábua de alfaiate multi-usos (na figura seguinte têm as inscrições explicativas na própria tábua), que ganhei num sorteio no Blogue Miss Celie’s Pants:


Ainda não vou virar as vistas para o direito porque antes vou confeccionar e aplicar a gola, este é o assunto do próximo artigo. Deixo-vos com uma foto da Missy, que resolveu reclamar a entretela para si. Os gatos são quase todos assim, e tenho a certeza que esta se ia dar muito bem com o Wellie, o gato da Summerset!

Another working week has passed within which there was no time for sewing. Thank God I still have some time left to sew during the weekend. Saturday I was able to sew the facings to the upper part of the coat, and I took some pictures to illustrate the process. For interfacing the facings I picked a very soft knit fusible interfacing. In the next picture there’s the facing, the interfacing and the corresponding pattern:

Here we have the front/lapel facings, the interfacing and the pattern:

After fusing the interfacing (always follow the manufacturer’s instructions for each type of interfacing or if you don’t have them, ask about the instructions at the place where you bought the interfacing. Don’t forget to run some tests too, because interfacings behave differently depending on the fabric used), I prepared the back facing by stitching a small chain as hanging loop (you’re seeing the right side of the facing):

Next I stitched the back facing to the front facings at the shoulders:

The SAs should be trimmed, bias cut at the edges and pressed open:

Why trimming? The facings seam will be against the coat’s shoulder seam; when trimming the facings SAs, I’m creating a grading effect and thus reducing bulk at the shoulders, as the next diagram tries to demonstrate:

The last step before stitching the facings to the coat is to staystitch the collar seam, which will be clipped to adjust its form to the collar's neckline edge later:

When addressing the lapel facings one has to take into account the turn of the cloth effect; to achieve the little extra width on the facings I first pin facing and front, right sides facing and all edges aligned, along the roll line:

Then I fold back the lapel along the roll line, notice how the facing seems to shrink a bit, that's the turn of the cloth effect:

While holding the lapel like this, I pin along the edges to retain the position of the facing and then stitch from the collar notch to the bottom edge (I stitch with the front side upwards or the lapels would turn out a little smaller):

The SAs should then be graded to reduce bulk along the edges:

Notice how I notched at the end of the roll line, and switched the grading side; the wider SAs should always face the visible outer part of the coat:

Another detail is the lapel tip corner; when stitching around the tip I reduce the stitch length and stitch diagonally as seen below:

The SAs should be pressed open to achieve a professional crisp look; to do this I’m using a June Tailor Board that I’ve won in a drawing contest over at Miss Celie’s Pants blog:


Now I will not turn the facings to the right side yet, because first I want to sew and attach the collar, the subject of the next article. I leave you with another photo of Missy, who decided to claim the interfacing as her own private nest. I think Missy would get along wonderfully with Wellie, Summerset’s cat!

Upper back reinforcements – Reforços da parte superior das costas

Português
English (uncheck the other box and check this one)
As costas do casaco também devem ter algum tipo de estrutura de suporte, se quiserem obter um casaco com aspecto “de alfaiate”. Primeiro apliquei fita termo-colante nas cavas, depois uni os painéis laterais; neste caso tomei a decisão de não fixar as margens de costura com pontos cruzados; porquê? Porque as costas não estão entreteladas como a frente e como resultado iam ver-se a marca dos valores de costura no lado direito. A entretela previne estas marcas, funcionando como um colchão para os pontos à mão e para o volume criado pelas margens. Estou a basear-me apenas em boas técnicas de assentar a ferro para abrir as costuras (falando em boas técnicas de assentar, a Ann do blogue Gorgeous Things escreveu mais um excelente artigo sobre este tema, vão lá dar uma espreitadela!). Aqui têm as costas, antes de aplicar o reforço final:

Notem que também colei a ferro uma tira de entretela nos ombros, depois das costuras de união estarem cosidas; esta tira é para estabilizar (impedir que estiquem) as costuras dos ombros. Neste caso temos painéis laterais, e em consequência costuras verticais que criam um efeito semelhante a uma pinça vertical nos ombros; se as costas não tivessem estas costuras seria necessário embeber (franzir ligeiramente) a orla dos ombros e dó depois aplicar a entretela. O efeito final é um ombro arredondado atrás, acompanhando melhor a anatomia do nosso corpo.

O molde para o reforço das costas é obtido da mesma forma do da frente. Na foto seguinte podem ver este reforço já alinhavado no lugar:

Agora posso prosseguir fechando as costuras dos ombros e dos lados; sejam meticulosas para as costuras verticais coincidirem:

E o resultado da manhã passada na sala de costura:

Agora poderia passar para a saia do casaco ou então prosseguir com as vistas e a gola na parte superior; acho que prefiro esta última hipótese porque estou morta por ver como fica a parte superior quase terminada! Outro aspecto de notar nesta fase relaciona-se com os chumaços; o modelo original da Burda não os menciona (?!) mas vendo como o ombro assenta no manequim, o casaco deverá levar chumaços, desde que não excedam 1cm de altura.

A Missy continua a exigir medidas de contenção no consumo de energia; aqui a têm a ameaçar-me por ter o ferro de passar muito tempo ligado!

Não posso terminar sem agradecer a todos as palavras de incentivo que tenho recebido, por me fazerem sentir tão apreciada por todo o tempo e esforço que invisto neste blogue. Tentarei sempre mantê-lo enquanto me for possível. Não terei sempre disponibilidade para o actualizar regularmente, nem para escrever tutoriais tão detalhados, mas farei sempre o meu melhor por partilhar o que faço, sabendo que inspira muita gente a costurar e fazer as suas roupas com a mesma paixão com que as faço. Obrigada a todos!

It’s also important to create some kind of inner support structure for the back, if you’re aiming for a tailored coat. First I taped the armholes, as I did for the front, and then I moved on to stitching the vertical seams; in this case I made the judgment call of not tacking down the seam allowances; why? Because the back is not fully interfaced as is the front. The interfacing cushions the fabric preventing an imprint on the right side and on the back there’s no cushioning. I’m relying solely on good pressing techniques for these seams (speaking of good pressing techniques, Ann of Gorgeous Things blog wrote an excellent article on pressing and its importance in sewing, go take a look). Here’s the back before attaching the back shield:

Notice that I also fused a strip of interfacing to the shoulder line, after the vertical seams where sewn; this is for stabilizing the shoulder seams, keeping them from stretching. In this case there are side panels on the back, which create some kind of a vertical dart effect; if there were no side panels, the back shoulder line should be slightly eased and then stabilized the same way. This creates a nice round shaping on the back, which will fit our body’s anatomy.

The back shield pattern is obtained the same way as the front shield was. In the next picture the panel is hand basted in place:

Now I can proceed into stitching the shoulder and the side seams; be thorough matching those side panel vertical seams:

The result of this morning sewing time:

Now I could just start on the skirt of the coat, or perhaps move on to the collar and facings and then the sleeves; I think I will take the last option, because I’m dying to see how the upper body will look like when it’s almost finished! I’m also thinking about the shoulder pads; the original Burda coat doesn’t take shoulder pads (?!). Seeing how the shoulders lie on the dressform, there’s room for thin shoulder pads, but they shouldn’t exceed 3/8” in height.

Missy continues to enforce power saving measures: here she is threatening me not to use the pressing iron so often!

Thanks to all for your supportive words, it means a lot to me and I feel appreciated and loved for all the effort and time I put into this blog. I’ll keep it running for as long as I can. I won’t always have the time to update regularly or to write detailed walkthroughs, but I will keep trying my best to share what I do, knowing that it helps and drives many people into sewing their own garments with the same passion as I do. Thank you all.

Upper front reinforcements – Reforços das frentes superiores

Português
English (uncheck the other box and check this one)
Hoje de manhã lá consegui fazer qualquer coisinha (não muito porque acordei já tarde). Comecei por colar entretela de tecido nas peças superiores da frente (lateral e central) e reforçar as orlas com fita beta (fita de entretela termo-colante própria); depois cosi as costuras da frente, golpeando quando necessário; para que as margens fiquem bem assentes, alinhavei-as como mostra a figura:

Depois fixei-as com pontos cruzados, retirando de seguida os alinhavos:

O passo seguinte foi marcar as linhas relevantes com alinhavos, para servirem de guia à aplicação do reforço de peito (estão a ver o avesso da frente):

Depois apliquei o reforço de peito, de acordo com o método de confecção de alfaiate com entretelas termo-colantes, explicado pelo Paco (ver aqui):

Antes de colar a tira branca de entretela na dobra da lapela, devem retirar-se os alinhavos que marcam a linha da dobra, ou estes ficarão colados e dificilmente poderão ser removidos. Aqui têm como ficou a frente superior do lado direito:

Termino com uma foto da Missy, que hoje de manhã implicou com o cabo de alimentação do portátil, queria arrancá-lo da tomada à viva força; provavelmente pensou que eu estava a derperdiçar energia...

Fiquem bem e até à próxima!

Today’s morning (or at least part of it, because I got up really late) was used to resume the works on the Burberry inspired coat, since during the week I wasn’t able to make any progress. I started by fusing woven interfacing to the front pieces (both sections) and also taped some edges (used on-grain woven fusible strips, or beta-tape as they are called in Spain). Then stitched the front sections together, edge-stitching staystitching, clipping and notching as usual for curved seams; I wanted the SAs to stay flat so I basted them in place as shown below:

Then I tacked them down with cross stitches, and removed the basting thread:

Next step was thread tracing all relevant markings; the lapel fold line is useful for guiding the front shield placement (the next picture shows the wrong side of a front panel):

The front shield was applied as per Paco’s instructions for the tailoring a jacket method using fusibles (click here), as mentioned in my previous article:

It’s important to remove the basting thread that marks the lapel fold line before fusing the interfacing there; otherwise the stitches will be very hard to remove later. Here’s the right side view so far:

Finally we get a photo of a cat on a mission: Missy was determined to unplug my laptop’s energy cable; I guess she thought I was wasting electrical power…

Be well and see you all soon!