Unique Jacket: Construction#2 - Jaqueta Unique: Construção #2


EN: Before proceeding with Paco’s jacket construction I really want to thank you all for the understanding and the support. This is a three day weekend for me (Monday is a holiday here) so I’m making the most of it, even more because the weather is stormy outside so what better weather for staying at home and sew, right?

When I moved to the front reinforcement panel I noticed that it would be easier to set it in place with no seam allowance on the edge, so I removed it:

---
PT: Antes de mais agradeço a vossa compreensão e apoio. Este fim-de-semana tem mais um dia, pois 2ª-feira é feriado, e espero torná-lo num fim-de-semana muito produtivo, para compensar a falta de tempo durante a semana de trabalho. Ainda para mais, está um tempinho mesmo convidativo para ficar em casa (chuva e muito vento). Vamos então continuar com a jaqueta do Paco:

Prosseguindo com a aplicação do reforço na frente, reparei que para o aplicar mais facilmente teria de deduzir a margem de costura que tinha deixado na orla da frente:

6 – Catch stitching the front reinforcement to the jacket’s front
I did it all by hand, being very careful not to pierce the pleather's right surface. The right reinforcement panel should have an opening where the buttonhole stands, and it should also be catch stitched to tack it down to the edge of the buttonhole.


6 – Aplicação do reforço, cosendo em redor com pontos cruzados à mão

Neste ponto é preciso cuidado para a agulha não perfurar a napa até ao direito. Deve-se também fazer uma abertura na parte direita da frente, para acomodar a casa de botão metida na costura. Também cosi com pequenos pontos cruzados em redor desta abertura.


EN: When the reinforcement piece was already attached I noticed that the lower front edge could use a little more support for stability, so I fused beta tape along the edge. The clever thing to do would be to fuse the beta tapes to the reinforcement before applying it to the front. Instead of the fusible tape I could also have used regular cotton tape, machine or handstitched to the edge of the reinforcement panel.
---
PT: Depois de aplicar o reforço, reparei que a orla da frente em tecido podia ser adicionalmente reforçada com fita beta (fita de entretela de colar a ferro). Se voltasse a fazer esta jaqueta, colava primeiro a fita ao reforço e só depois aplicava o reforço, mas como não me lembrei, apliquei a fita no fim. Também podem usar fita de algodão normal e cose-la ao reforço à máquina.

7 – Stitching the shoulder/upper sleeve seam

I pressed the seam allowances to the back and topstitched, ending at the sleeve’s hem edge:


7 – Fechar a costura dos ombros e costura superior da manga

Depois de coser assentei as margens na direcção das costas e cosi um pesponto:

EN: Notice how I treated the seam allowances to reduce bulk:
---
PT: Na bainha da manga não é preciso pespontar. Reparem no tratamento dos valores de costura, para reduzir o volume da bainha depois de pronta:


8 – Sides and lower sleeve seams

This seam was stitched as a single step and the seam allowances were pressed open (don’t forget to leave the pocket openings unstitched and then stitched with a lower tension/long stitch setting, just to be able to press seams open along the side and construct the in-seam pockets later). At the lower armhole corner I also stitched some cotton tape to provide additional reinforcement to this area:


8 – Costura dos lados e costura inferior das mangas

Esta costura é cosida de uma só vez e os valores de costura assentes abertos (não se esqueçam de deixar a abertura para os bolsos nas laterais, que pode ser fechada com pontos soltos nesta altura). No canto de união da cava, onde temos a junção da napa com o tecido, usei um pouco de fita de algodão como reforço adicional:

EN: Here’s the seam treatment on the sleeve hem:
---
PT: Vejam o tratamento na área da bainha das mangas:


EN: The curved seam right bellow the armhole corner should be clipped before pressing the seam open:
---
PT: A zona curva da costura lateral (em tecido) deve levar uns golpes para assentar melhor com os valores de costura espalmados:

EN: Here’s the right side view of the armhole lower corner:
---
PT: O canto da cava do lado direito ficou assim:


9 – Press all the hem allowances to the wrong side of the garment

10 – In-seam pockets

At this point I direct you to Paco’s tutorial so no further explaining and illustration is needed; here’s the pocket bags with the facings that I’ll be using:


9 – Assentar a ferro todas as bainhas para dentro

10 – Confecção dos bolsos metidos nas costuras
Aqui remeto-vos para o excelente tutorial do Paco. Na foto podem ver os sacos dos bolsos já com a vista de tecido aplicada.

EN: Next step is bagging the lining, the subject to next post (it’s a lot easier to do than to explain/illustrate, believe me!).
---
PT: Depois dos bolsos, passaremos para o forro aplicado totalmente à máquina (muito fácil de fazer mas difícil de explicar e ilustrar, acreditem!), um assunto para o próximo artigo. Até breve!

Unique Jacket: Construction #1 - Jaqueta Unique: Construção #1


EN: I got home a little earlier yesterday and I was able to make some progress. I’ll list each step so you can follow the construction order exactly as I did it:
---
PT: Ontem cheguei um pouco mais cedo a casa e tive algum tempo para trabalhar neste projecto. Vou listar os passos que fui completando, tentando ilustrá-los o melhor possível:


1 – Interfacing the sleeves (pleather) for hem cushioning

Since it’s not advisable to use fusibles on pleather because it could be damaged during the fusing process, I used bias cut canvas strips a little wider than the hem allowance and I stitched them by hand right above the hem line. The stitching needle should not pierce the pleather all the way to the right side surface, but instead it should catch one thread or two from the fabric coating on the wrong side of the pleather:


1 – Colocação das entretelas nas mangas (napa)

As mangas são feitas de napa, que pode ser passada a ferro, mas sempre numa temperatura média e com um pano de passar entre o ferro e a napa. No entanto, não é conveniente utilizar entretelas de colar a ferro, pois o processo poderia danificar a napa. Então cortei tiras de viés de entretela de coser e aplique-as com pontos cruzados à mão, tendo o cuidado de na napa só apanhar um fio do revestimento de tecido, sem passar para o lado direito:


2 – Cushioning the lower section hem (wool fabric) and reinforcing the pocket openings and the in-seam buttonholes

There’s no problem with fusing the reinforcements here. The bias cut fusible interfacing strips were fused right above the hem line and the pocket openings and buttonholes were reinforced using chain stitched fusing tape (on both facing and right front):


2 – Colocação das entretelas nas partes inferiores da jaqueta (tecido de lã)

Aqui já não há problema em colar as entretelas a ferro. Colei tiras de entretela de 6cm de largura acima da linha da bainha, tiras de reforço na zona dos bolsos e também reforcei o local onde ficará a casa metida na costura na frente direita e na vista seguida:

3 – Reinforcing the armhole lower corner on the upper sections of the jacket

This will make the Job of stitching the sleeves lower seam and side seam as a single step much easier, later on the construction process. The corner should also be clipped as seen in the photos:


3 – Reforço do canto das cavas nas partes superiores da jaqueta

Para facilitar mais tarde coser a costura inferior das mangas e as costuras dos lados numa só vez, passa-se um pesponto no canto inferior da cava (nas partes superiores da frente e na parte superior de trás) a 1,3mm da margem; depois golpeia-se o canto:


4 – Joining the upper facing/lapel to the front upper section

This should be done before joining the upper and lower sections; I did not stitch all the way to the top, since the upper corner will be finished later when all the facings are set in position. The seam allowances should be gently pressed open using a pressing cloth:


4 – Coser a vista superior às partes superiores da frente

Para conseguirmos depois coser as costuras horizontais da frente, convém primeiro coser a vista superior, mas tendo o cuidado de não a coser até cima, deixando esta costura para terminar posteriormente. Depois de cosida, deve-se abrir a costura a ferro, com a ajuda de um pano de passar para não danificar a napa:


5 – Joining the upper and lower sections (front and back)

Do notice that the stitching line ends right at the reinforced/clipped armhole corner. Next press the seam allowances open and topstitch them on both sides:


5 – Coser as costuras horizontais de união da napa com o tecido

Na cava a costura deve terminar exactamente no canto que previamente reforçámos e golpeámos. Seguidamente os valores de costura são abertos a ferro e pespontados:


EN: The next step will be attaching the front reinforcement panels made of cotton organza… I do hope to find the time for finishing this jacket during the weekend.

My deepest apologies to my blogging readers for my lack of commenting on your blogs… Please understand that my time is so limited these days that I haven’t been able to keep up with the more than three hundred blogs that I follow, along with sewing and updating this blog in both Portuguese and English languages. I do appreciate your visits and comments and really wish I could thank each one of you personally and repay your visits as you all deserve, but I find it increasingly difficult to handle all this with my limited time schedule :(.

---
PT: O próximo passo vai ser fixar o reforço da frente em organza de algodão… Espero ter tempo para finalizar esta jaqueta durante o fim-de-semana.

Peço desculpa às minhas leitoras por não visitar/comentar na maioria dos blogs que sigo, mas infelizmente continuo com o meu tempo livre muito reduzido e não consigo costurar, escrever em duas línguas neste blog e ainda visitar/comentar nos mais de 300 blogs que sigo… Aprecio quem tem um momento para visitar e deixar um comentário de incentivo e o meu desejo era poder agradecer a cada uma pessoalmente e retribuir da mesma forma, mas cada vez mais é difícil de o fazer :(.

Unique Jacket: additional reinforcements - Jaqueta Unique: os reforços adicionais


EN: Today I was able to start working on Paco’s jacket, at last. I started by cutting off the pattern, which looks great and very professional:
---
PT: Hoje consegui finalmente ter um tempo para começar a jaqueta do Paco, inspirada em Celine. Comecei pelo molde, que me parece óptimo e com aparência muito profissional:

EN: As you can see, the pattern is ready to be cut off; it includes 5/8” seam allowances, and separate pieces for the facings and lining. Paco also included English labels (in red):
---
PT: O molde está pronto a recortar, inclui margens de costura e bainhas e partes separadas para o forro e vistas. Como podem ver, as indicações estão escritas em castelhano e em Inglês (a vermelho):

EN: The grainlines, notches, and all other relevant markings are there. The lower back section includes two cutting lines, one for the fabric hem and the other for the lining hem, which is narrower, so this pattern piece serves for both lining and fabric. All other lining pieces have separate patterns. I chose to copy the lining pattern to another sheet of tracing paper and leave the lower back original pattern piece undamaged for cutting the fabric.

I opted for reinforcing the center front of the jacket with cotton organza for a little added structure. To obtain the reinforcement pattern I overlapped the upper and lower front section patterns along the horizontal stitching lines and traced the reinforcement pattern into another paper sheet as follows:

---
PT: O “correr do fio”, os pontos de aposição e todas as marcações relevantes estão presentes. O molde inferior das costas tem duas linhas de corte na bainha, uma para o tecido e outra para o forro (que é um pouco mais curto). Optei por copiar o molde do forro para papel, para não cortar parte da baínha ao molde e assim poder mais facilmente reutilizá-lo. Todas as outras partes do forro encontram-se em peças separadas.

Optei por reforçar a frente com tecido de algodão para lhe dar um pouco mais de firmeza. Para conseguir o molde do reforço (que não necessita de ter um recorte a meio), juntei a parte superior e a parte inferior da frente sobrepondo-as pela linha de costura e copiei para papel de molde uma peça única, como mostram as fotos:


EN: Obviously I'll have to open a hole where the in-seam buttonhole will be placed (because there will be no dividing seam there) so it’s useful to copy the buttonhole placement lines to the reinforcement pattern as well. 
---
PT: Como é óbvio, vou ter de abrir um orifício para a casa metida na costura na parte direita do reforço, por isso é útil copiar também a marcação da casa para o molde do reforço:

EN: The pattern pieces are ready to be placed on top of the correspondent fabrics and cut. In the next picture, on top there are all the pleather pieces (upper front with sleeve, upper back and sleeve, upper front facing/lapel and back facing); bellow there are the wool fabric pieces (lower back and lower front):
---
PT: Depois de cortar todas as peças do molde, coloquei-as sobre os vários tecidos e talhei todas as peças da jaqueta. Na próxima foto têm em cima as partes do molde cortadas em napa (parte superior das costas com manga incluída, parte superior da frente com manga incluída, vista superior/lapela e vista do decote, e em baixo as partes em tecido de lã (parte inferior da frente e parte inferior das costas):

EN: In the next picture there are all the quilted lining pieces and also the pocket bags, which I chose to cut on regular lining fabric. There are also the pocket facings cut on wool fabric (see the in-seam pocket tutorial here).
---
PT: Na próxima foto estão todas as partes cortadas em forro acolchoado e os fundos dos bolsos que cortei em forro normal com uma secção em tecido de lã para a vista (ver tutorial aqui).

EN: I also gathered all the reinforcements to be applied: the front reinforcement cut on cotton organza, fusing stripes for the pocket opening, and several bias cut stripes of interfacing for the hems. The canvas stripes are for the sleeves hem, because I can’t use fusible there.
---
PT: Reuni também os reforços adicionais: o reforço da frente cortado em organza de algodão, fita termo-colante de entretela e várias tiras de entretela em viés (6cm de largura) para reforçar as bainhas. A entretela de colar a ferro é para a bainha inferior do casaco e a entretela de alfaiate (que não é de colar, mas sim de coser) será para reforçar as bainhas das mangas, que são em napa.

EN: Until next time, happy sewing everybody!
---
PT: Até à próxima e fiquem bem!

Paco’s Unique Jacket pattern interpreted by me - O Jaqueta Unique do Paco interpretada por mim


EN: You can purchase this pattern here. Paco made it available for delivery worldwide, all costs included in the final price.
---
PT: Podem adquirir o molde aqui. O Paco disponibiliza-o para entrega em qualquer lugar do mundo e o preço inclui todos os gastos de expedição.

EN: Relevant articles for the construction of the jacket, published on Paco’s blog:
Presenting the jacket

How to alter the pattern for different sizing and anatomical characteristics

How to make the in-seam pockets


PT: Artigos relevantes para a confecção desta jaqueta no blog do Paco:


EN: When my friend Paco decided to make this pattern available for purchase, I didn’t think twice about hitting the “buy” button, because this jacket is so “me”! For those who don’t know Paco Peralta yet, he’s a professional couturier and tailor based in Barcelona. I had the pleasure of meeting him through our sewing blogs and ever since we’ve maintained regular contact. His giving personality, advanced sewing skills and his willing to share his knowledge, inspire my deepest friendship and admiration. When I explained him my vision for this jacket, Paco was as enthusiastic as myself about it and immediately offered to help with whatever necessary to make this project come alive. I was inspired by Celine’s spring 2010 RTW collection, this dress in particular (image credits www.style.com):

---
PT: Quando o meu amigo Paco decidiu disponibilizar este molde de sua autoria para venda, não pensei duas vezes, pois é exactamente a minha cara! O Paco, para quem não conhece, é um costureiro de alta-costura e alfaiate sediado em Barcelona e que tive o prazer de conhecer através dos nossos blogues de costura. A sua personalidade altruísta, a sua aptidão para a criação de peças únicas e exclusivas e o seu prazer em ensinar e partilhar a sua arte fazem dele uma pessoa digna da minha mais profunda amizade e admiração, e desde que nos conhecemos temos mantido um contacto muito estreito. Depois de explicar ao Paco a minha visão para esta jaqueta ele ficou tão entusiasmado com a ideia quanto eu e prontificou-se a conseguir inclusivamente alguns materiais que eu não tinha disponíveis localmente. Passo a explicar a minha ideia, que surgiu inspirada neste vestido da colecção primavera 2010 de Celine (créditos da foto, www.style.com):


EN: The clean minimalist lines and the fact that it contains a horizontal seam line made me have a light bulb moment… And it all started to take form in my mind: the upper section would be made of leather or leather-like material, the lower section would be made of wool; the lining would be the quilted kind, as used by Paco on his prototype; all the materials in black. The end result: a monochromatic garment joining different textures in harmony of color. All I needed was the right materials and I immediately started looking for them. The lining was easy to find locally, and I already have a black worsted wool fabric in my stash that might work, or perhaps it’s too thin for this jacket's structure… The pleather found locally was definitely too soft for this project, so I asked Paco if he knew a leather provider or if he could find me some pleather with the right body for this project. My friend exceeded all my expectations and a couple of days later I received a package in the mail, containing some great black pleather, the ideal black wool fabric and a few stitching samples… As if all this wasn’t enough, Paco also included some special purpose thread which is a little heavier than regular stitching thread and the most amazing metal button ever! Words are not enough to express my gratitude… I promise to do my very best creating a unique garment, a tribute to Paco's design that will be worn with pride for many years! THANK YOU my dear friend!

---
PT: As linhas puras e minimalistas e o facto de conter uma costura transversal do molde do Paco fizeram uma luzinha acender no meu cérebro… E assim nasceu a ideia de confeccionar esta jaqueta com a parte superior de couro ou imitação, a parte inferior em lã e o forro em tecido acolchoado (como o Paco usou no seu protótipo), todos em negro, num conjunto monocromático de texturas diversas! Quando tenho uma ideia fixa, persigo-a com toda a tenacidade, mas perante a evidência de não conseguir os materiais ideais, pedi ajuda ao meu amigo, pois não conheço aqui fornecedores de pele e as imitações vendidas localmente são um pouco finas demais para uma jaqueta estruturada como esta. O Paco simplesmente enviou-me todos os materiais que eu não consegui encontrar aqui, inclusivamente com amostras das costuras usando imitação de couro e couro genuíno; Enviou-me também linhas um pouco mais grossas que o normal (as quais também não encontro cá) e um botão de metal envelhecido que me deixou completamente rendida! Palavras não são suficientes para agradecer… Apenas me resta prometer que farei o meu melhor por confeccionar uma peça única e exclusiva, homenagiando a criação do meu amigo e que irei usar com muito orgulho durante muitos anos. Obrigada, querido Amigo!


Colete de pele e gratificação instantânea Leather vest and instant gratification

Português
English (uncheck the other box and check this one)

Bom, não é de pele, mas parece! Este colete é muito simples de fazer desde que se utilize um tecido com alguma estrutura que não necessite de remates e que tenha um interior bonito. Eu utilizei uma imitação de cabedal castanha, forrada a malha em cor bege/cru e para lhe dar mais piada fiz outra gola com tecido gravado com padrão réptil. Comecei a fazê-lo às 9h da manhã e terminei à hora de almoço!

Modelo original: BurdaStyle nº5 (Outubro 2010), modelo 129

Descrição: Colete originalmente confeccionado com pele de carneiro, tem orlas inacabadas, gola “cascada” e costuras “a fio” (costuras em que os dois tecidos são costurados sobrepostos, direito contra avesso). Ajusta com dois cordões na cintura.

Mais vistas do colete:


Modificações: O material escolhido tem características diferentes do aconselhado, mas creio que resultou bem. Desde que se utilize pele, imitação ou tecido com alguma consistência e corpo, o resultado é satisfatório. Mantive as costuras “a fio”, de acordo com as instruções, mas fiz dois pespontos em vez de um (na pele de carneiro bastaria um pesponto). Depois de terminado, não gostei muito de ver a gola em cru, pareceu-me muito contrastante; se fosse em pelo, talvez gostasse. Então decidi cortar as partes da gola em tecido impresso de padrão réptil, uni-las na costura de trás e simplesmente sobrepô-las na gola existente, pespontando próximo da orla exterior e cosendo à mão a outra orla dentro do colete. Para os cordões, em vez de usar tiras de tafetá, cortei tiras da napa com 2cm, dobrei-as ao meio no sentido do comprimento e pespontei. O efeito final “inacabado” condiz com o colete na perfeição.

Mais detalhes:


Podem observar o efeito “inacabado das tiras de atar e das orlas:


O colete não precisa de forro, o acabamento em malha no interior serve perfeitamente:

Conclusão: Atrevo-me a dizer que adorei o efeito inacabado, a lembrar as peças artesanais de pele, e o facto de ter demorado apenas uma manhã a concluir o projecto. Agora estou a pensar em confeccionar uma saia tubo comprida, para usar com o colete, e que também não me deve demorar mais de uma hora a fazer… Beijinhos e obrigada por passarem cá!

NOTA: Podem ver-me a usar o colete aqui


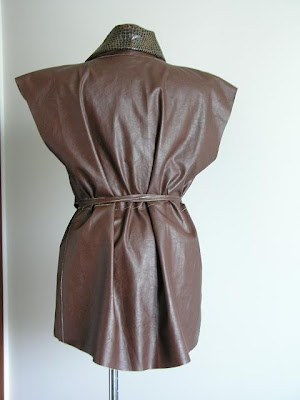
Well, it’s not leather exactly, but it sure looks like it! This vest is so easy to make if using a material with a certain body, suitable for leaving raw edges and with a nice comfortable wrong side. I used fake leather/pleather which is backed with some kind of natural color soft fabric. To add some interest I made another collar/side front using snake print effect fabric. I started this project at 9am today and I had it finished by lunch time.

Pattern: BurdaStyle October 2010, model 129

Description: This vest is originally made of shearling leather, has raw edges, cascade collar and overlapped seams (place one layer without SAs wrong side facing down on top of the SA of the bottom layer, right side facing up). The vest is tied to the waist.

A couple more views on the dressform:


Modifications: none to the pattern, but since I used other material than the specified, I had a few minor modifications; the seams were double topstitched (a single row of topstitching would suffice if using shearling or fake shearling). For the ties, instead of the taffeta stripes I used 2cm wide pleather stripes, folded in half lengthwise and topstitched. The unfinished effect of the straps matched the vest quite well IMO. When I was done with the construction I wasn’t quite happy with the “natural color” large collar, from the wrong side of the pleather; it was too much contrast with no texture. If using natural backed shearling, it would be alright, but the pleather wrong side just didn’t feel right. So I cut another collar/side front edge on this snake print fabric that also looks like leather and after stitching the back neck seam I placed it on top of the vest, wrong sides facing and edges aligned. A single row of topstitching along the edge and a few handstitches on the inside and the vest was ready to go!

Additional details:


The unfinished look of the ties suits this vest style quite well:


Since the wrong side of the pleather is nicely fabric backed, there’s no need for a lining:

Conclusion: I dare saying that I really love the unfinished look on this vest, similar to the handcrafted real leather garments that are so trendy now. Next I’m planning on making a matching brown jersey maxi-skirt (something that won’t take more than an hour to complete) and I’ll have myself a complete outfit ready today! Have a nice weekend and thank you all so much for dropping by!

NOTE: You can see pictures of me wearing the vest here