
EN Summary: The Draped Top by BCN Unique patterns (the newer version has sleeves option, click here) is very easy to make and Paco has published an excellent tutorial (in Spanish) for a couture version of this top with organza underlining (click here). In my article I share the process that I used for making this top and show all the details (picture heavy).
---
PT Sumário: O Top Drapeado dos moldes BCN Unique (a versão mais recente tem opção de mangas, cliquem aqui) é muito fácil de fazer e o Paco publicou um excelente passo-a-passo da sua versão alta-costura que inclui uma percalina de organza (clicar aqui). Neste artigo partilho o passo-a-passo de como confecionei este top e mostro fotos de todos os detalhes (tem muitas fotos, pode demorar algum tempo a carregar)

EN: I wanted to make the top to match my version of the Lehenga skirt (click here for the construction notes of the skirt). The fabric used is dark blue silky satin, and as with the skirt, I played with both sides of the satin to achieve a top that would coordinate perfectly with my version of the skirt. The front draped piece of the top and the back facing were cut with the shiny side on the outside and the remaining pieces with the dull side. The first thing to do after all the pieces are cur is to prepare them to be sewn. In the photo below I try to demonstrate what needs to be done: in blue the fusible interfacing, the dashed line represents the stay-stitching, the red lines represent where to clip the SAs (careful not to hit the staystitching) and the green wavy lines on the back shoulders represent the ease stitching.
---
PT: O top foi escolhido para fazer conjunto com a minha versão da saia Lehenga (clicar aqui para as notas sobre a sua construção). O tecido usado foi cetim de seda azul-marinho, e tal como no caso da saia, joguei com as duas fazes do tecido para obter um top que se coordenasse perfeitamente. A parte drapeada da frente e a vista de trás do decote foram cortadas com o lado brilhante para fora e as restantes peças com o lado baço. Na figura abaixo tento resumir estes passos de preparação: a azul a entretela colada a ferro, as linhas tracejadas são os pespontos de reforço, a vermelho onde se deve golpear (atenção para não atingir os pontos de reforço), e as linhas onduladas a verde nos ombros da parte das costas representam onde se deve embeber a costura com pontos longos e soltos.

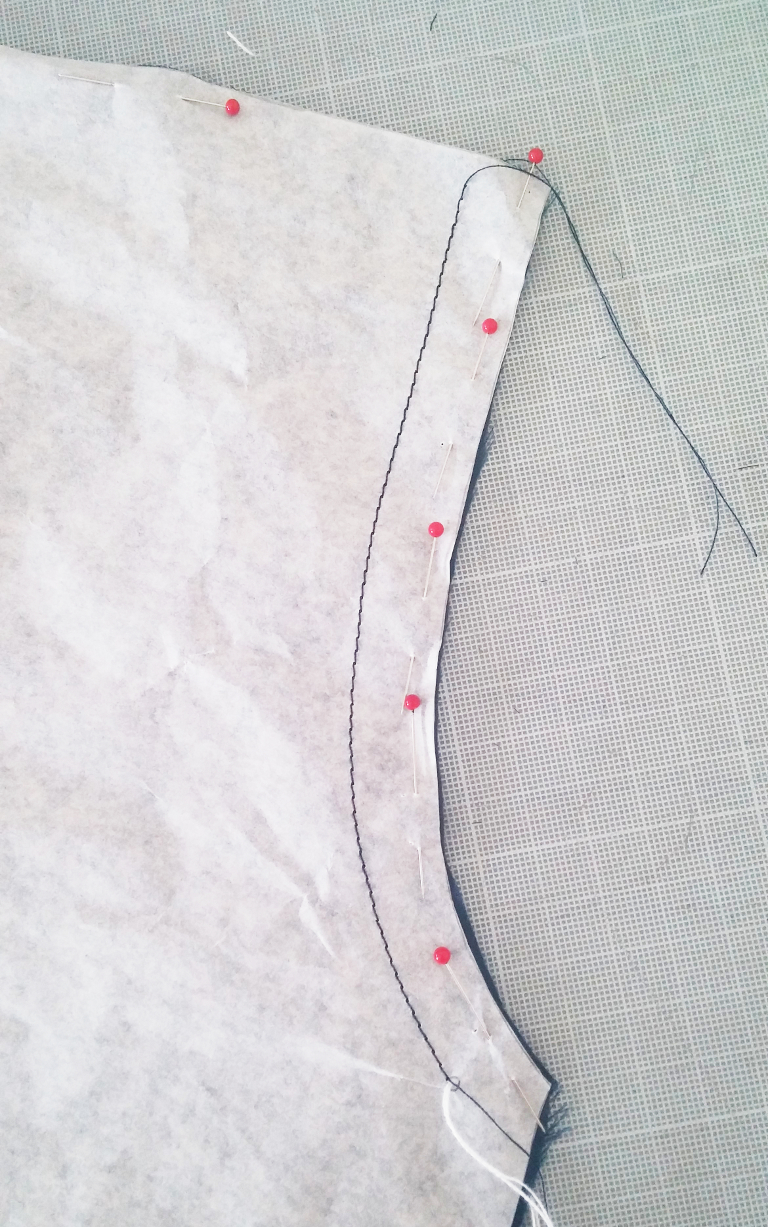
EN: To help with the stay-stitching on this very slippery fabric, you can stitch over the pinned paper pattern which will come off easily when you're done. Of course this can only be done when a single layer cutting layout is used, which is the case for the upper draped part of the front. I'm stay-stitching the armhole seams because later I will shave off the SAs, leaving the stitches very close to the edge; the stay stitches will prevent the armholes from stretching and deforming.
---
PT: Para ajudar no processo de reforçar com pesponto as cavas neste tecido escorregadio, podemos coser por cima do molde de papel enquanto este está preso ao tecido com alfinetes (o molde depois sai pelo picotado). É claro que só podemos fazer isto quando o tecido foi cortado singelo, que é o caso da parte de cima drapeada da frente. Estou a reforçar com um pesponto na linha de costura porque depois vou recortar retirando as margens de costura; o pesponto que fica serve para as cavas não esbujarem.
EN: The first construction step is attaching the upper draped front to the lower front, which should not be difficult if you've done the stay-stitching and clipping correctly). The needle should hit the vortex stay stitching exactly before changing direction (clipped/stay-stitched side is facing up on the sewing machine).
---
PT: O primeiro passo na costrução é juntar a parte drapeada da frente à parte de baixo da frente, o que não deve ser dificil se reforçaram e golpearam o ângulo na parte de baixo. Ao coser, a agulha deve atingir o ponto de reforço no vértice antes de mudar de direção (a parte reforçada/golpeada deve ficar por cima enquanto se cose).

EN: This is how it looks, right side and wrong side, after the top is finished:
---
PT: Depois de terminado o top, é assim que fica no direito e no avesso:


EN: Next I stitch the CB seam from the neckline edge to the zipper placement notch and sew in the invisible zipper. Then I stitch the back neckline facing to the back neckline and I under-stitch the junction seam (don't forget to clip the seam allowances first). The back is complete:
---
PT: Em seguida coso a costura do meio de trás desde o decote até à linha de colocação do fecho, e coso o fecho invisivel. Depois cose-se a vista do decote ao mesmo, assenta-se as margens na direção da vista e passa-se um pesponto junto à costura do lado da vista prendendo as margens (não esquecer de golpear as margens antes de fazer isto):


EN: With both front and back completed, it's time to stitch the shoulder seams and the facing to the upper draped front, all in one single step (which again should be easy if you've done the stay-stitching and the clipping on the draped upper front). Now it's time to do the armhole finishing before stitching the side seams. I shave off the armhole SAs and use self-fabric bias cut strips, which I prepared following this method (click here). They are stitched 7-8mm from the armhole edge (the pre-folded bias is 14mm wide), turned in and pinned to the inside and then fell-stitched:
---
PT: Com as partes das costas e da frente completas, passamos a coser as costuras dos ombros, sendo que a vista é cosida à parte drapeada da frente no seguimento da mesma costura (deve ser fácil se reforçaram e golpearam o canto na parte drapeada da frente). Antes de coser as costuras dos lados faz-se o acabamento das cavas: para isso recortam-se as margens de costura rente ao pesponto de reforço. Para o acabamento usei tiras em viés do próprio tecido e preparei-as seguindo este tutorial (clicar aqui). São cosidas a cerca de 7-8mm da beira (porque as tiras dobradas têm 14mm de largura) e depois viram-se para o avesso onde se fixam com alfinetes. Para fechar o acabamento cosi pelo avesso com pontos à mão invisiveis:

EN: After finishing the armholes we can close the side seams. I fell-stitched the bias-bound allowances open, as you can see bellow:
---
PT: Depois de terminado o acabamento das cavas, fixei as costuras abertas sobre o remate em viés, usando pontos à mão invisíveis, como podem ver abaixo:

EN: The top is almost done, the last step is hemming:
---
PT: O top está praticamente terminado: o último passo é embainhar:

EN: Here's the back view with the invisible zipper:
---
PT: As costas com o fecho invisivel:


EN: The hem is fell-stitched to the zipper tape:
---
PT: A bainha é cosida com pontos à mão invisíveis à fita do fecho:

EN: A view of the finished armhole:
---
PT: Como ficou a cava depois de pronta:

EN: Here's where the facing meets the draped front (the part that turns inside). To secure this seam in place, I fell-stitched it to the shoulder SAs:
---
PT: Aqui têm a junção da vista com a parte drapeada da frente (a parte da frente que vira para o avesso). Para a manter no lugar, cosi-a à mão com pontos invisíveis às margens da costura dos ombros:

EN: Both labels sewn in (Paco always includes his label along with the paper patterns):
---
PT: Ambas as etiquetas cosidas no lugar (O Paco inclui sempre a sua etiqueta junto com os moldes de papel):

EN: Finally, a photo of the top together with the skirt; I think I managed the proportions just right, and the slope of the panels and its spacing also matches perfectly on both garments when worn together, so I am beyond happy with the outcome! Hope this tutorial helps those of you willing to make this top, its design is fabulous and it hugs the body beautifully with a very flattering draped effect on the front. Another winner from Paco!
---
PT: Finalmente uma foto do top junto com a saia; creio que consegui proporções muito harmoniosas, pois a inclinação e o espaçamento dos painéis de ambas as peças ficou exatamente como tinha planeado. Estou mesmo muito satisfeita com o resultado final! Espero que este passo-a-passo possa ajudar que quiser fazer este top, que tem linhas muito bonitas, ajusta-se muito bem ao corpo e favorece bastante com o efeito lindíssimo do drapeado da frente. Mais um molde genial do Paco!


6 comments:
Te ha quedado muy bien el conjunto. Ahora sólo falta vertelo puesto! Un beso
Beautiful!!!!
Your new outfit looks fantastic Tany. I've saved your tutorial because I'll be making this top soon. I'm in transit home right now carrying 4 kilos of fabric from Portugal plus braid and buttons from your store in Aveiro.
Gorgeous!!!!
Thank you for the sewing tutorial.
The entire outfit is quite stunning, Tany. Thank you for the tutorials that you provide. I like the way you break them down into easily managed steps.
Beautifully done, thank you for all the details.
Post a Comment