2015#2 - The black&white flower print pleated midi skirt (BurdaStyle 03/2015 mod102)


Description: This pattern features a skirt with side invisible zipper extending through the waistband and six inverted pleats (three on the front and three on the back). The original pattern has patch pockets (which I omitted) and it’s shorter in length, sitting roughly above the knee (I added 6 inches to the skirt length, so mine become a midi-style length) and it's unlined.

---

Descrição: Este molde apresenta uma saia com fecho invisível na lateral, que se estende pelo cós e seis pregas/macho (três à frente e três atrás). O modelo original tem bolsos (detalhe que omiti) e é mais curto, batendo ligeiramente acima do joelho (adicionei 15cm obtendo assim um comprimento “midi”). O modelo original também não é forrado.

Side and Back view / vista de lado e de trás:


Original Model and line drawing / Modelo original e diagrama:

Alterations: Omitted the pockets, added 6 inches to the length and lined the skirt creating a floating hem. I also widen the waistband (a wider waistband seems more balanced with a longer skirt)

Fabric used: printed basket weave cotton blend; the print has a brushstroke aspect, I knew it would become a pleated midi skirt the moment I saw it.

--- 

Alterações: Omiti os bolsos, acrescentei 15cm ao comprimento e forrei a saia de forma a criar uma “bainha flutuante” (o forro suporta a bainha, não sendo necessário cose-la à saia). Também alarguei um pouco o cós, pois parece-me que um cós mais largo fica melhor com este comprimento de saia.

Tecido usado: Misto de algodão tipo sarja 2x2, com estampado efeito "pintado a pincel". Mal vi o tecido soube logo que o iria transformar numa saia assim.

Details / Detalhes:

The invisible zipper shows a bit at the waistband and that's only natural because of all the fabric layers in that area.
---
O fecho invisivel arreganha um pouco na zona do cós, o que é natural devido à sobreposição de camadas de tecido nessa área.
In the above photo the waistband finishing and the lining is visible on the wrong side of the skirt (the hook&eye wasn't set in at this point, but you can see it next); I cut the waistband along the fabric length and kept the selvage, so I could use it as finishing on the wrong side of the waistband. The lining was hand stitched to the zipper tape.
---
Na foto acima podemos ver o acabamento do cós e forro no avesso da saia (os colchetes ainda não estava aplicados quando tirei esta foto, mas podem ver esse detalhe já a seguir!); cortei o cós ao longo do comprimento do tecido, de forma a poder utilizar a aurela como acabamento do avesso do cós. O forro foi cosido com pontos à mão à fita do fecho invisivel.
The floating hem detail / O detalhe da bainha flutuante:
To be able to form the pleats holding lining and fashion fabric together AFTER stitching the lining to the hem allowance (the hem allowance isn't stitched to anything but the lining, that’s why it’s “floating”) and still keep the invisible zipper extending to the waistband I had to adjust the construction step order as follows:

1 – Partially stitch the waistband (which should be pressed folded) to the left edge of the skirt’s panels (stitched for 2 inches or so) so the first step is inserting the invisible zipper to the left side-seam. The SAs should be reinforced with interfacing as on ever zipper insertion. The waistband junction SAs should be pressed up before inserting the zipper.
2 – Stitch the side seams (both skirt panels and lining panels, don’t forget the zipper opening on the lining) – also note that the lining hem allowance should be 5/8”
3 – Press the skirt’s hem allowance up, just to form the crease; stitch the lining to the skirt at the hem, right sides facing; press the lining up towards the waist and baste both skirt and lining together along the waist edge; trim lining if necessary so lining and skirt are now joined as one single cloth.
4 – Form the pleats (baste or pin them in place).
5 – Stitch the waistband to the skirt (the edge near the zipper is already stitched).
6 – Press (grade, trim) the allowances towards the waistband, turn the waistband to the wrong side of the skirt along the crease and stitch “on the ditch” along waistband seam.
7 – Hand stitch lining to the zipper band; set in the hook&eye.
---
A técnica que usei para forrar esta saia é pouco convencional pois é necessário coser o forro à bainha antes de formar as pregas e com o fecho invisível já aplicado; uma vez que o fecho invisível também é aplicado no cós, o cós tem de estar cosido aos panos da saia, pelo menos junto à orla onde se aplica o fecho. Basicamente segui os passos seguintes:

1 – Cosi o cós à saia só 4-5cm nas orlas onde será aplicado o fecho invisível (o cós já deve estar passado ao meio ao longo da largura). Assentei a ferro os valores de costura na direção do cós e apliquei em seguida o fecho, que deve terminar perto da dobra do cós (NOTA: os valores de costura da orla de aplicação do fecho devem estar reforçados com entretela, assim como o cós deve estar completamente entretelado!)
2 – Coser as costuras laterais (no lado esquerdo abaixo do fecho), tanto na saia como no forro (nota: a bainha do forro deve medir 1,5cm, enquanto a da saia mede 4cm)
3 – Dobrar a bainha da saia para dentro e assentar a ferro (não é preciso coser a bainha à saia); sobrepor os suplementos de bainha da saia com os do forro (direito contra direito) e coser a toda a volta. Com a bainha da saia dobrada para dentro, assentar a ferro o forro para cima, juntando forro e saia na orla da cintura (aparar o excesso de forro se necessário). Forro e saia serão a partir de agora tratados como um só tecido.
4 – Formar as pregas, alinhavando-as ou prendendo-as com alfinetes.
5 – Coser o cós à saia prendendo as pregas (as pontas do cós já estavam cosidas ao pano da saia)
6 – Assentar os valores de costura da direção do cós (aparar e gradar as costuras), virar o cós para dentro ao longo da dobra (os valores de costura nos extremos devem estar virados para dentro), alinhavar. Coser pelo direito exatamente sobre a costura de junção do cós.

7 – Coser à mão o forro ao fecho por dentro; coser os colchetes.


Conclusion/Notes: The skirt waist is a little tight and I remember having to slightly ease the skirt to the waistband; I suspect the waistband pattern, which is supposed to include SAs, doesn't include it after all. I will have to measure the skirt pattern minus the pleats and confront it with the waistband to be sure. If you make this skirt be sure to double check this measurement, Other than this, I really love the outcome and the skirt is very fashionable and pretty!
---
Conclusão/Notas: O cós da saia parece-me um pouco justo e lembro-me de ter que franzir ligeiramente a saia depois de formadas as pregas, para a unir ao cós. Suspeito que o molde do cós, que supostamente refere medidas finais já com orlas de costura, não as contém. Vou ter de medir o molde da saia com as pregas fechadas para ter a certeza, Se fizerem esta saia verifiquem esta medida, inclusivamente comparando-a com a medida da vossa cintura real. Aparte deste detalhe gostei muito do resultado final, é uma saia com estilo e que está muito na moda!

2015#1 - Retro-style fuchsia coat (BurdaStyle 2014-11 mod111) - Casaco Fucsia estilo retro

Description: Lined overcoat with large collar, princess seams and back vent, slightly flared from the hip down, two-button closure on the front. This pattern was featured with illustrated instructions, which makes it easier to construct.

Pattern used: BurdaStyle 2014-11 mod111 (cut size 38)

---

Descrição: Sobretudo forrado com gola XL, costuras princesa e racha atrás, ligeiramente evasé, a frente de trespasse fecha com dois botões. A construção do modelo vem com ilustrações, o que facilita bastante para quem tem menos experiência.

Molde: BurdaStyle 2014-11 mod111 (cortei o 38)
 Alterations: Added in-seam side-pockets and bound buttonholes.

---

Alterações: Acrescentei bolsos metidos nas costuras laterais e fiz casas ce botão avivadas.
 Fabric: Boiled wool of some sort (it doesn't ravel)

---

Tecido: Lã fervida (não desfia)
 Construction: Followed BurdaStyle's instructions for the most part, except for the interfacing (you can check the details on my previous post - link), A few notes to consider: this coat has no shoulderpads and the sleeves are narrower than usual BurdaStyle coats.

---

Construção: Segui a sequência ilustrada na revista, exceto no que toca à entretala (podem consultar os detalhes no meu artigo anterior - link). Alguns detalhes que merecem destaque: o casaco não leva chumaços e as mangas são mais justas que o habitual nos casacos BurdaStyle.
 The in-seam side pockets / Os bolsos metidos na costura:

 Front closure detail / Fecho da frente:

 The hem/lining/facing intersection / A interseção da bainha/forro/vista:
 The back vent / A racha atrás:

 And finally the hanging chain loop and my label / E para acabar, a corrente de pendurar e a minha etiqueta:
Conclusion: A very nice pattern, dresses quite well and is fairly easy to make, I highly recommend it!
ETA: Photos of me wearing the coat were published at my personal style blog, click here.

---

Conclusão: O molde excelente, veste muito bem e não é dificil de fazer. Recomendo vivamente!
Editado para acrescentar: Publiquei fotos minhas a usar o casaco no meu blogue de estilo pessoal, cliquem aqui.

Ongoing project: Retro-style fuchsia coat – Projeto em curso: Casaco fúcsia estilo retro

Hello dear all, this is what I’m currently working on: BurdaStyle 2014/11 model 111:
---
Viva a todos, este é o casaco que estou a costurar: BurdaStyle 2014/11 modelo 111:

This pattern is featured in the magazine with illustrated instructions, so my project notes will focus on what I've done differently from the instructions; so far I have the inner shell (lining, facings and upper collar – on the left) and the outer shell (the coat itself and inner collar – on the right) is almost done; I still have to press the hem allowances, clip and grade seams, etc

--- 

Este molde vem com instruções ilustradas na revista, portanto vou evidenciar essencialmente o que fiz de diferente; até agora completei a parte de dentro do casaco (forro, vistas e parte de fora da gola – à esquerda) e a parte de fora está quase pronta (o casaco propriamente dito, com a parte de baixo da gola, à direita). Na parte de fora ainda tenho que gradar valores de costura, passar a ferro as bainhas, etc.

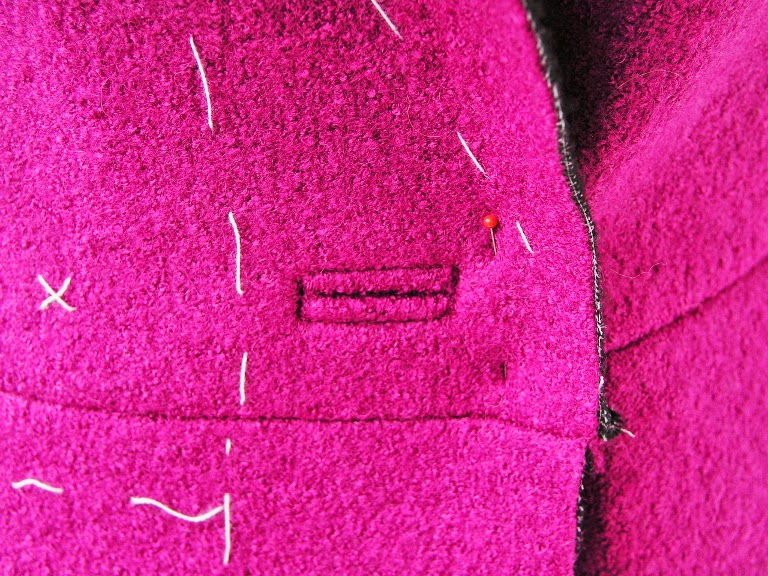
I've made bound buttonholes: 

--- 

Fiz casas avivadas:

I've added inseam pockets on the side seams: 

--- 

Adicionei bolsos metidos nas costuras laterais:


I interfaced the entire bodice instead of just reinforcing the armholes and neckline (used what I believe is equivalent to fusible thermo weft) : 

--- 

Entretelei a parte de cima por completo, em vez de apenas reforçar as cavas e decote (usei uma entretela de colar a ferro bastante maleável e estável, comprada na Feira dos Tecidos):

Interfaced hem allowances and above, so I get some cushioning (the basting lines correspond to the hem line); I also traced the allowances to be able to do the facing/hem/lining corner the industrial way (refer to the tutorial tab for instructions). 

--- 

Entretelei os suplementos de bainha (4cm) e acima deles (5cm); as linhas de alinhavo correspondem à dobra da bainha; ao cortar o molde preparei-o para depois fazer a junção do canto da vista/bainha/forro à maneira industrial.

This is the back vent, I decided to make mitered corners here (scroll down to see how they turned out). 

--- 

Esta é a abertura das costas do casaco. Decidi fazer cantos em esquadria (podem ver na mais abaixo como ficaram).

This is the sleeve hem; notice how the interfacing cushions the hem. 

--- 

Esta é a bainha das mangas; vejam como a entretela serve de apoio para depois coser a bainha:

Finished back vent mitered corners: 

--- 

Os cantos em esquadria terminados na bainha da abertura das costas:

On the inner Shell, here’s the back fold for ease of movement: 

--- 

Na camada interior, podem ver a prega do forro nas costas para dar folga e facilitar o movimento:

And finally here’s the chain hanging loop: 

--- 

E para finalizar, o detalhe da corrente de pendurar o casaco:


Now there's still a lot to do after joining both outer and inner shell, most of it will be hand sewing, like tacking down the hems and facings, finish stitching the lining to the hem and back vent, finish the bound buttonholes on the facing side, adding the buttons, pressing, etc. See you soon!

---

Ainda há muito que fazer, depois de unir a parte exterior à interior, principalmente acabamentos à mão como coser bainhas e segurar as vistas ao casaco, fazer o acabamento do forro na abertura das costas, fazer o acabamento das casas de botão no lado das vistas e coser os botões. Até breve!

A quick & simple knitting project – Um projeto de tricô simples e rápido


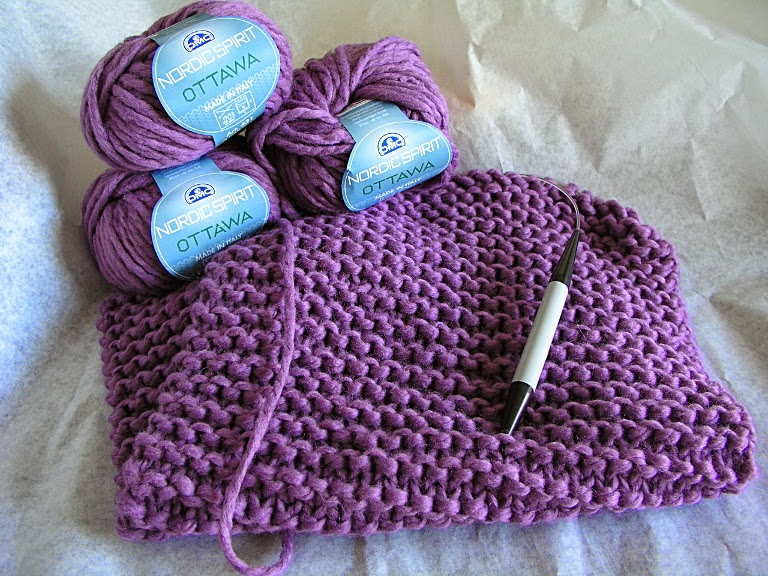
Hello dear reader and friends, I’m just getting back "in business" after a long absence,… Life hasn't been easy on me lately and unfortunately I haven’t been able to update this blog or even sew/kit as much as I’d wish. Today I have a finished knitting project to share, a quick and easy garter stitch beanie. I used three skeins of DMC Nordic Spirit Ottawa yarn in violet and size 13 circular needles (10mm) to knit a garter stitch rectangle. I casted on 42 stitches and knitted for 11 ½ inches then bind off leaving a long yarn trail. I threaded the long train into a blunt needle and then stitched in-and-out along bound off edge. I pulled to gather top of the hat, gave it a few more stitches to secure it well and sewed the seam, shifting sides middle way (because of the turn-up). 

--- 
Olá queridos leitores e amigos, estou de volta após uma longa ausência… A vida não tem sido fácil por estes lados e infelizmente não tenho podido atualizar o blogue, nem sequer costurar/tricotar tanto quanto desejaria. Hoje tenho um projeto de tricô muito fácil e rápido para partilhar, um gorro muito simples e rápido de fazer todo tricotado em liga com agulhas e lã grossas. Usei três novelos de lã Nordic Spirit Ottawa da DMC, cor violeta, e agulhas circulares de 10mm para tricotar um retângulo em liga. Montei 42 malhas e tricotei por 29cm, rematando todos os pontos e deixando uma ponta de fio comprido. Depois de enfiar a ponta de fio numa agulha romba para lã grossa, enfiei-a através dos pontos rematados e puxei, franzindo o topo do gorro. Dei alguns pontos para segurar bem e continuei a coser a costura central do gorro, tendo o cuidado de trocar o avesso pelo direito a meio da costura porque o gorro tem uma dobra para fora.

Using 5-6 7 more skeins I’m also knitting a matching scarf: cast on 25 stitches and knit in garter stitch until getting the desired length, then bind off (note: I used size 17 needles to knit the scarf). I really loved the end result with this chunky yarn and the vibrant violet color and perhaps I'll knit another set like this using a different color. It’s the ideal project to keep the hands busy while watching your favorite TV series in the evening (I’m able to knit without looking down to my hands). 

--- 

Usando mais 5 a 6 7 novelos estou a fazer um cachecol a condizer: montei 25 malhas em agulhas de 12mm e estou a tricotar em liga até atingir o comprimento desejado. Adoro o resultado desta lã grossa e a cor violeta, e não ponho de parte fazer um conjunto igual noutra cor. Este género de projetos são ideais para manter as mãos ocupadas enquanto se vê televisão à noite (uma vez que consigo tricotar sem ter de olhar para o trabalho em mãos).

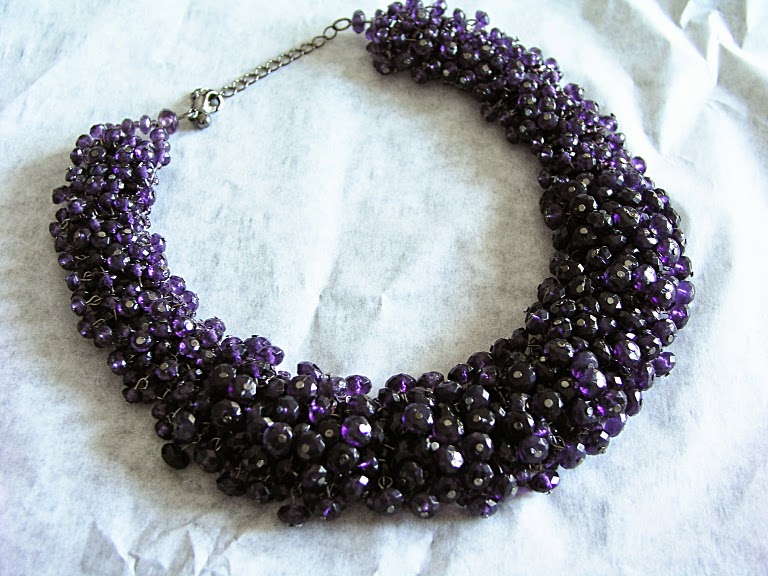
In spite of the simplicity of the project, ideal for the beginner knitter, I found the result to be quite stylish and I can’t wait to wear this set (keep an eye out on my wardrobe blog for an upcoming outfit featuring the beanie and the scarf). I also got this beautiful necklace as a gift and its color complements my knitting set beautifully, don't you think? 

--- 

Apesar da simplicidade do projeto, ideal para as principiantes, achei o resultado muito bonito e com muito estilo, mal posso esperar para usar o conjunto (fiquem atentas ao meu blogue de estilo pessoal!). Também recebi este colar lindíssimo de presente, cuja cor complementa muito bem o gorro e o cachecol, não acham?

On the sewing side I'm working on a coat (BurdaStyle 11/2014, model 111), hopefully I’ll get it finished in a week or two. You all have a wonderful week ahead, and thank you so much for visiting!

---

Quanto à costura, estou a trabalhar num casaco (BurdaStyle 11/2014, modelo 111), espero tê-lo acabado em uma ou duas semanas! Tenham uma ótima semana e muito obrigada por aparecerem!

Burda Vintage (the 50’s): did you get yours already? – Burda Vintage (Anos 50): Já têm a vossa?


The Portuguese edition is out today! There are eleven vintage style multi-size patterns featured in this magazine (see the full preview here) and my favorites are the following:

---

A edição portuguesa está hoje nas bancas! Nesta revista encontram onze moldes estilo vintage (cada molde é fornecido em vários tamanhos, ao estilo da revista BurdaStyle); podem ver a coleção completa clicando aqui. Os meus favoritos são os seguintes:


Note: this is not a sponsored post; all images are courtesy of burdastyle.pt.

---

Nota: Este artigo não foi patrocinado; todas as imagens são de burdastyle.pt

2014#26 – Faux leather vest (BurdaStyle 10/2010_mod129), V2.0 – Colete de imitação de pele com pelo, V2.0

Pattern: BurdaStyle 10/2010_mod129, cut size 38 (note: I've already sewn this pattern before in 2010, click here for V1.0)

Description: Shearling leather vest has raw edges, cascade collar and overlapped seams. The vest is tied to the waist.

Material: This time I used dark brown faux leather with fur on the wrong side, a much thicker material to sew with; I used a leather needle (#100), regular thread on the bobbin and buttonhole twist thread on the needle. The stitch length used was 4mm. My sewing machine behaved surprisingly well and I will probably sew with this faux leather again, if I can still find it on sale.

---

Molde: BurdaStyle Portuguesa nº5/2010 (Outubro 2010), modelo 129 (nota: já tinha feito este modelo em 2010, podem ver a versão 1.0 clicando aqui). Cortei o tamanho 38.

Descrição: Colete em carneira com orlas a fio, gola cascata e costuras sobrepostas. Tem tiras para atar à cintura.

Material: Desta vez usei imitação de carneira castanha-escura (com pelo no avesso), um material bastante mais grosso do que tinha usado da primeira vez (comprei na Feira dos Tecidos em Aveiro). Usei uma agulha especial para pele nº100, linha normal na bobine e torçal na agulha. O comprimento do ponto usado foi 4mm. A minha máquina portou-se surpreendentemente bem neste projeto, por isso não descarto a possibilidade de voltar a trabalhar com este material.
 Side and back views / Vista lateral e das costas:
 Back collar seam / Costura de trás na gola:
 Shoulder seam / Costura dos ombros:
 The waist ties are made of pre-folded corduroy bias tape, folded lengthwise and top-stitched:
---
As tiras de atar são feitas de fita de viés de bombazine dobradas no sentido do comprimento e pespontadas:


Now I must eagerly wait for the colder winter days to wear my my new vest! Thank you so much for reading!
---
Agora só me resta esperar por dias mesmos frios para poder usar o meu novo colete! Obrigada a todos por aparecerem!