Showing posts with label BS201411_mod111. Show all posts

2015#1 - Retro-style fuchsia coat (BurdaStyle 2014-11 mod111) - Casaco Fucsia estilo retro

Description: Lined overcoat with large collar, princess seams and back vent, slightly flared from the hip down, two-button closure on the front. This pattern was featured with illustrated instructions, which makes it easier to construct.

Pattern used: BurdaStyle 2014-11 mod111 (cut size 38)

---

Descrição: Sobretudo forrado com gola XL, costuras princesa e racha atrás, ligeiramente evasé, a frente de trespasse fecha com dois botões. A construção do modelo vem com ilustrações, o que facilita bastante para quem tem menos experiência.

Molde: BurdaStyle 2014-11 mod111 (cortei o 38)
 Alterations: Added in-seam side-pockets and bound buttonholes.

---

Alterações: Acrescentei bolsos metidos nas costuras laterais e fiz casas ce botão avivadas.
 Fabric: Boiled wool of some sort (it doesn't ravel)

---

Tecido: Lã fervida (não desfia)
 Construction: Followed BurdaStyle's instructions for the most part, except for the interfacing (you can check the details on my previous post - link), A few notes to consider: this coat has no shoulderpads and the sleeves are narrower than usual BurdaStyle coats.

---

Construção: Segui a sequência ilustrada na revista, exceto no que toca à entretala (podem consultar os detalhes no meu artigo anterior - link). Alguns detalhes que merecem destaque: o casaco não leva chumaços e as mangas são mais justas que o habitual nos casacos BurdaStyle.
 The in-seam side pockets / Os bolsos metidos na costura:

 Front closure detail / Fecho da frente:

 The hem/lining/facing intersection / A interseção da bainha/forro/vista:
 The back vent / A racha atrás:

 And finally the hanging chain loop and my label / E para acabar, a corrente de pendurar e a minha etiqueta:
Conclusion: A very nice pattern, dresses quite well and is fairly easy to make, I highly recommend it!
ETA: Photos of me wearing the coat were published at my personal style blog, click here.

---

Conclusão: O molde excelente, veste muito bem e não é dificil de fazer. Recomendo vivamente!
Editado para acrescentar: Publiquei fotos minhas a usar o casaco no meu blogue de estilo pessoal, cliquem aqui.

Ongoing project: Retro-style fuchsia coat – Projeto em curso: Casaco fúcsia estilo retro

Hello dear all, this is what I’m currently working on: BurdaStyle 2014/11 model 111:
---
Viva a todos, este é o casaco que estou a costurar: BurdaStyle 2014/11 modelo 111:

This pattern is featured in the magazine with illustrated instructions, so my project notes will focus on what I've done differently from the instructions; so far I have the inner shell (lining, facings and upper collar – on the left) and the outer shell (the coat itself and inner collar – on the right) is almost done; I still have to press the hem allowances, clip and grade seams, etc

--- 

Este molde vem com instruções ilustradas na revista, portanto vou evidenciar essencialmente o que fiz de diferente; até agora completei a parte de dentro do casaco (forro, vistas e parte de fora da gola – à esquerda) e a parte de fora está quase pronta (o casaco propriamente dito, com a parte de baixo da gola, à direita). Na parte de fora ainda tenho que gradar valores de costura, passar a ferro as bainhas, etc.

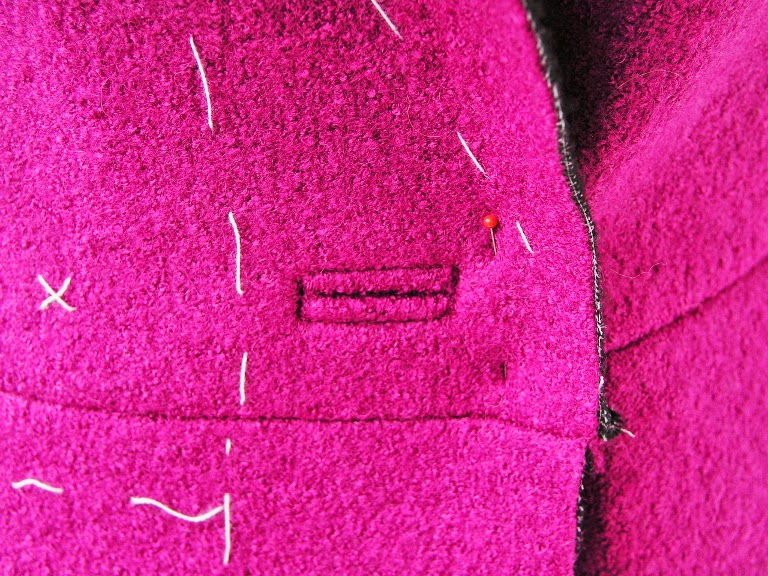
I've made bound buttonholes: 

--- 

Fiz casas avivadas:

I've added inseam pockets on the side seams: 

--- 

Adicionei bolsos metidos nas costuras laterais:


I interfaced the entire bodice instead of just reinforcing the armholes and neckline (used what I believe is equivalent to fusible thermo weft) : 

--- 

Entretelei a parte de cima por completo, em vez de apenas reforçar as cavas e decote (usei uma entretela de colar a ferro bastante maleável e estável, comprada na Feira dos Tecidos):

Interfaced hem allowances and above, so I get some cushioning (the basting lines correspond to the hem line); I also traced the allowances to be able to do the facing/hem/lining corner the industrial way (refer to the tutorial tab for instructions). 

--- 

Entretelei os suplementos de bainha (4cm) e acima deles (5cm); as linhas de alinhavo correspondem à dobra da bainha; ao cortar o molde preparei-o para depois fazer a junção do canto da vista/bainha/forro à maneira industrial.

This is the back vent, I decided to make mitered corners here (scroll down to see how they turned out). 

--- 

Esta é a abertura das costas do casaco. Decidi fazer cantos em esquadria (podem ver na mais abaixo como ficaram).

This is the sleeve hem; notice how the interfacing cushions the hem. 

--- 

Esta é a bainha das mangas; vejam como a entretela serve de apoio para depois coser a bainha:

Finished back vent mitered corners: 

--- 

Os cantos em esquadria terminados na bainha da abertura das costas:

On the inner Shell, here’s the back fold for ease of movement: 

--- 

Na camada interior, podem ver a prega do forro nas costas para dar folga e facilitar o movimento:

And finally here’s the chain hanging loop: 

--- 

E para finalizar, o detalhe da corrente de pendurar o casaco:


Now there's still a lot to do after joining both outer and inner shell, most of it will be hand sewing, like tacking down the hems and facings, finish stitching the lining to the hem and back vent, finish the bound buttonholes on the facing side, adding the buttons, pressing, etc. See you soon!

---

Ainda há muito que fazer, depois de unir a parte exterior à interior, principalmente acabamentos à mão como coser bainhas e segurar as vistas ao casaco, fazer o acabamento do forro na abertura das costas, fazer o acabamento das casas de botão no lado das vistas e coser os botões. Até breve!