EN Summary: As I am working on a new garment, I thought it would be fun to share some of my ongoing progress along with some pocket sewing resources. Keep reading the full article on tanysewsandknits.blogspot.com.
---
PT Sumário: Tendo em mãos um novo projeto de costura, achei interessante partilhar o meu progresso e alguns recursos relacionados com a confeção dos bolsos. Continuem a ler o artigo completo em tanysewsandknits.blogspot.com.
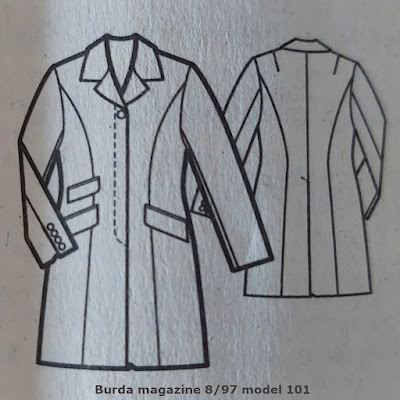
EN: Back in the late 90s I've made several garments from the August 1997 Burda magazine (back then the magazine was called Burda instead of Burdastyle). One of these garments, model 101, was a tailored princess line coat/long blazer (35" long) with short lapel collar, hidden button placket, long back vent and tailored two-piece sleeves with buttoned vents. The coat is close fitting, has broad structured shoulders and double-welt pockets with flaps (also referred in soem books as bound pockets with flaps and/or double-lip buttonhole pockets with flaps). There are two pockets on the right side as worn, and one pocket of the left side.
---
PT: No final dos anos 90 confecionei várias peças da revista Burda de Agosto de 1997 (antigamente chamava-se só Burda e não Burdastyle). Uma destas peças foi o modelo 101; trata-se de um casaco/blazer comprido (90cm) de corte princesa com gola de alfaiate subida, abotoadura escondida, abertura grande atrás e mangas de alfaiate de duas peças com abertura abotoada. O modelo é justo tem ombros largos e estruturados e bolsos avivados com paleta. No lado direito de quem usa tem dois bolsos e no lado esquerdo apenas um.

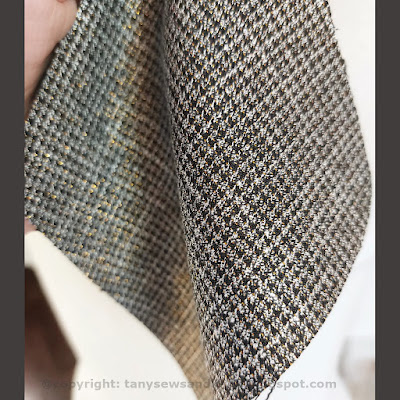
EN: My first version was made of black woolen and had a matching self-drafted 6-panel A-line mini-skirt with the same slanted pocket (the smaller size) on the right side as worn. The set was an absolute favorite os mine and I wore it for years,... When it became too worn out to show in public, I salvaged the buttons to make it once again in the future. This time around I will use this fabric instead; it has sort of a tiny hounds-tooth weave with golden metallic threads, which make it sparkle when the light hits in a certain angle:
---
PT: A primeira vez que fiz este casaco foi com uma fazenda de lã preta e tinha uma mini-saia evasé com seis painéis e um bolso inclinado igual (do tamanho pequeno) no lado direito também. O conjunto foi um dos meus favoritos de todos os tempos e usei-o durante muitos anos. Quando ficou demasiado velho e usado, antes de o por fora aproveitei os botões com a intenção de o confecionar outra vez no futuro. Desta vez vou usar este tecido: tem um padrão pata-de-galo miudinho e fios metalizados dourados que o fazem brilhar quando a luz bate de certo ângulo:
EN: I had traced the pattern in size 40 a couple of months ago and last weekend, when I finally made up my mind regarding the fabric, I cut it, cut the lining and applied fusible interfacing where required. My only alteration was cutting the undercollar in two bias pieces with a center back seam, as I usually do when sewing tailored lapel collars.
I followed the instructions interfacing suggestions but I also added fusible stabilizing tape to the front edges, neckline and armholes. I pre-pressed all hems and vent edges.
Then I stitched the princess seams (front and back), center back seam (stopping at the vent opening) and facing shoulder seams (joining back neckline facing to the front facings). I also stitched the back seam of the two-leaf tailored sleeves, stopping at the vent opening.
The next logical step is sewing the pockets; each pocket comprises two welts (approximately 1/8" wide when ready; the magazine provides exact measurements for cutting the welts and instructs to interface then), a flap (the visible side should be interfaced), a fabric pocket bag (the inner bag, the one visible when you raise the flap), and a lining pocket bag (3/8" shorter than the fabric pocket bag).
---
PT: Já tinha traçado o molde no tamanho 40 há uns meses e no fim-de-semana passado, quando finalmente decidi o tecido a usar, cortei-o, cortei o forro e apliquei entretela termo-colante nas partes que devem ser reforçadas. A minha única alteração ao molde foi cortar a parte de baixo da gola em duas partes em viés, com uma costura de união central, como costumo fazer nas golas com lapelas de alfaiataria.
Segui as sugestões de onde aplicar entretela, mas acrescentei também fita de reforço termo-colante nas orlas da frente, decote e cavas. Vinquei todas as bainhas e aberturas a ferro.
Comecei por coser as costuras princesa (frente e costas), costura do meio de trás (parando na abertura) e costuras dos ombros das guarnições (decote e frente). Também cosi a costura de trás das mangas, parando na abertura.
O passo lógico seguinte é confecionar os bolsos; cada bolso compreende dois vivos (aproximadamente 5mm de largura depois de prontos; a revista indica o tamanho exato a cortar e instrui para entretelar estes vivos), uma paleta (o lado virado para o exterior deve ser reforçado com entretela), uma fundura interior em tecido (a que fica visível quando se levanta a paleta e se abre o bolso) e uma fundura em forro, 1cm mais curta que a de tecido.

EN: There are several ways to sew this type of pockets; the Burda instructions basically tell you to sew a bound opening first (exactly as you would sew a bound buttonhole), then insert the finished flap into its final position and stitch it in place to the upper welt seam allowance from the wrong side. The fabric pocket bag is also to be stitched to the upper welt/flap seam allowance from the wrong side, and the lining pocket bag is stitched to the lower welt's seam allowance, also from the inside, and pressed downwards. If the cutting was precise, the two overlapping pocket bags should match. The pocket bags are then to be sewn together all around. Needless to say that precision is key: the pocket opening and its ends should be pencil marked on the wrong side and thread traced so there are guidelines on the right side to sew the welts in place; the flap should be a scant smaller then the finished welt opening, etc.
---
PT: Há vários métodos para coser este tipo de bolsos; as instruções da Burda basicamente indicam coser uma abertura avivada primeiro (tal e qual uma casa de botão avivada), e depois inserir a paleta em posição pela abertura, prendendo-a com um pesponto exatamente na costura de junção do vivo superior por dentro. A seguir, também por dentro, cose-se a fundura em tecido às margens desta costura, e a fundura em forro às margens do vivo inferior, assentando-a depois a ferro para baixo. No final, se as partes foram cortadas e posicionadas com precisão, as duas funduras sobrepostas devem coincidir e o saco do bolso pode ser fechado com uma costura à sua volta. É óbvio que a precisão com que se corta e cose é essencial: a abertura e as suas extremidades devem ser traçadas a lápis no avesso e depois marcadas com alinhavos para servir de guia à confeção pelo exterior; a paleta deve ser um ou dois milímetros mais estreita que a abertura, etc.
EN: Here's the pocket on the left side (as worn):
---
PT: Aqui têm o bolso do lado esquerdo (de quem usa):
EN: Paco Peralta (may his soul rest in peace) published an excellent tutorial in Spanish for this exact type of pockets a few years ago, using a method which can be more precise than Burda's (click here for his tutorial). With his method the flap is pre-stitched to the upper welt before attaching it to the pocket opening and the lining pocket bag is pre-stitched to the bottom welt before attaching it in place.
Here's another excellent video tutorial by Diane Deziel (click here).
Finally one of my favorite video tutorials: the industrial method by Atelier Saison (The Japanese Sewing Factory) - click here. ---
PT: O Paco Peralta (que a sua alma descanse em paz) publicou um excelente passo-a passo, em Espanhol, que na minha opinião é mais preciso do que o da Burda (cliquem
aqui para o passo-a-passo). Com o método dele a paleta é pré-cosida ao vivo superior antes de o aplicar e a fundura em forro também é pre-cosida ao vivo inferior antes de o coser no lugar.
Aqui têm outro excelente passo-a-passo, desta vez em vídeo, da Diane Deziel (clicar
aqui).
Finalmente um dos meus passo-a-passos industriais em video favoritos, de Atelier Saison
(The Japanese Sewing Factory) - clicar
aqui.


I am looking forward to following your progress on this project. The fabric looks fabulous and I hope it doesn’t fray too much. Thank you for the links to pockets with flaps. I haven’t dared to make bound flap pockets yet for fear of ruining the fronts. Maybe I should just practice them on off-cuts for a bit to get really comfortable with the different techniques. I will make that a goal for spring, using firmly woven cotton for a start. Have a lovely time making this coat and thank you for generously posting your projects.
ReplyDeleteThank you so much, Mona, for your feedback and kind words! I highly appreciate it, thank you!
ReplyDelete