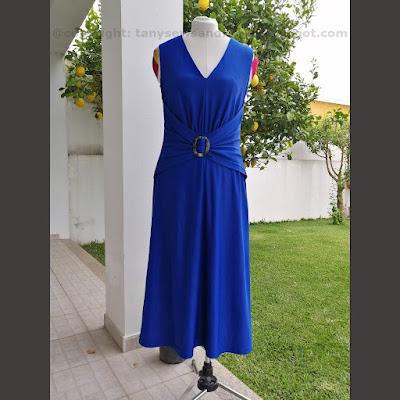
EN Summary: I has been a while since I've sewed knits and used my coverstitch machine. Here's one more item for the Blue&GreenCrazeSet, a striking blue dress! Keep reading the full article on tanysewsandknits.blogspot.com.
---
PT Sumário: Já faz algum tempo desde a última vez que confecionei com tecidos de malha e usei a minha máquina recobridora. Aqui têm mais uma adição ao conjunto Loucura em Tons de Azul e Verde, um vistoso vestido azul! Continuem a ler o artigo em tanysesandknits.blogspot.com.
EN: The pattern is featured in the May 2008 Burdastyle magazine, model 104. I've traced size 40 with the following modifications:
- added 8" to the total length at the hem
- omitted the center back invisible zipper (it's not really necessary with jersey fabric)
I've made this dress before, back in 2008 (click here and scroll down for the sewing review in English)
---
PT: O molde vem na revista Burdastyle de Maio 2008, modelo 104. Copiei o tamanho 40 com as seguintes alterações:
- adicionei mais 20cm no comprimento, na bainha
- oiti o fecho invisível na costura do meio das costas (não é verdadeiramente necessário quando se usa jersey)
Já tinha confecionado este vestido antes, em 2008; podem ler o artigo de confeção antigo clicando aqui.
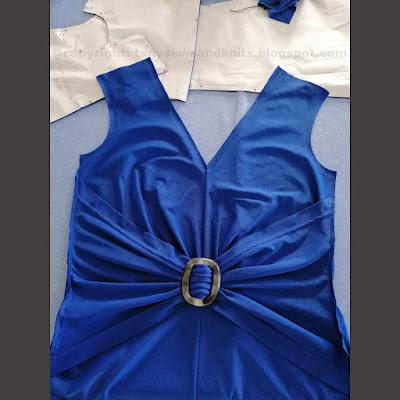
EN: Below there's the pattern laid out on the folded jersey. I added 3/8" seam allowances and a little more than 1" as hem allowance to the patter pattern. I altered the suggested cutting layout by inverting the back facing piece - it has allowed me to save fabric and it makes no difference. Even by adding 8" to the length of the dress I was able to stay within the suggested yardage for the original shorter model.
---
PT: Abaixo podem ver o plano de corte que usei no jersey dobrado. Adicionei 1cm de margens e 3cm de bainha já no molde em papel. Em vez de usar o plano de corte sugerido na revista, inverti a peça das costas da guarnição/vista e isso permitiu-me poupar no tecido, não ultrapassando o comprimento de jersey sugerido para o modelo original (mais curto 20cm).
EN: Regarding the construction, I followed the magazine suggestions for sewing the front first, adding the draping with the buckle; I didn't stitch the center front seam and pressed it open as suggested, instead I serged/overlocked it (4-thread overlock). I stabilized the neckline and armholes (front and back), which is not suggested in the instructions.
---
PT: Quanto à confeção, segui as indicações da revista para confecionar primeiro a frente com a aplicação do drapeado/fivela; não cosi a costura central com as margens abertas como sugerido, em vez disso passei com a corta-e-cose (overloque com 4 fios). Também estabilizei as costuras do decote e cavas (nas costas também) com fita termo-colante especial, algo que não é mencionado nas instruções.
- leave the center back unstitched for now and stitch (serge/overlock) the shoulders, joining the front and the two backs;
- serge the center front facing seam (stop at the neckline and clip), overcast the bottom of the facing pieces and serge/overlock the shoulders together of the facings front and two backs;
- place facings on top of front/back dress, right sides together; keeping the side which is taped facing up, stitch the neckline (regular sewing machine) stopping one inch shy of the center back edge; do the same for the armholes, stopping 1 inch shy of the sides edge;
- reach inside the shoulders and turn everything to the right side; under-stich the neckline and armholes stopping 2" shy from the center back and sides;
- serge/overlock side seams on the facings and dress separately; serge/overlock center back seams on facings and dress separately;
- from the wrong side, stitch the remainder of the armhole (dress and facings right sides together); do the same on the back neckline unstitched section;
- finish under-stitching the bottom of the armholes and the back neckline, give the edges a good press;
- finally, cover-stitch the hem of the dress.
---
PT: O processo de confeção é relativamente fácil se estiverem habituados a coser guarnições seguidas (cavas e decote) em vestidos de cavas:
- deixar a costura do meio de trás aberta por enquanto, e coser com a corta-e-cose as costuras dos ombros, unindo a frente com as duas partes das costas;
- fechar com a corta-e-cose a costura do meio da guarnição da frente, parando na base do decote (golpear aí); rematar com a corta-e- cose a beira inferior das guarnições; fechar com a corta-e-cose as costuras dos ombros das guarnições;
- colocar as guarnições em cima do vestido, direito contra direito, com a parte que tem as fitas de reforço virada para cima; coser o decote e cavas com a máquina de coser normal, parando 2,5cm antes do meio das costas e dos lados;
- virar tudo para o direito, passando a mão por dentro dos ombros; fazer o pesponto de girar nas cavas e decote, parando 5cm antes dos lados e meio das costas;
- com a corta-e-cose, fechar a costura das costas no vestido e nas guarnições separadamente; fazer o mesmo para as costuras laterais;
- pelo avesso, coser a parte aberta das cavas com a máquina de coser; repetir no decote/meio das costas;
- fazer o pesponto de girar nestas secções que faltavam;
- finalmente, coser a bainha com a recobridora.
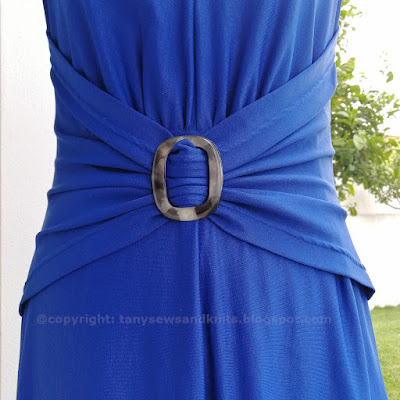
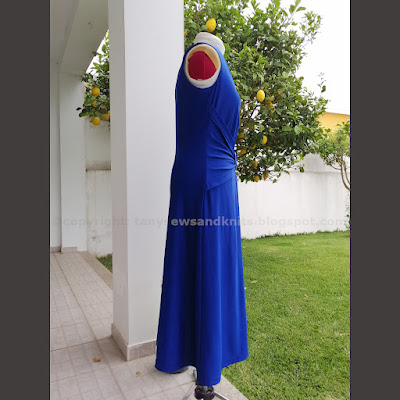
EN: The front draping detail with the buckle is really nice:
---
PT: O detalhe do drapeado com fivela é mesmo giro:
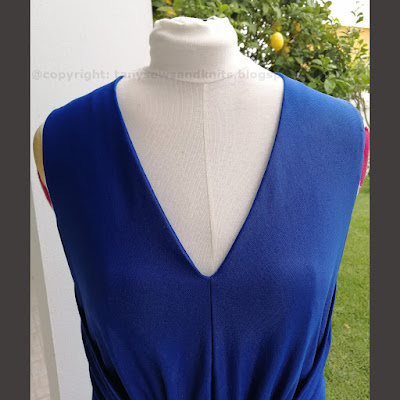
EN: Based on my previous dress experience, I can attest that the taping of the neckline and armholes really adds quality; the under-stitching also helps the neat finishing of the edges:
---
PT: Baseada na experiência que tive com o vestido anterior, posso atestar que usar os reforços de fita termo-colante dá realmente mais qualidade ao produto final; o pesponto de girar também ajuda no acabamento final bem limpo:
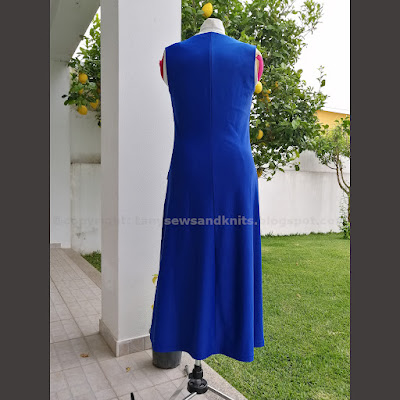
EN: Again, there's no need for a center back zipper; the dress can be pulled on and off through the head and shoulders quite easily:
---
PT: Mais uma vez relembro que não há necessidade de ziper atrás neste caso: o vestido pode enfiar-se facilmente pela cabeça e ombros:
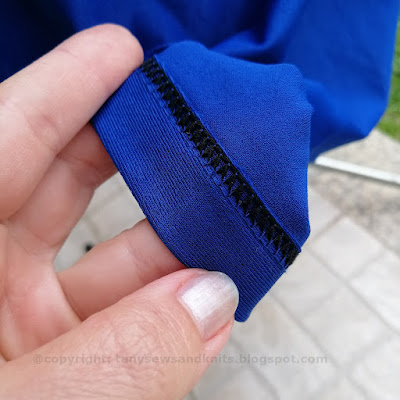
EN: Here's the dress's hem cover-stitch detail; on the front draping hem I used regular thread on the looper; noticing the ridged and slightly pulling appearance of the hem I switched to wooly nylon on the looper and loosen its tension to zero, obtaining a better result with my wide two-thread cover-stitch on the hem of the dress:
---
PT: Na bainha do drapeado usei linha normal na laçadeira/gancho da recobridora e notei que a bainha ficava mais indentada e ligeiramente torcida... Terminei por mudar a linha da laçadeira para fio volumoso elástico e consegui um resultado melhor no meu ponto duplo de bainha largo na bainha do vestido:
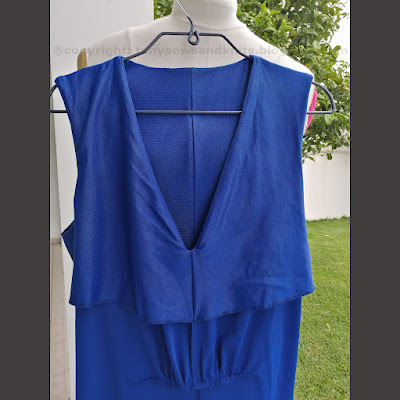
EN: Here's the wrong side of the dress (all-in-one facings):
---
PT: Aqui têm o avesso do vestido (vistas seguidas do decote e cavas):
EN: I made a couple of thread bridges to tack the facings bottom to the sides and center front/back seams.
---
PT: Fiz umas correntes de linha para fixar as vistas na base dos lados e centro frente e costas.
EN: I love this dress and I will probably make another one in a different color (I have another buckle that I saved from my first version; I wore that yellow dress for years until it got stained beyond salvation...).
Finally here's a shot at all the garments of the Blue&GreenCrazeSet on the rack, minus the orange top; I wore it yesterday and forgot to fetch it to include in the photos...
---
PT: Gosto muito deste modelo e provavelmente farei mais um vestido destes numa cor diferente (tenho a fivela do primeiro vestido que fiz deste modelo, que depois de muitos anos de uso ficou manchado além de qualquer salvação...).
Finalmente têm aqui as peças do conjunto Loucura em Tons de Azul e Verde no rack, exceto o top laranja; usei-o ontem e esqueci-me de o ir buscar para mostrar juntamente com as restantes...








Fantastic work Tany 🎉 Congrats on the new dress and all the matching worderobe on the rack ❤️
ReplyDeleteI love this pattern - thanks for reminding me about it. One of my favourite travel dresses was made from it back in the day. Yours looks fabulous, and beautiful sewing, as always!
ReplyDeleteLovely dress. Great pattern and love the fabric. Love the front draping detail with the buckle is really nice and I also love the color. Such a beautiful creation. Love it.<3
ReplyDelete