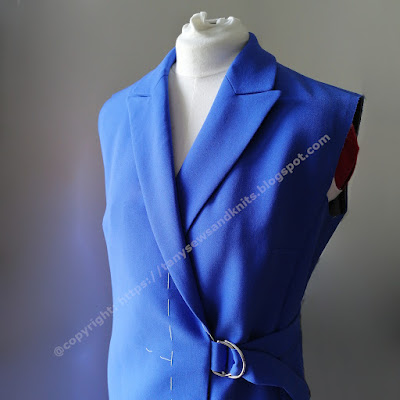
EN Summary: This blazer features a notched collar with collar stand and a neckline hidden dart. In this article I will try to demonstrate the sewing process for this collar. Keep reading the full article, originally published on tanysewsandknits.blogsot.com.
---
PT Sumário: Este blazer tem uma gola com pé e bandas, inserido num decote com uma pinça escondida. Neste artigo vou tentar demonstrar o processo para confecionar esta gola. Continuem a ler o artigo completo em tanysewsandknits.blogspot.com.
EN: I followed the magazine's instructions to sew this notched collar (I have acquired some experience decoding Burdastyle instructions, since I've learned to sew with them), but I also used a few practical tricks to help achieving perfect results, specially with the corners and pivoting. We start by assembling the under collar's central seam and collar stand (let's call it the under collar unit) and the upper collar with the collar stand (the upper collar unit); at this stage the body of the jacket should be assembled and the neckline's hidden dart should be thread traced or marked with any other method. The front and back facings should also be stitched together as a facing unit. The under collar unit will be assembled to the body of the jacket, while the upper collar unit will be assembled to the facings unit. Lets start by observing the final result when under collar is assembled with the body of the jacket:
---
PT: Segui as instruções da revista (adquiri alguma experiência a interpretar as instruções Burdastyle, pois aprendi a costurar com as revistas Burda), mas também usei algumas astúcias que ajudam a obter bons resultados, especialmente com os cantos e viragens. Começa-se por coser a costura central da parte de baixo da gola e depois coser esta ao pé da gola (a peça resultante será o conjunto da parte inferior da gola). Une-se também a parte de cima da gola com o outro pé da gola (o conjunto da parte de superior da gola); nesta fase, o corpo do blazer deve estar montado, com a pinça do decote marcada (eu usei alinhavos). O conjunto das guarnições/vistas também deve estar montado (guarnição do decote de trás com as guarnições da frente, unidas nas costuras dos ombros). O conjunto da gola inferior deve ser cosido ao corpo do blazer no decote e o conjunto superior da gola deve ser cosido às guarnições, também no respetivo decote. Vamos começar por observar como deve ficar aplicado o conjunto inferior da gola:
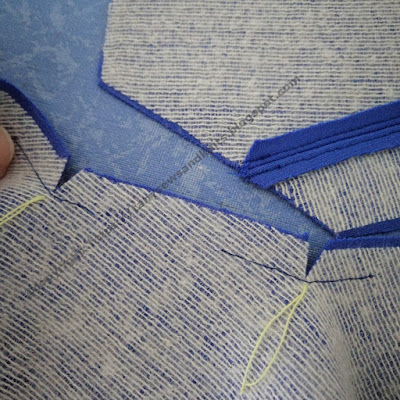
EN: Note that the pivoting corners are tailor-tacked for a precise location and also stay-stitched. These corners are notched before assembling the body with the under collar unit; the notching allows for the precise pivoting while sewing the under collar unit to the blazer body. Also note where the stitching stops at the collar side, at precisely the seam allowance width (again, I'm using 3/8" SA and I find it a lot more precise to work with than the 5/8" SA advised in the magazine's instructions).
---
PT: Notem que os cantos de viragem estão marcados precisamente com alinhavos e também têm um pesponto de reforço justamente ligeiramente dentro da margem de costura. Estes cantos devem ser golpeados anntes de coser o conjunto da gola inferior ao decote, o que torna possível a viragem ao coser à máquina. Notem também que a costura para exatamente na margem de costura da gola inferior (as margens que uso são de 1cm, e neste tipo de costuras creio que 1cm permite um trabalho mais preciso do que os 1.5cm que as instruções preconizam).
EN: For assembling the under-collar unit with the body of the jacket, there are two seams on each side of the collar; #1 is to be sewn first, stopping exactly at the marked corner and the corner of the hidden neckline dart (which has to been cut open first, trimming the margins to 3/8" at the top). Next seam #2 is closed, from the center back neckline to the tip of the dart all in one continuous row of stitching. The procedure is repeated on the other end of the under-collar.
---
PT: Para montar a gola inferior com o corpo da jaqueta, há duas costuras de cada lado da gola; a #1 é cosida primeiro e deve terminar exatamente no ângulo marcado com o alinhavo e na perna da pinça escondida (a pinça deve ter sido cortada aberta com margens de 1cm de cada lado). Depois é fechada a costura #2, começando no centro da gola atrás e fechando a pinça escondida na continuação. Repete-se o procedimento para o outro lado da gola/decote.
EN: Needless to say, you need to press as you go, it is very important for achieving a flawless result; here's how the assembling looks from the right side, where you can see the hidden neckline dart, which will be hidden when the lapel is turned down. This dart helps to distribute the fullness of the chest dart of the basic block and allows for a smoother neckline with less pronounced chest fullness on a women's blazer:
---
PT: Não preciso de relembrar que o assentar a ferro à medida que se cose é de extrema importância; aqui têm como fica a montagem pelo lado direito do blazer, onde podem ver também a pinça de decote que ficará depois escondida debaixo da lapela. Esta pinça ajuda a distribuir a amplidão da pinça de peito do molde de base e produz um decote mais suave e um peito menos demarcado em blazers de senhora:
EN: The procedure for assembling the upper collar unit with the facings unit is very similar, but there's no dart; instead there's another corner to be pivoted. I will show step by step photos this time; hopefully they are better than words:
---
PT: O processo de montagem da unidade superior da gola com a unidade das guarnições é bastante semelhante, só que agora não temos a pinça; em vez disso há dois ângulos de viragem, e desta vez vou mostrar fotos passo-a-passo, que espero que sejam melhores do que as palavras a explicar como se faz:
EN: See the two pivoting corners below, marked and stay-stitched:
---
PT: Vejam abaixo os dois ângulos de viragem, marcados e reforçados com um pesponto:
EN: The mandatory notching for pivoting:
---
---
PT: Como alfinetar as duas unidades para depois coser à máquina:
EN: Starting at the first corner exactly (don't forget to secure the seam with back-stitch); the first pin is removed as soon as the needle is inserted down by hand; the following pins are removed before the needle can hit them too:
---
PT: Começar a costura no primeiro canto exatamente onde está marcado (não esquecer de rematar com pontos atrás); o primeiro alfinete é retirado depois de baixar a agulha manualmente exatamente onde o canto está marcado; os alfinetes seguintes também são retirados antes que a agulha os possa atingir:
EN: Pivoting at the corner; again the needle is inserted down manually, the corner pin is removed, the unit is pivoted and the stitching is resumed from the corner on:---
PT: A viragem no canto; mais uma vez a agulha é baixada no canto manualmente, o alfinete retirado, o trabalho girado com a agulha enfiada no canto e depois é só continuar a coser:
EN: Don't forget to clip the corners on the collar to reduce seam bulk:
---
PT: Não esquecer de aparar os cantos das margens da gola para resuzir o volume da costura depois de pronta:
EN: Notch all curved seams and press seams open with the help of a pressing ham:
---
PT: Golpear as margens das costuras curvas e assentar as costuras abertas com a ajuda de uma almofada de alfaiate:
EN: Here's how it looks from the right side; all there is to do now is stitching this unit to the under collar and body of the jacket. This is made in two steps: firstly the collar edges from the notch and all around the collar to the other notch (the back of the collar could also be under-stitched by hand or by machine, pressing the notched and graded allowances towards the under-collar); secondly the lapels and front edges, again from the notch, around the lapels and down the front edges to the bottom hem corner of the blazer (on the right side, don't forget to include the loop holding the D-rings, sandwiched in the front edge seam at waist level). The under-stitching on the lapels edge should be made on the blazer's side (SAs pressed towards the body of the blazer and stitched at a scant from the seam), and under-stitched on the facing side from the break point of the roll line down to the hem (SAs pressed towards the facing and top-stitched a scant from the seam-line).
---
PT: Podem ver abaixo como fica a montagem pelo direito; agora só falta unir esta parte com o corpo da jaqueta com gola inferior já montada. Este processo também se faz em dois passos: primeiro as orlas da gola, de canto a canto (a orla de trás da gola pode levar um pesponto de girar, à mão ou à máquina, assentando as margens aparadas e golpeadas para o lado da gola inferior e pespontando-as junto à costura de união); em seguida cose-se as lapelas e orlas da frente, começando no canto da gola, contornando as lapelas e terminando em baixo na bainha (não esquecer de colocar a banda com as argolas D entre a costura ao nível da cintura). Nesta costura o pesponto de girar faz-se em duas partes: na lapela as margens são assentes para o lado do corpo do blazer e pespontadas rente à costura; no entanto, abaixo da linha de dobra da lapela até à bainha o pesponto de girar é feito do lado da guarnição - o pesponto de girar é sempre feito do lado que não fica à vista.
EN: Hopefully this information will be useful and understandable. Thank you all for joining in!
---
PT: Espero que esta informação seja compreensível e útil. Obrigada por aparecerem!


This is such a great tutorial! Burda patterns often add this neckline dart and I've never been sure how to correctly sew it. Thank you so much to have taken the time to illustrate it. As usual I'm learning so much reading your blog! Julie
ReplyDelete
ReplyDeleteHi Tany,
Another excellent post full of fabulous up close pictures and perfect explanations.
Thank you so much for all the time and effort you put into your blog, it really is very much appreciated and we always get to see great pattern selections.
Hope you remain safe and well. Until next time, Marysia.
We all need these finer skills 👍🧥🤠🌛🌝🌜
ReplyDelete