EN Summary: The Magic Bias Dress instructions describe an edge finishing technique called the French Bias Facing. This technique is ideal to edge finish necklines and armholes on sheer fabrics, and the result is a stabilized/reinforced edge that looks like piping. If you'd like to know how to make this lovely bias bound edging, keep reading, it's really simple!
---
PT Sumário: As instruções do Vestido Mágico em Viés descrevem uma técnica de acabamento chamada guarnição de viés à Francesa. Esta técnica é ideal para tecidos finos e resulta numa orla estável e reforçada com um acabamento fino que se assemelha a um galão com cordão. Continuem a ler para saberem como se faz, é muito fácil!
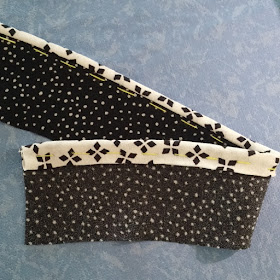
EN: For demonstration purposes I'm using a straight strip of bias cut fabric (the darker fabric), but this technique can be used on any edge and works wonderfully on curved edges. I used the bias cut strip because I wanted to test how stable the edge would get without further stabilization other than the stay-stitching and the bias binding. So I'm starting with a stay-stitched edge at 1/4" (white thread) and a 2" wide true-bias strip of fabric folded and pressed lengthwise for the binding (wrong sides together):
---
PT: Para efeitos de demonstração estou a usar uma tira de tecido cortada em viés ( o tecido escuro), mas esta técnica pode ser usada em qualquer orla e resulta especialmente bem em orlas curvas. Escolhi esta tira em viés porque queria provar quão estável a orla fica depois do debrum aplicado, sem outro reforço que não seja o pesponto de reforço e o debrum cosido. Começo então com esta tira reforçada com um pesponto (comprimento do ponto 1.5mm) a 6-7mm da orla (linha branca) e uma tira de 5cm de largura, em viés, dobrada e passada ao meio no sentido do comprimento (avesso para dentro):
EN: If the bias binding is to be applied on the round (neckline or armhole) the bias strip should be precisely measured and its ends should be stitched together before the strip is folded and pressed. Pin folded bias strip to the right side of stay-stitched edge, with raw edges even:
---
PT: Se o acabamento for aplicado numa orla de decote ou cava, a fita de viés deve ter o comprimento certo e as suas extremidades devem ser cosidas antes de dobrar e passar a fita. Prender com alfinetes a fita dobrada ao direito do tecido reforçado com pesponto, orlas com orlas:
EN: Stitch a 3/8" seam allowance with the wrong side of the fabric up (the stay stitching is visible); the stay-stitching can be used as a guide for stitching accurately:
---
PT: Coser pelo avesso do tecido reforçado deixando uma margem de aproximadamente 1cm; o pesponto de reforço pode e deve ser utilizado como guia para uma costura mais precisa:
EN: Trim seam allowance to 1/8" (close to the stay-stitching). I don't find it necessary to clip in curved areas with this type of narrow binding:
---
PT: Aparar a margem de costura para 3mm (rente ao pesponto de reforço). Não é necessário golpear nas curvas neste acabamento tão estreito:
EN: Fold the bias facing to the wrong side, around the raw edges which will be encased by the facing. An round edge of approximately 1/8" should show on the right side, and because of all the layers encased, it should be kind of "fat". I wouldn't press this edge flat to keep the faux piping effect.
---
PT: Dobra-se a tira do debrum para dentro sobre a margem aparada sem a abater. Um debrum de 3-4mm deve ficar visível do direito do trabalho, sendo que este debrum não deve ser assente a ferro para manter o aspeto de vivo-cordão, devido às várias camadas de tecido no seu interior.
EN: Hand-baste the bias binding close but not crossing the junction with the main fabric:
---
PT: Alinhava-se o vivo próximo à junção do lado do tecido a debruar, sem sobrepor os alinhavos na junção:
EN: For stitching in the ditch I like using my Pfaff zipper foot. Stitch on the right side of the fabric along the junction or very close to it:
---
PT: Para fixar o vivo, cose-se pelo direito mesmo por cima da junção ou muito próximo desta sobre o tecido a debruar. Gosto de usar o pé calcador para fechos da minha Pfaff para fazer este trabalho:
EN: Remove the bastings and the work is done! Hope you guys find this photo-tutorial useful!
---
PT: Depois de remover os alinhavos, o trabalho está concluído! Espero que este passo-a-passo vos seja útil!


Great tutorial a a beautiful finish. Thanks, Tany.
ReplyDeleteThanks this is great- my pattern just came ! Love your fabric choices & I love piping so this is timely . Thanks
ReplyDeleteObrigado pelo tutorial, Tany. É sempre útil ter informação de qualidade escrita em português.
ReplyDeleteThank you for this clear and useful tutorial.
ReplyDeleteGood site you've got here.. It's hard to find high-quality writing like yours nowadays.
ReplyDeleteI truly appreciate people like you! Take care!!