English (uncheck the other box and check this one)
 Mais uma semana de trabalho passou, durante a qual não tive tempo para a costura. Ainda bem que tenho os fins-de-semana. No sábado consegui terminar as vistas da parte de cima do casaco, e tirei algumas fotos para ilustrar o processo. Para entretelar as vistas escolhi uma entretela de malha fina, muito maleável. Aqui têm a vista das costas, a entretela e o molde:
Depois temos as vistas da frente com lapela, a entretela e o molde respectivo:

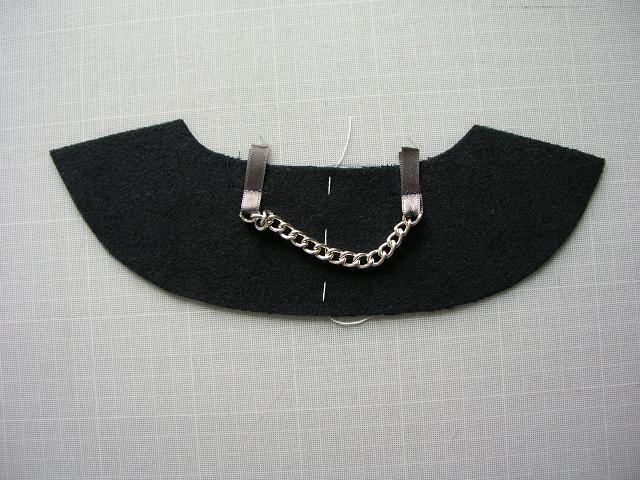
Após colar a entretela com o ferro (seguir sempre as instruções do fabricante, ou quando não as tiverem não se esqueçam de perguntar no local de compra a melhor forma de as aplicar: se devem usar vapor, quanto tempo devem pousar o ferro e exercer pressão, etc. – não se esqueçam, mesmo com as instruções, de fazer alguns testes em restos de tecido), preparei na vista das costas uma pequena corrente de pendurar o casaco; é muito fácil, basta passar fita nos elos extremos e coser a 1,3cm da orla para segurar a fita (estão a ver o direito da vista):
A seguir unem-se as vistas da frente às das costas pela costura dos ombros:

As margens devem ser aparadas, cortadas em viés e abertas com o ferro:

Porquê aparar? Estas margens vão ficar directamente por baixo das margens da costura da costura do ombro do casaco; ao aparamos a largura das margens vamos criar um certo degrade diminuindo o volume das costuras sobrepostas nos ombros, como tenta demonstrar o diagrama seguinte:

O último passo antes de aplicar as vistas às orlas da frente e lapela é reforçar a beira onde depois será cosida a gola. Cose-se a 1,3cm da orla (sendo que a margem completa é de 1,5cm), para depois podermos golpear à vontade e moldar esta margem sobre a margem da gola:

As vistas devem acompanhar a dobra da lapela, o que quer dizer que deverão ter uma certa folga em relação à frente. Para conseguir essa folga, sobrepõe-se a vista sobre a frente, direito contra direito e colocam-se uns alfinetes ao longo da linha de dobra da lapela, segurando a vista por baixo:

Depois vira-se a lapela sobre a linha de dobra, reparem como a vista ficou mais “curta” nas margens:

Fixam-se as margens desfasadas com alfinetes, para depois coser (com a frente virada para cima) desde o sinal de aplicação da gola até abaixo:

As margens da lapela e da orla da frente devem ser escaladas (aparadas em degrade) para uma vez mais diminuir o volume das beiras:

Notem como o final da dobra é golpeado e o degrade, é cortado, ficando as margens da frente maiores (uma vez que da dobra para baixo a parte que fica para fora é a frente):

Outro pormenor é o tratamento na ponta da lapela; vejam como cosi alguns pontos em viés e como as margens estão aparadas:

Para abrir as costuras a ferro (um passo importante se queremos orlas direitinhas e com aspecto profissional) estou a usar uma tábua de alfaiate multi-usos (na figura seguinte têm as inscrições explicativas na própria tábua), que ganhei num sorteio no Blogue Miss Celie’s Pants:


Ainda não vou virar as vistas para o direito porque antes vou confeccionar e aplicar a gola, este é o assunto do próximo artigo. Deixo-vos com uma foto da Missy, que resolveu reclamar a entretela para si. Os gatos são quase todos assim, e tenho a certeza que esta se ia dar muito bem com o Wellie, o gato da Summerset!
 Another working week has passed within which there was no time for sewing. Thank God I still have some time left to sew during the weekend. Saturday I was able to sew the facings to the upper part of the coat, and I took some pictures to illustrate the process. For interfacing the facings I picked a very soft knit fusible interfacing. In the next picture there’s the facing, the interfacing and the corresponding pattern:
Here we have the front/lapel facings, the interfacing and the pattern:
After fusing the interfacing (always follow the manufacturer’s instructions for each type of interfacing or if you don’t have them, ask about the instructions at the place where you bought the interfacing. Don’t forget to run some tests too, because interfacings behave differently depending on the fabric used), I prepared the back facing by stitching a small chain as hanging loop (you’re seeing the right side of the facing):
Next I stitched the back facing to the front facings at the shoulders:
The SAs should be trimmed, bias cut at the edges and pressed open:
Why trimming? The facings seam will be against the coat’s shoulder seam; when trimming the facings SAs, I’m creating a grading effect and thus reducing bulk at the shoulders, as the next diagram tries to demonstrate:
The last step before stitching the facings to the coat is to staystitch the collar seam, which will be clipped to adjust its form to the collar's neckline edge later:
When addressing the lapel facings one has to take into account the turn of the cloth effect; to achieve the little extra width on the facings I first pin facing and front, right sides facing and all edges aligned, along the roll line:
Then I fold back the lapel along the roll line, notice how the facing seems to shrink a bit, that's the turn of the cloth effect:
While holding the lapel like this, I pin along the edges to retain the position of the facing and then stitch from the collar notch to the bottom edge (I stitch with the front side upwards or the lapels would turn out a little smaller):
The SAs should then be graded to reduce bulk along the edges:
Notice how I notched at the end of the roll line, and switched the grading side; the wider SAs should always face the visible outer part of the coat:
Another detail is the lapel tip corner; when stitching around the tip I reduce the stitch length and stitch diagonally as seen below:
The SAs should be pressed open to achieve a professional crisp look; to do this I’m using a June Tailor Board that I’ve won in a drawing contest over at Miss Celie’s Pants blog:
Now I will not turn the facings to the right side yet, because first I want to sew and attach the collar, the subject of the next article. I leave you with another photo of Missy, who decided to claim the interfacing as her own private nest. I think Missy would get along wonderfully with Wellie, Summerset’s cat!


16 comments:
Beautiful work you do, I appreciate the many photos and explanations of these techniques. Looking forward to more.
This coat will be one of your masterpieces. Like Julie, I really do appreciate your detailed explanations of tailoring techniques.
Olá Tany! Adoro seu blog! estou adorando estes tutoriais sobre alfaiataria - tantos detalhezinhos que não foram apreciados no coat sewing along! por favor, continue a postar compartilhando conosco suas técnicas, é um privilégio poder aprender com uma pessoa perfeccionista como você! Beijos do Brasil, Carina
Origada Carina pelo seu comentário e simpatia! Beijinhos!
Oi,
Já estamos no fim de semana novamente, e este em especial, devido a chuva que está caindo desde quinta-feira aqui no Sul do Rio Grande do Sul, resolvi colocar alguns dos meus projetos em dia. Estou acompanhando o seu progresso com o casaco, e acho muito legal da sua parte documentar, para quem não tem experiência em costura é uma aula completa, eu já não tenho esta qualidade, mas admiro quem tem. Uma ótima semana para você.
Bjs.
Tuca.
Looking good so far Tany! Thanks for sharing the details!
Pode parecer pouco, mas fizes-te bastante trabalho. Com calma terás este casaco pronto!
Bjs
Mónica
Hello Tany , I love your hanging loops I am definitely going to do mine that way , it looks so much nicer than a fabric loop. Great work and fantastich photos .
Hi, after following you from the dark I have now signed up to your excellent blog. It´s fantastic!
You coat is coming along nicely. Yes, your Missy would get along nicely with my fabric loving cats!
Welcome to Couture et Tricot, la inglesita!
you could also add my cats "Greebo" and "Cookie" to the flock of cats :) They do love jumping on my fabric/tracing paper/instruction sheets. Esp. just in the moment I need to use those :)
I appreciate all this work you on the kind of tailoring with which I always have such problems. Notably, I notice you sewed diagonally across the lapel point, which seems counterintuitive to me, if you want a sharp point when its turned right side out. What am I not understanding?
Gratefully,
Hello Inkstain and welcome to Couture et Tricot. My experience tells me that when sewing with bulky fabric, you cannot hope for a very "sharp" point; if you try pivoting the stitches at the angle, you'll get in trouble when turning the tip to the right side, and the end result will not be perfect. I sew about 2-3 stitches with stitch length set to 1, so the diagonal is very narrow and the final result is noticeable good in my opinion. You can make a test and compare the results yourself, if you wish.
Adorei o seu blog Tany! Você é muito caprichosa, minuciosa e técnica. O resultado do trabalho só poderia ser um sucesso. Parabéns!
Obrigada Rosânia, fico muito feliz que tenha gostado! Abraço!
Post a Comment